[toc]
- Git Book Notes
- Chapter 1 Getting Started
- Chapter 2 Git Basics
- Chapter 3 Git Branching
- Chapter 5 Distributed Git
- Chapter 6 GitHub
- Chapter 7 Git Tools
Git Book Notes
Link to the book: https://git-scm.com/book/en/v2
Chapter 1 Getting Started
1.1. Three Main States
- ==committed==–means that the data is safely stored in your local database.
- ==modified==–means that you have changed the file but have not committed it to your database yet.
- ==staged==–means that you have marked a modified file in its current version to go into your next commit snapshot.

The basic Git workflow goes something like this:
- You modify files in your working tree.
- You selectively stage just those changes you want to be part of your next commit, which adds only those changes to the staging area.
- You do a commit, which takes the files as they are in the staging area and stores that snapshot permanently to your Git directory.
If a particular version of a file is in the Git directory, it’s considered committed. If it has been modified and was added to the staging area, it is staged. And if it was changed since it was checked out but has not been staged, it is modified.
1.2 First-Time Git Setup
1.2.1 About configuration levels
git config tool can set/==get== configuration variables.
Variables can be stored in three different places:
- ==
/etc/gitconfig== file: Contains values applied to every user on the system and all their repositories. If you pass the option--systemtogit config, it reads and writes from this file specifically. (Because this is a system configuration file, you would need administrative or superuser privilege to make changes to it.) - ==
~/.gitconfig== or ==~/.config/git/config== file. Values specific personally to you, the user. You can make Git read and write to this file specifically by passing the--globaloption, and this affects all of the repositories you work with on your system. - ==
config== file in the Git directory (that is,.git/config) of whatever repository you’re currently using: Specific to that single repository. You can force Git to read from and write to this file with the--localoption, but that is in fact the default. (Unsurprisingly, you need to be located somewhere in a Git repository for this option to work properly.)
To be summarized:
- ==system level==
- ==user level==
- ==directory level==
To view all of the settings and where they are coming from, using:
1 | git config --list --show-origin |
1.2.2 Setup my identity info
1 | git config --global user.name "movic" |
1.2.3 Setup my editor
1 | git config --global core.editor vim |
1.2.4 Setup credential cache
If you don’t want to type the password every single time you push, you can set up a “credential cache”.
1 | In Git Book |
Chapter 2 Git Basics
2.1 Getting a Git Repository
2.1.1 Initializing a repository in an existing directory
1 | git init |
then add file to be tracked by:
1 | if it’s a directory, the command adds all the files in that directory recursively |
2.1.2 Clone an existing repository
1 | git clone https://github.com/**/* [my_working_directory(optional)] |
2.2 Recording Changes to the Repository
2.2.1 Lifecycle of the status of the files
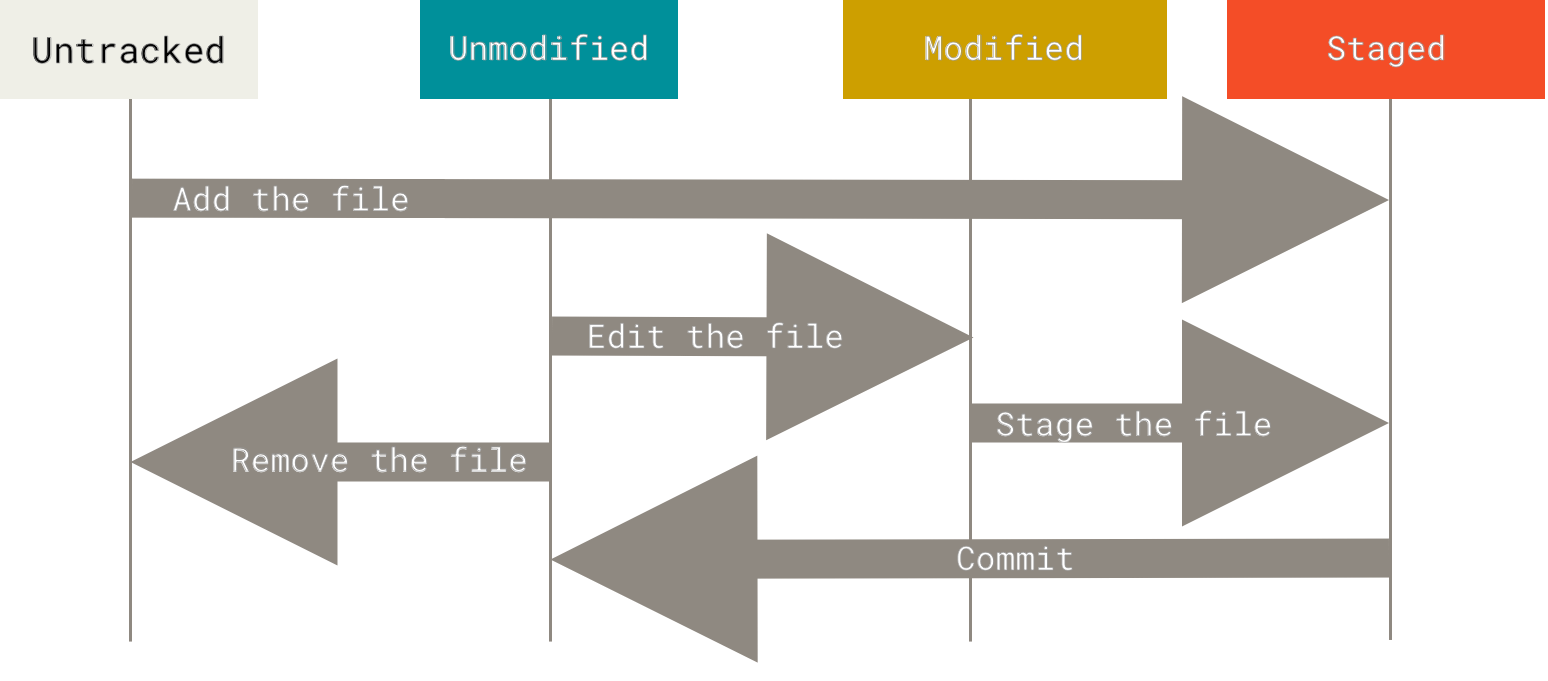
2.2.2 Checking the status of the files
1 | git status |
==??== stands for untracked file, ==A== stands for added file, ==” M”== stands for modified but not yet staged file, ==”M “== stands for modified and staged file, and ==MM== stands for modified, staged file, and then modified again.
2.2.3 Staging modified files
1 | `git add` is a multipurpose command, it can be used to stage files as well |
2.2.4 Ignoring files
The rules for the patterns you can put in the .gitignore file are as follows:
- Blank lines or lines starting with
#are ignored. - Standard glob patterns work, and will be applied recursively throughout the entire working tree.
- You can start patterns with a forward slash (
/) to avoid recursivity. - You can end patterns with a forward slash (
/) to specify a directory. - You can negate a pattern by starting it with an exclamation point (
!).
Glob patterns are like simplified regular expressions that shells use. An asterisk (*) matches zero or more characters; [abc] matches any character inside the brackets (in this case a, b, or c); a question mark (?) matches a single character; and brackets enclosing characters separated by a hyphen ([0-9]) matches any character between them (in this case 0 through 9). You can also use two asterisks to match nested directories; a/**/z would match a/z, a/b/z, a/b/c/z, and so on.
1 | ignore all .a files |
Tip: Examples of .gitignore file.
2.2.5 Viewing the staged and unstaged changes
1 | the below command compares what is in your working directory with what is in your staging area. The result tells you the changes you’ve made that you haven’t yet staged |
2.2.6 Committing your changes
1 | git commit -m message -v |
2.2.7 Skipping the staging area
1 | adding -a option to the `git commit` command will automatically add the tracked files to the staged area |
2.2.8 Removing files
1 | to remove a file from Git, use `git rm` command. This command will remove the file from working directory as well |
2.2.9 Moving files
1 | git mv a.py b.py |
2.3 Viewing the Commit History
2.3.1 Options for formatting the log output
1 | git log |
Customized log output —— ==format==, the oneline option and format option are particularly useful with another option called --graph
1 | git log --pretty=format:"%h - % an" --graph |
Useful options for git log --pretty=format:
| Option | Description of Output |
|---|---|
%H |
Commit hash |
%h |
Abbreviated commit hash |
%T |
Tree hash |
%t |
Abbreviated tree hash |
%P |
Parent hashes |
%p |
Abbreviated parent hashes |
%an |
Author name |
%ae |
Author email |
%ad |
Author date (format respects the --date=option) |
%ar |
Author date, relative |
%cn |
Committer name |
%ce |
Committer email |
%cd |
Committer date |
%cr |
Committer date, relative |
%s |
Subject |
A few common options listed below:
| Option | Description |
|---|---|
-p |
Show the patch introduced with each commit. |
--stat |
Show statistics for files modified in each commit. |
--shortstat |
Display only the changed/insertions/deletions line from the –stat command. |
--name-only |
Show the list of files modified after the commit information. |
--name-status |
Show the list of files affected with added/modified/deleted information as well. |
--abbrev-commit |
Show only the first few characters of the SHA-1 checksum instead of all 40. |
--relative-date |
Display the date in a relative format (for example, “2 weeks ago”) instead of using the full date format. |
--graph |
Display an ASCII graph of the branch and merge history beside the log output. |
--pretty |
Show commits in an alternate format. Options include oneline, short, full, fuller, and format (where you specify your own format). |
--oneline |
Shorthand for --pretty=oneline --abbrev-commit used together. |
2.3.2 Limiting log output
- ==Time filter==
1 | gets the list of commits made in last two weeks: |
- ==Author filter==
1 | git log --author="movic" |
- ==Message filter==
1 | list out the commits that match the `keywords` in the message |
- ==Changes filter==
1 | this only list out the commits which add or remove the `keywords` |
- ==Path filter==
1 | limit log output to commits that introduced a change to the specified files |
| Option | Description |
|---|---|
-<n> |
Show only the last n commits |
--since, --after |
Limit the commits to those made after the specified date. |
--until, --before |
Limit the commits to those made before the specified date. |
--author |
Only show commits in which the author entry matches the specified string. |
--committer |
Only show commits in which the committer entry matches the specified string. |
--grep |
Only show commits with a commit message containing the string |
-S |
Only show commits adding or removing code matching the string |
2.4 Undoing Things
2.4.1 Modify a commit
- Change the commit message
1 | git commit --amend -m "message" |
- Add the forgotten file to the commit as well as change the commit message
1 | the second commit replaces the results of the first |
2.4.2 Unstaging a staged file
1 | the file in the working directory is not touched |
2.4.3 Unmodifying a modified file
1 | revert the file from last commit. Be careful, your modification will disappear |
2.5 Work with Remotes
2.5.1 Showing your remotes
To see which remote servers you have configured, run git remote command. The name origin is the default name Git gives to the server you cloned from.
1 | git remote |
2.5.2 Adding remote repositories
To add a new remote Git repository as a shortname you can reference easily, run git remote add <shortname> <url>
1 | git remote add origin https://github.com/xxxxx/xxxxxx.git |
2.5.3 Fetching and pulling from your remote
1 | use `git fetch <remote>` to pull down all the data from that remote project, this doesn’t automatically merge it with any of your work or modify what you’re currently working on. You have to merge it manually into your work when you’re ready |
2.5.4 Pushing to your remotes
1 | back up to the server |
2.5.5 Inspecting a remote
Use the git remote show <remote> command to show more information about a particular remote.
1 | git remote show origin |
2.5.6 Renaming and removing remotes
Run git remote rename to change a remote’s shortname. This changes all your remote-tracking branch names too. Run git remote remove or git remote rm to remove a shortname.
1 | rename |
2.6 Tagging
Just type git tag (with optional -l or --list)
1 | git tag |
- ==lightweight tag== – a pointer to a specific commit
1 | to create a lightweight tag, don't supply any of the `-a`, `-s` or `-m` options, just provide a tag name |
- ==annotated tag== – full object in the Git database
1 | specify `-a` to create a annotated tag |
2.6.3 Tagging later
1 | specify the commit checksum(or part of it) at the end of the command to create a tag for the past commit |
By default, the git push command doesn’t transfer tags to the remote servers. Explicitly push tags to a shared server by running git push origin <tagname>.
1 | git push origin v2.0 |
Use git tag -d <tagname> to delete a tag on your local repository.
1 | note that this does not remove the tag from any remote servers |
This puts your repository in ==detached HEAD== state, which has some ==ill side effects==.
1 | git checkout v2.0 |
In “detached HEAD” state, if you make changes and then create a commit, the tag will stay the same, but your new commit won’t belong to any branch and will be unreachable, except by the exact commit hash. Thus, if you need to make changes — say you’re fixing a bug on an older version, for instance — you will generally want to create a branch:
1 | git checkout -b version2 v2.0.0 |
2.7 Git Aliases
2.7.1 Setup aliases
1 | git config --global alias.co checkout |
Chapter 3 Git Branching
3.1 Branches in a Nutshell
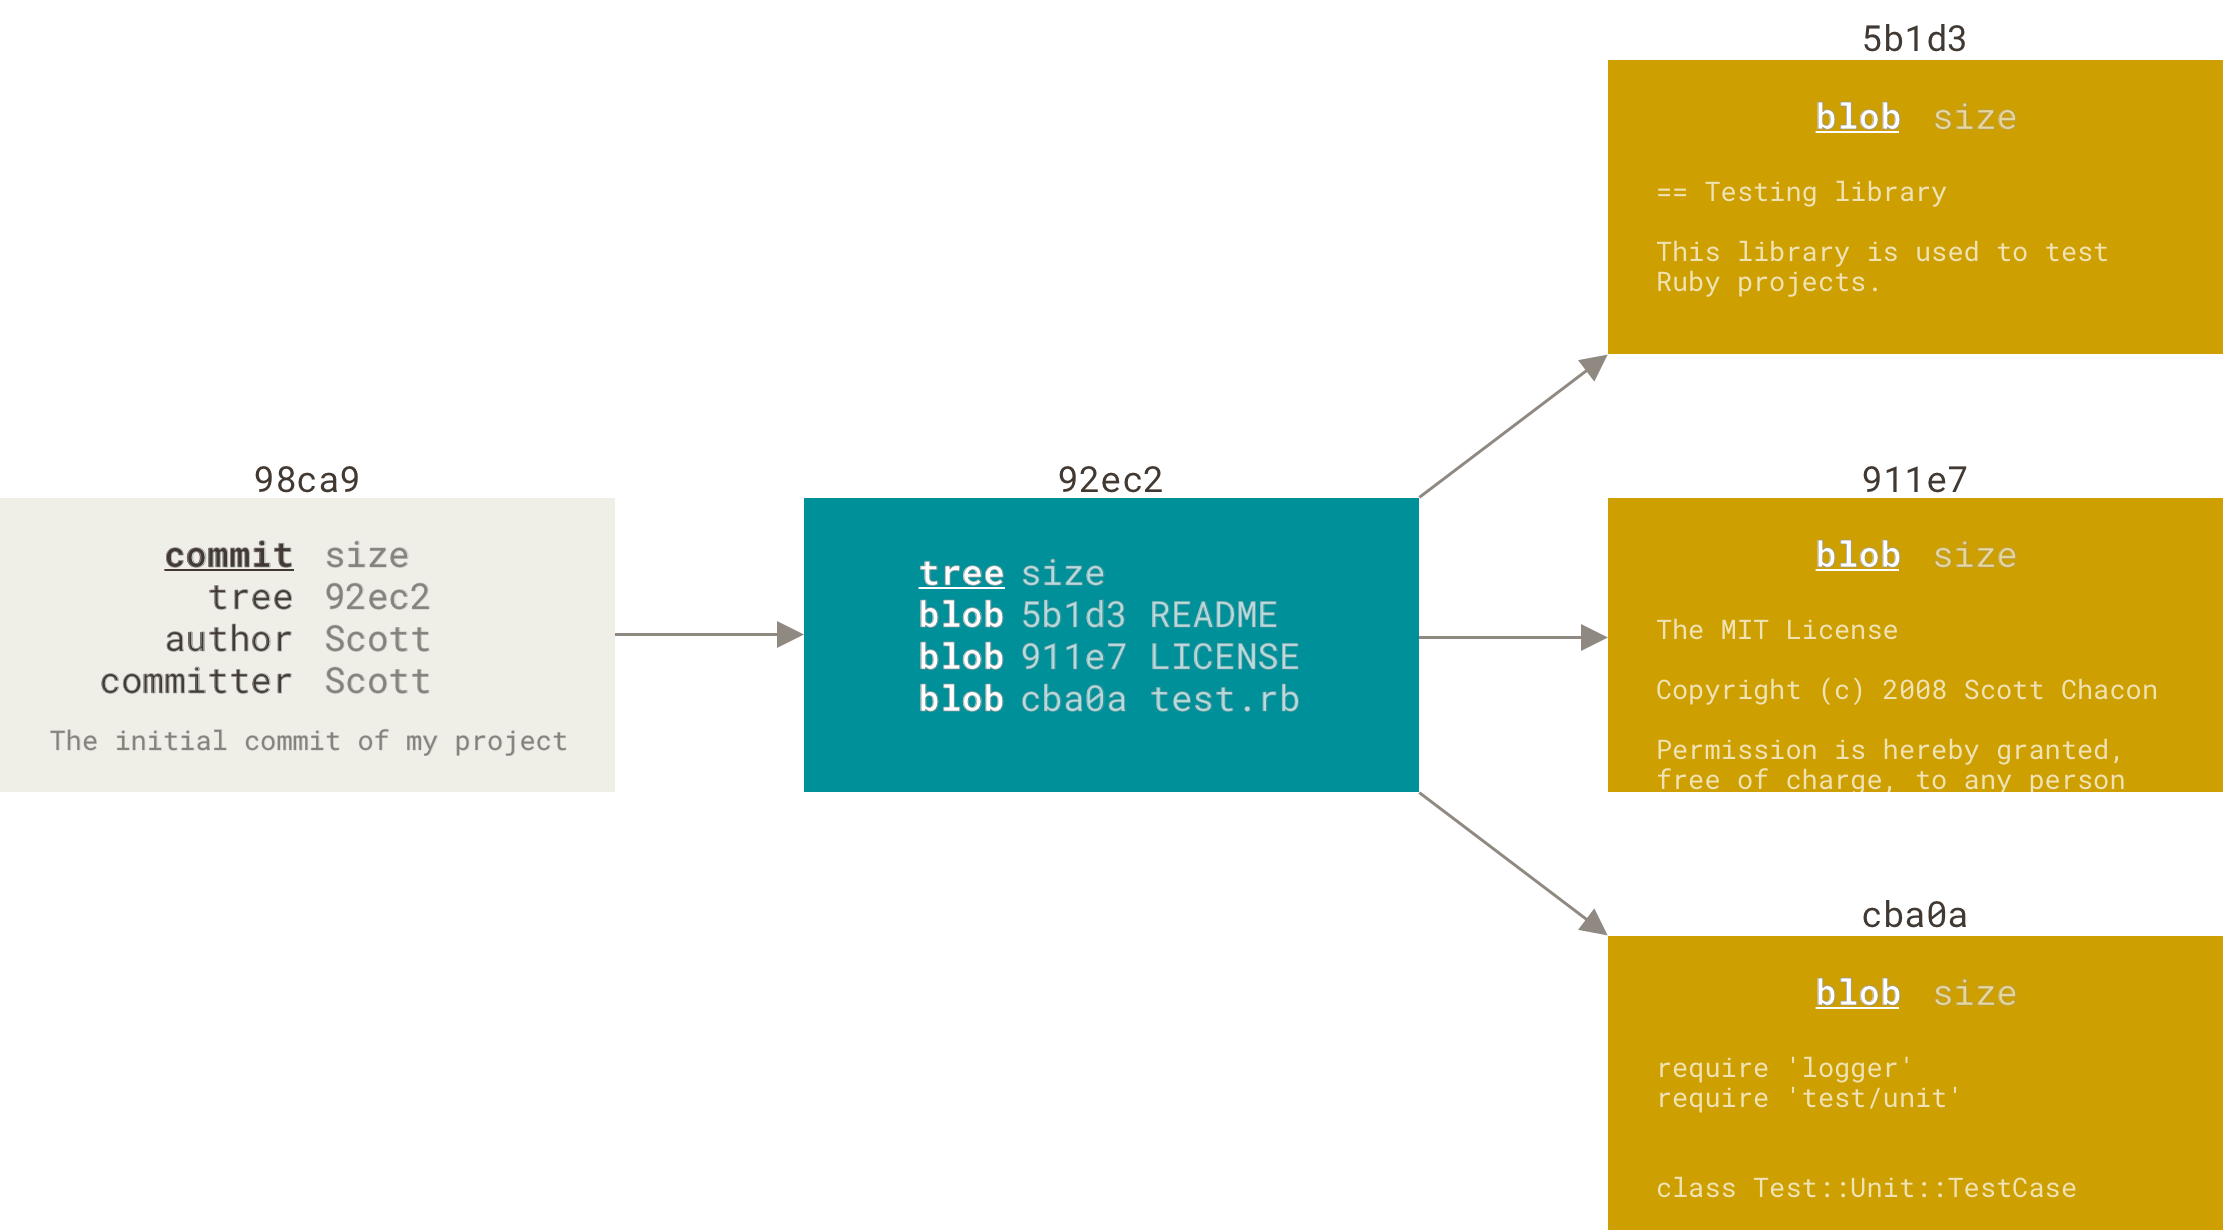
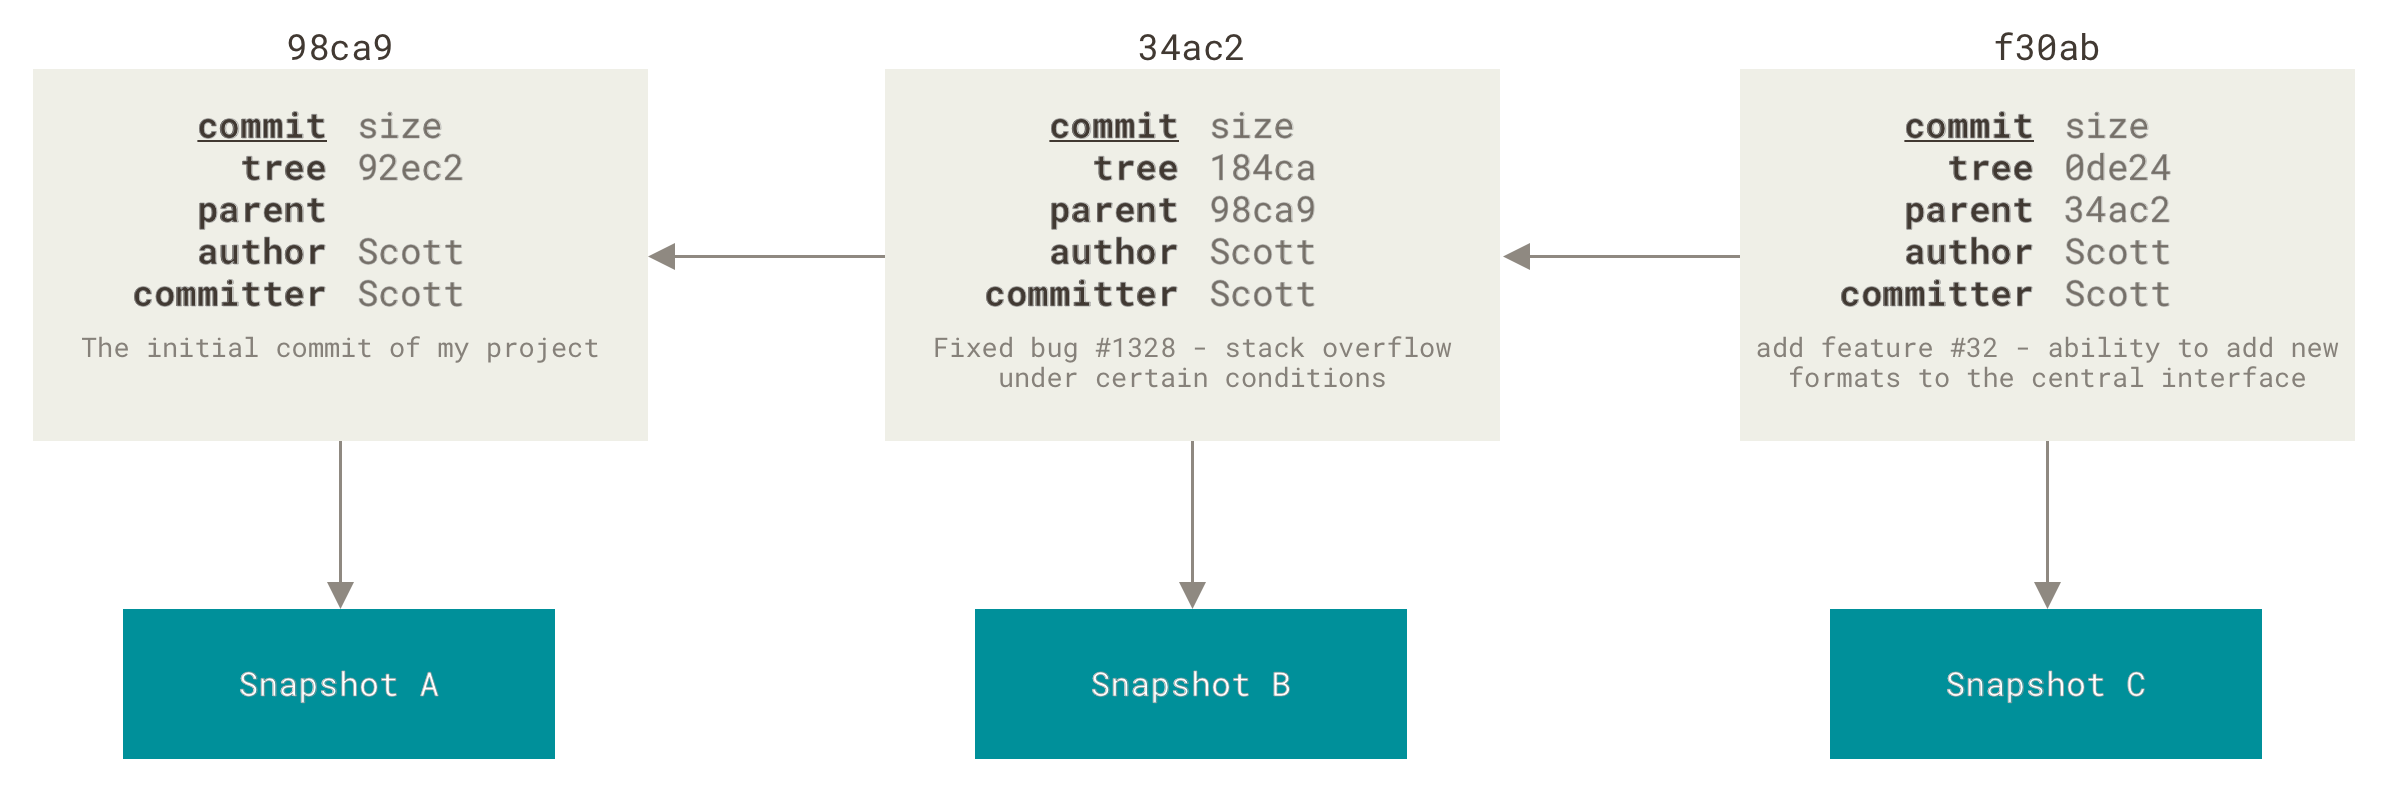
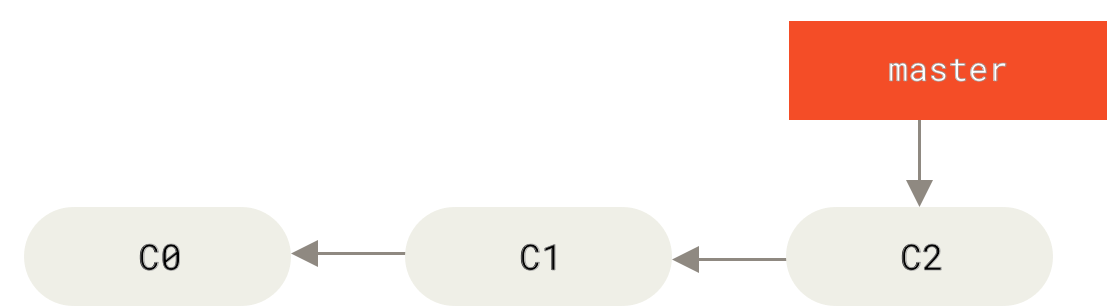
When you make a commit, Git stores a commit object that contains a ==pointer== to the snapshot of the content you staged. This object also contains the ==metadata==, including the author’s name and email address, the message and pointers to the commit or commits that directly came before this commit (its parent or parents): zero parents for the initial commit, one for a normal commit, and multiple for a commit that results from a merge of two or more branches.
Some objects after a commit:
- blobs
- tree
- commit
3.1.1 Creating a new branch
Use git branch command to create a new branch.
1 | git branch testing |
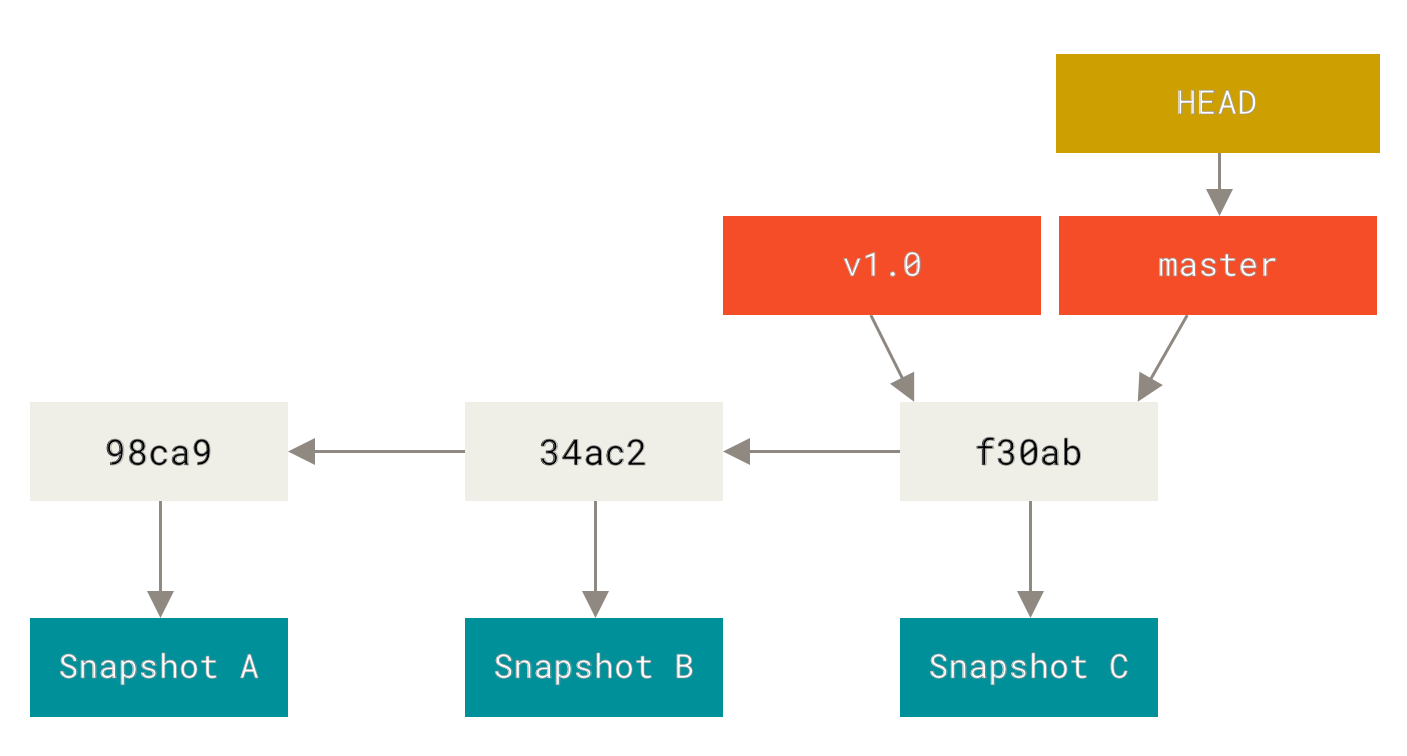
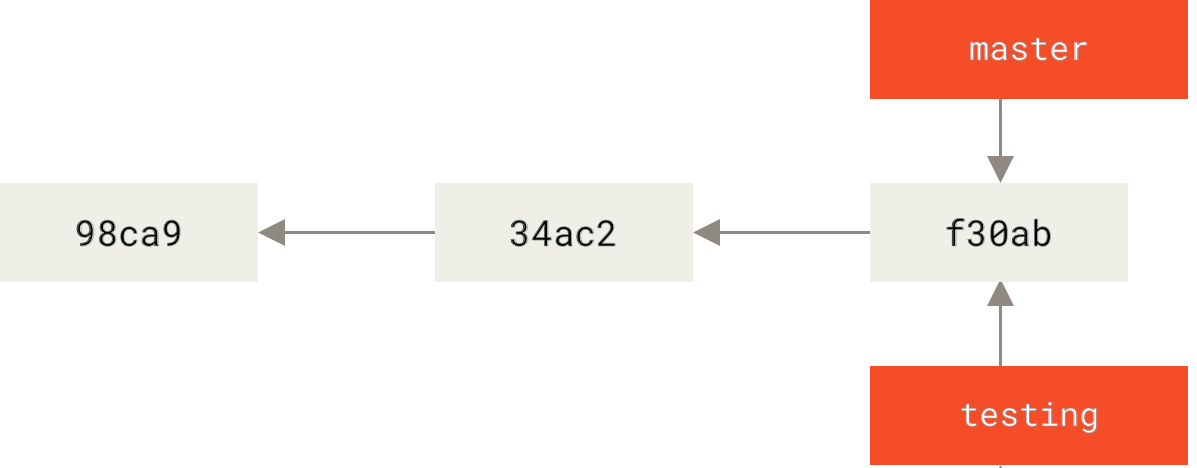
HEAD is a special pointer, which points to the current commit. The git branch command only created a new branch – it didn’t switch to that branch. To checkout a branch at the same time, run git checkout -b <newbranchname> command
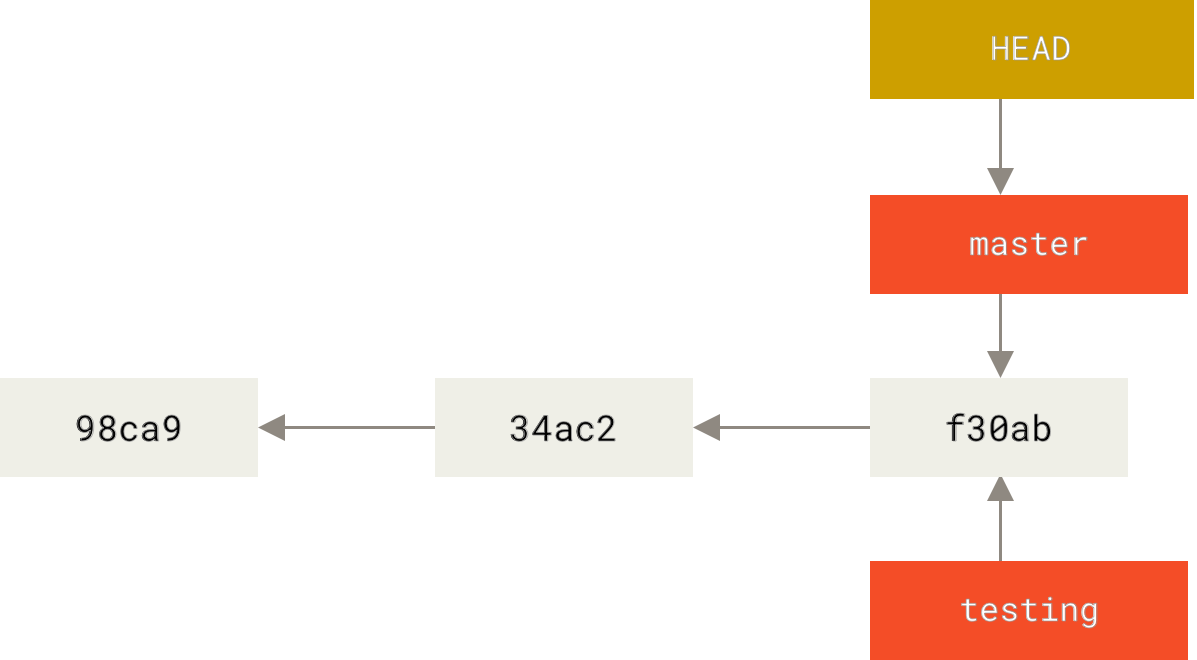
Run git log --decorate to show the pointed commit of HEAD pointer
1 | git log --decorate |
3.1.2 Switch branches
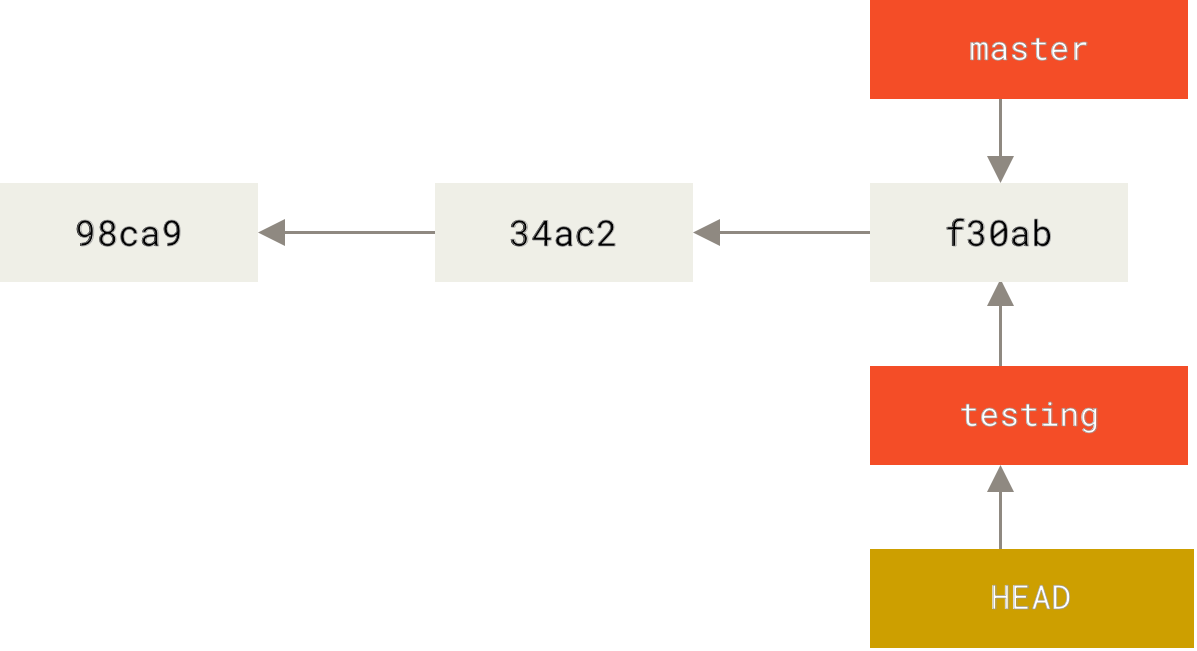
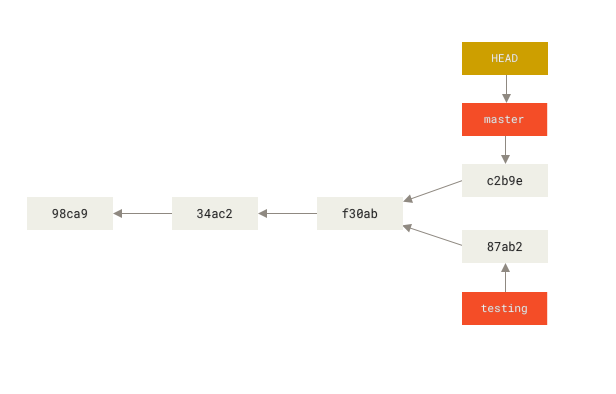
Run git checkout to switch to a existing branch.
1 | git checkout testing |
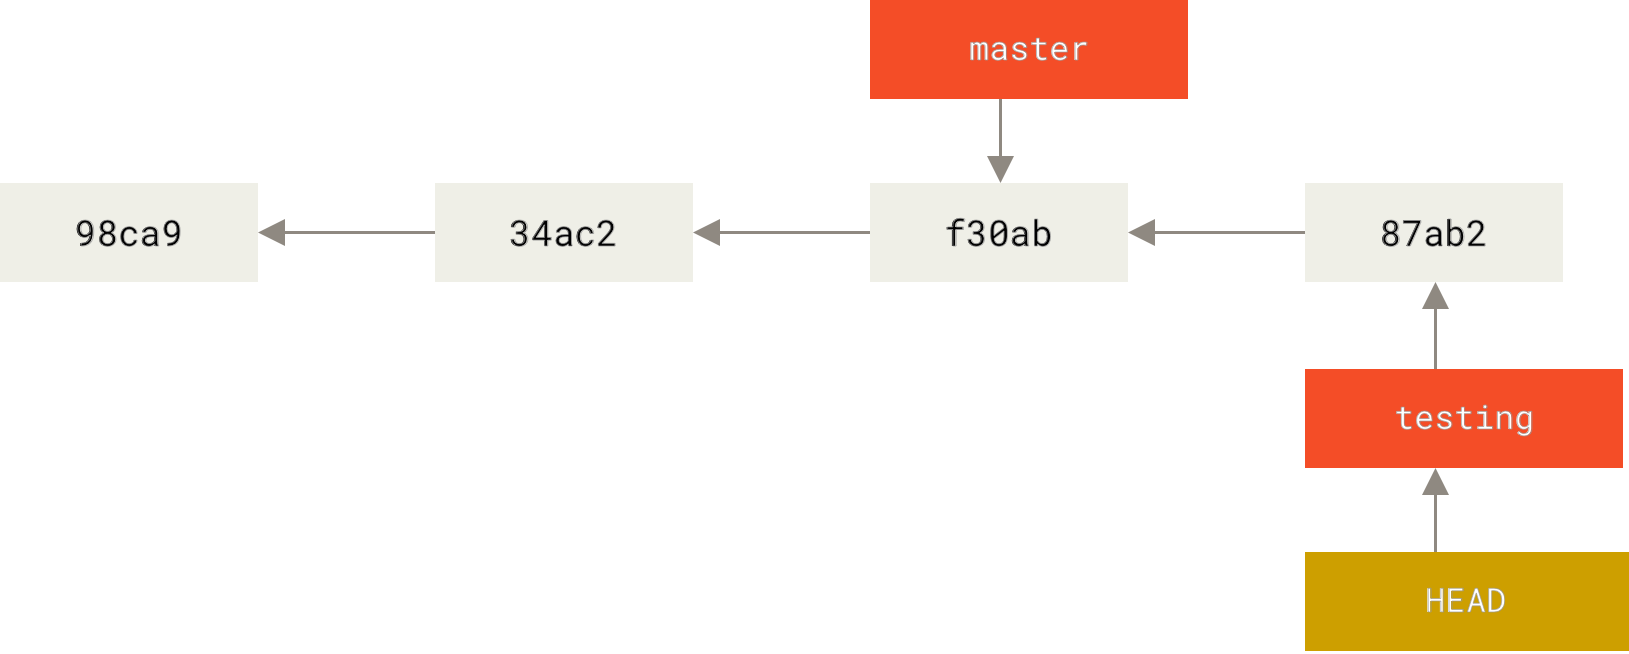
If we make a new commit on the testing branch, then the testing branch will move forward.
And run git checkout master to switch back.
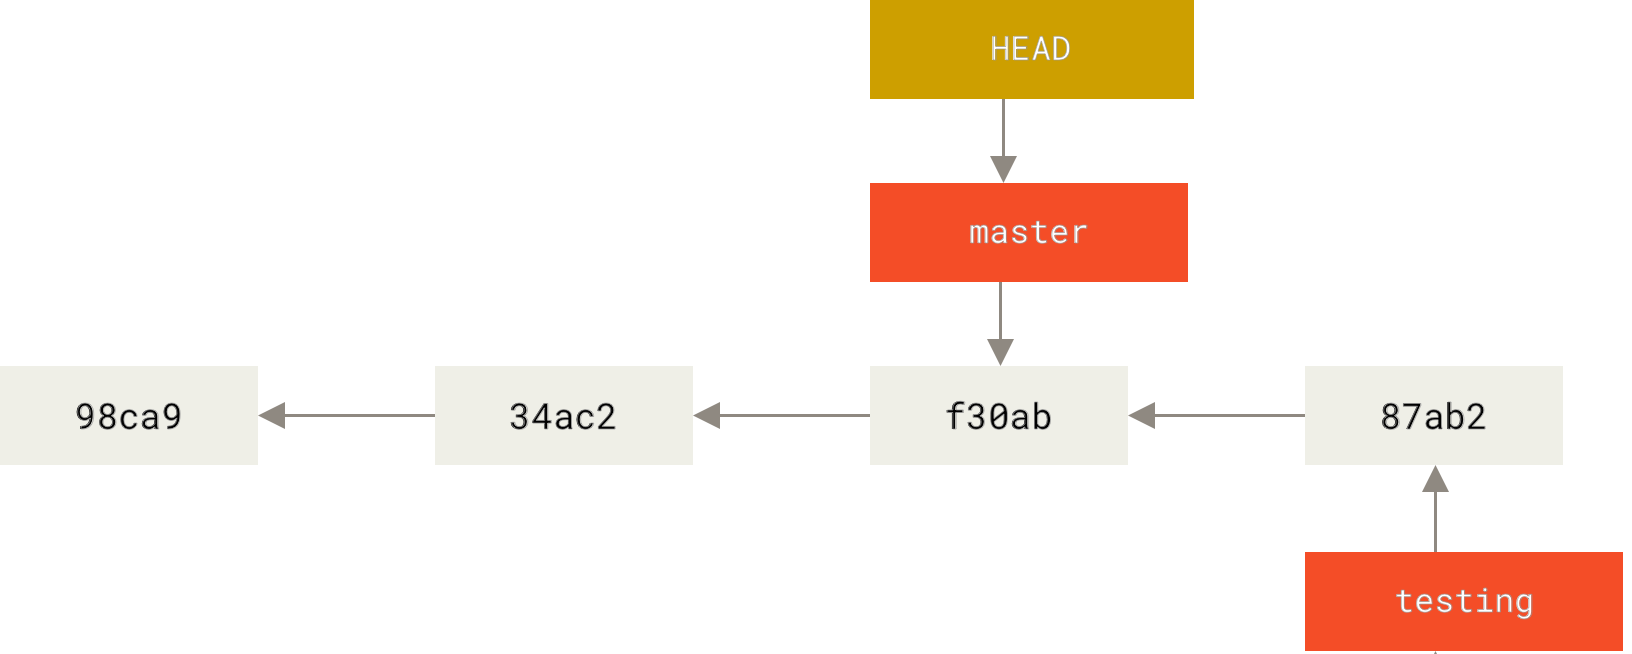
Now if you make a new commit on the master branch.
Use git log --all to print out ==all== the commits
3.2 Basic Branching and Merging
3.2.1 Basic branching workflow
- Do some work on a website
- Create a branch for a new user story you’re working on
- Do some work in that branch
At this stage, you’ll receive a call that another issue is critical and you need a hotfix. You’ll do the following:
- Switch to your production branch
- Create a branch to add the hotfix
- After it’s tested, merge the hotfix branch, and push to production
- Switch back to your original user story and continue working
3.2.2 Basic branching
- current state
- create a
iss53branch
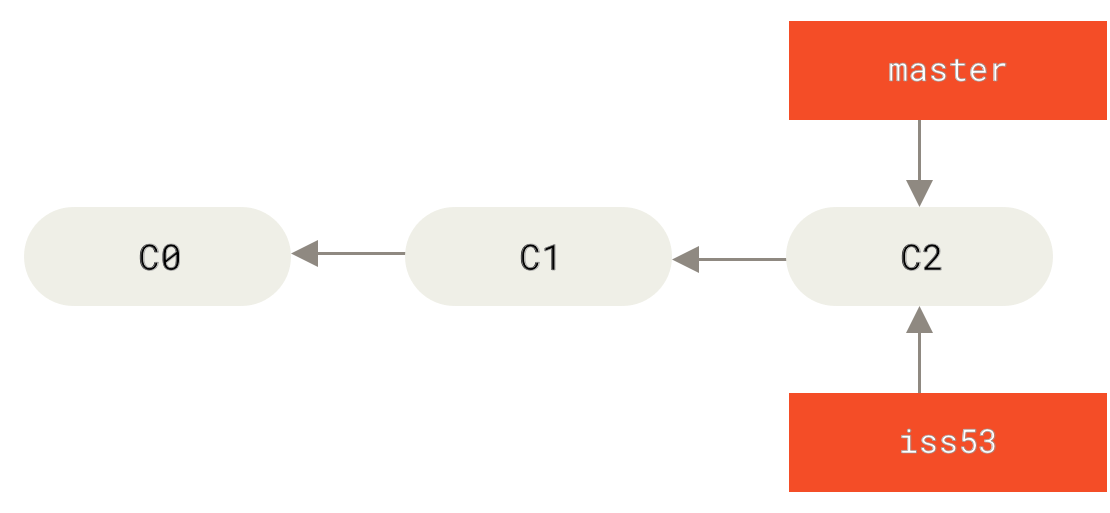
- make a new commit on branch
iss53
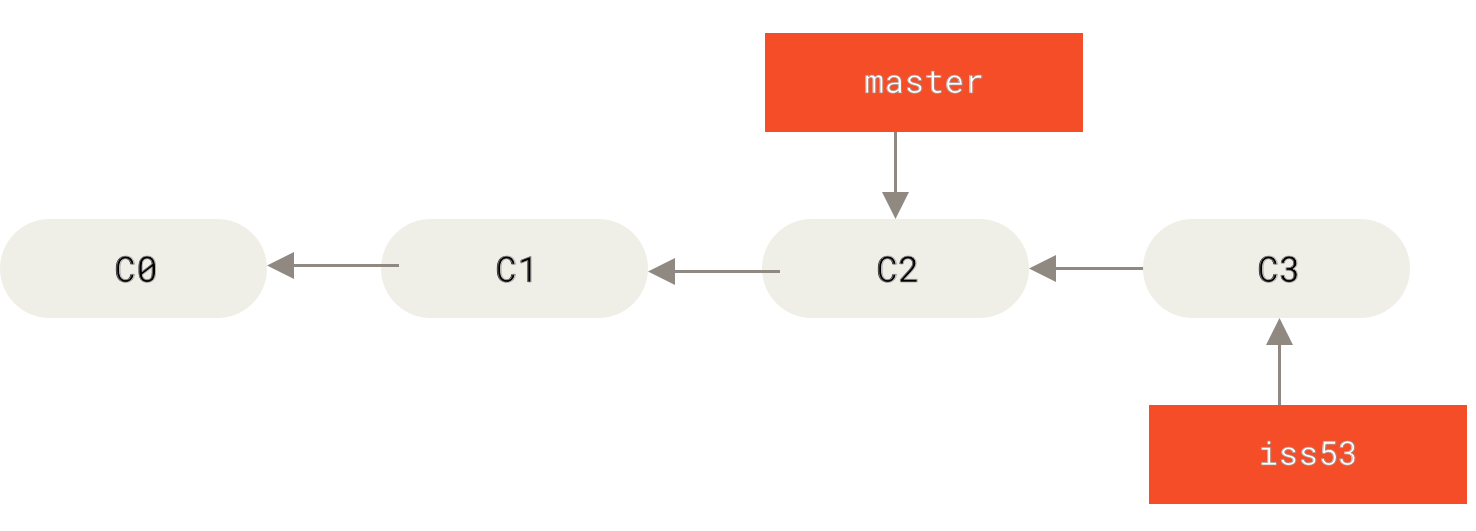
- switch back to your
masterbranch, and create a hotfix branch to fix the bug
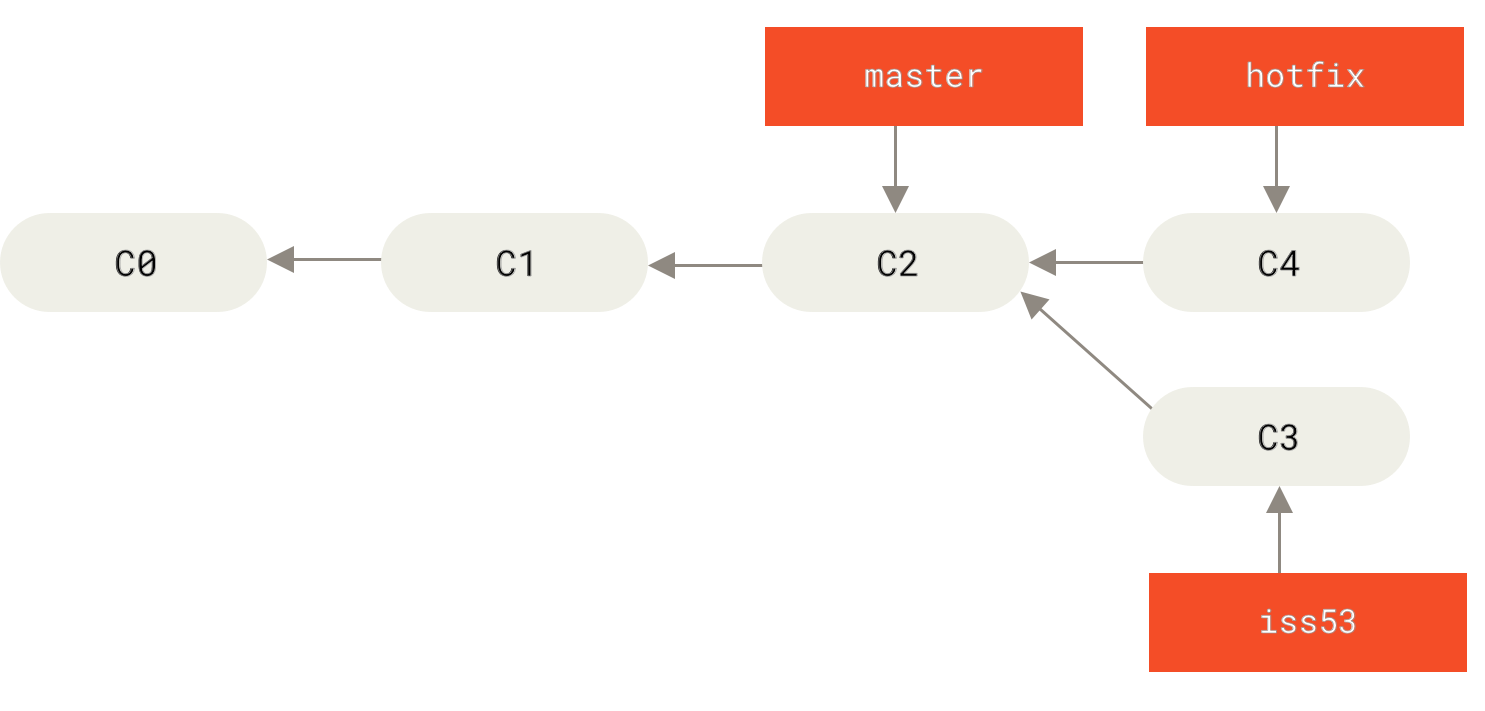
- run some tests on branch
hotfix, and usegit mergecommand to merge branchhotfixto the master branch when you’re ready
1 | git checkout master |
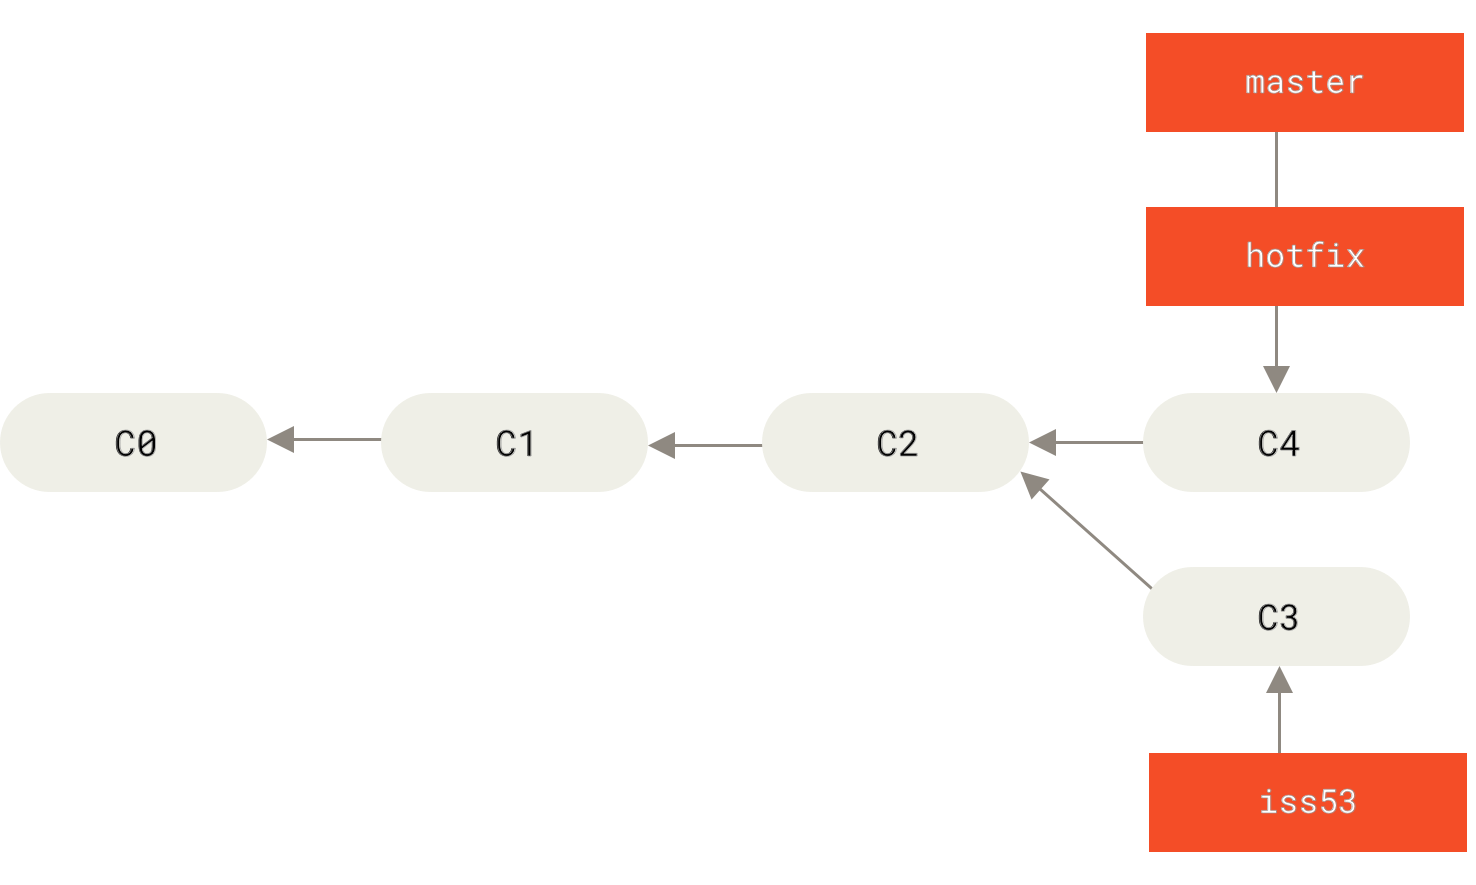
- run
git branch -d <branchname>to delete the hotfix branch
1 | git branch -d hotfix |
- back to your original work, the ==work-in-progress== branch
iss53
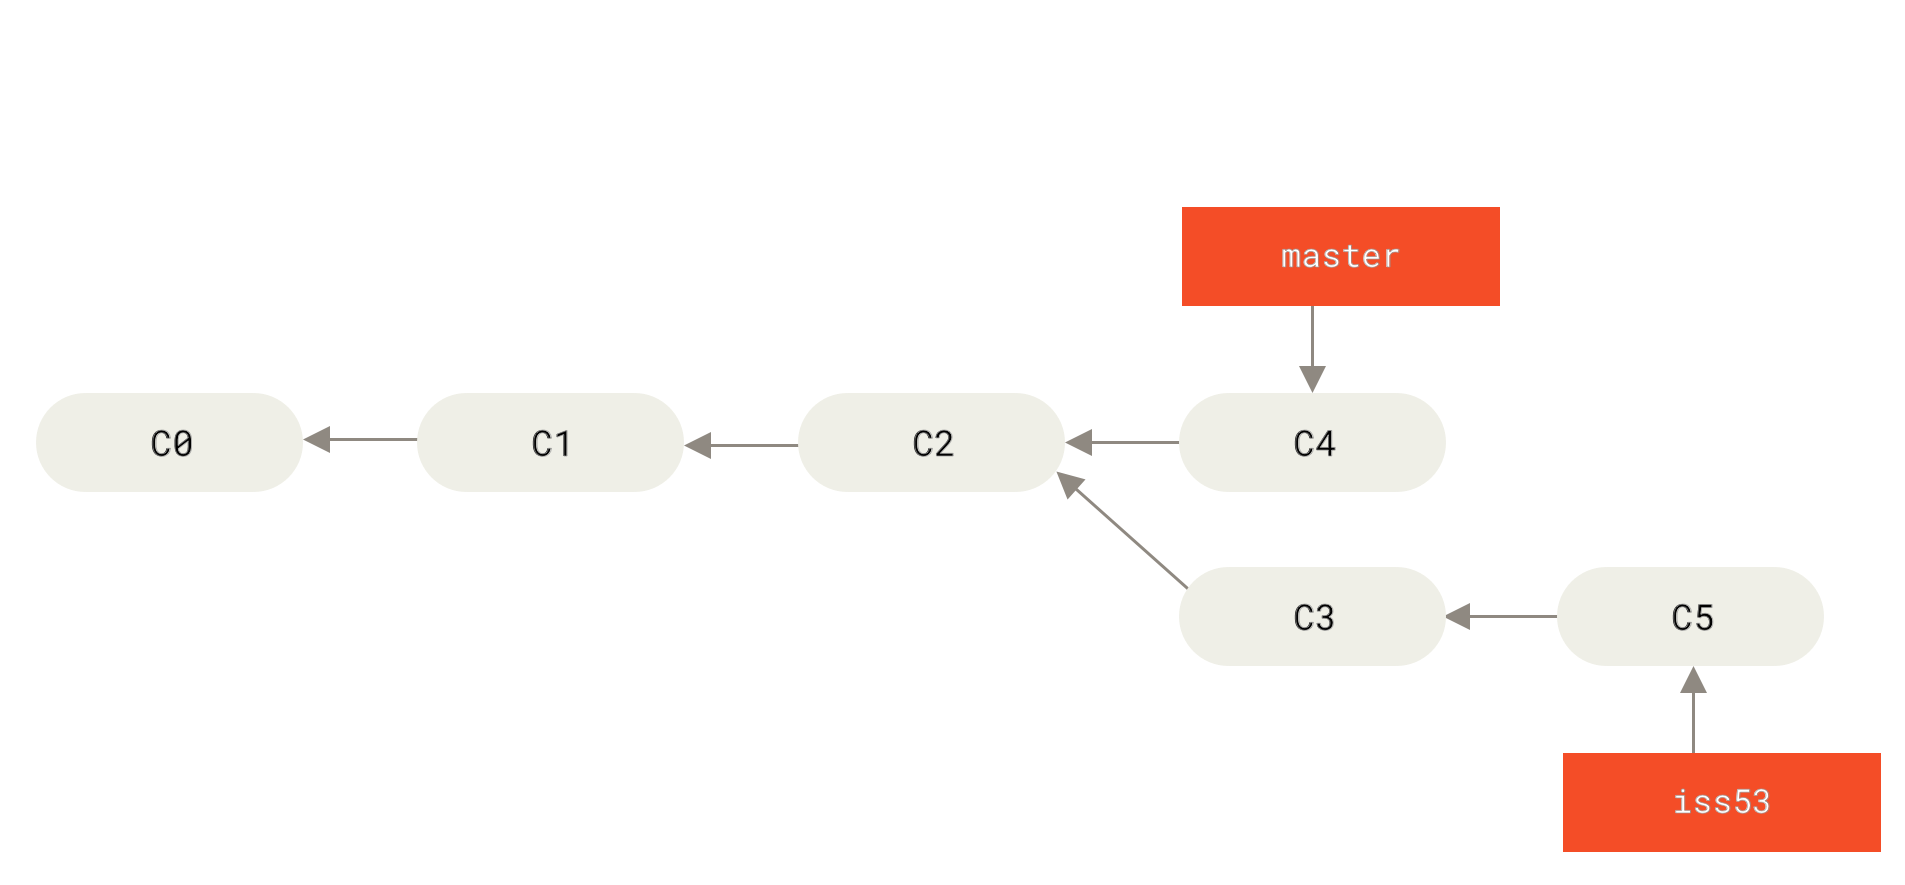
3.2.3 Basic merging
All you have to do is check out the branch you wish to merge into and then run git merge <branchname> command.
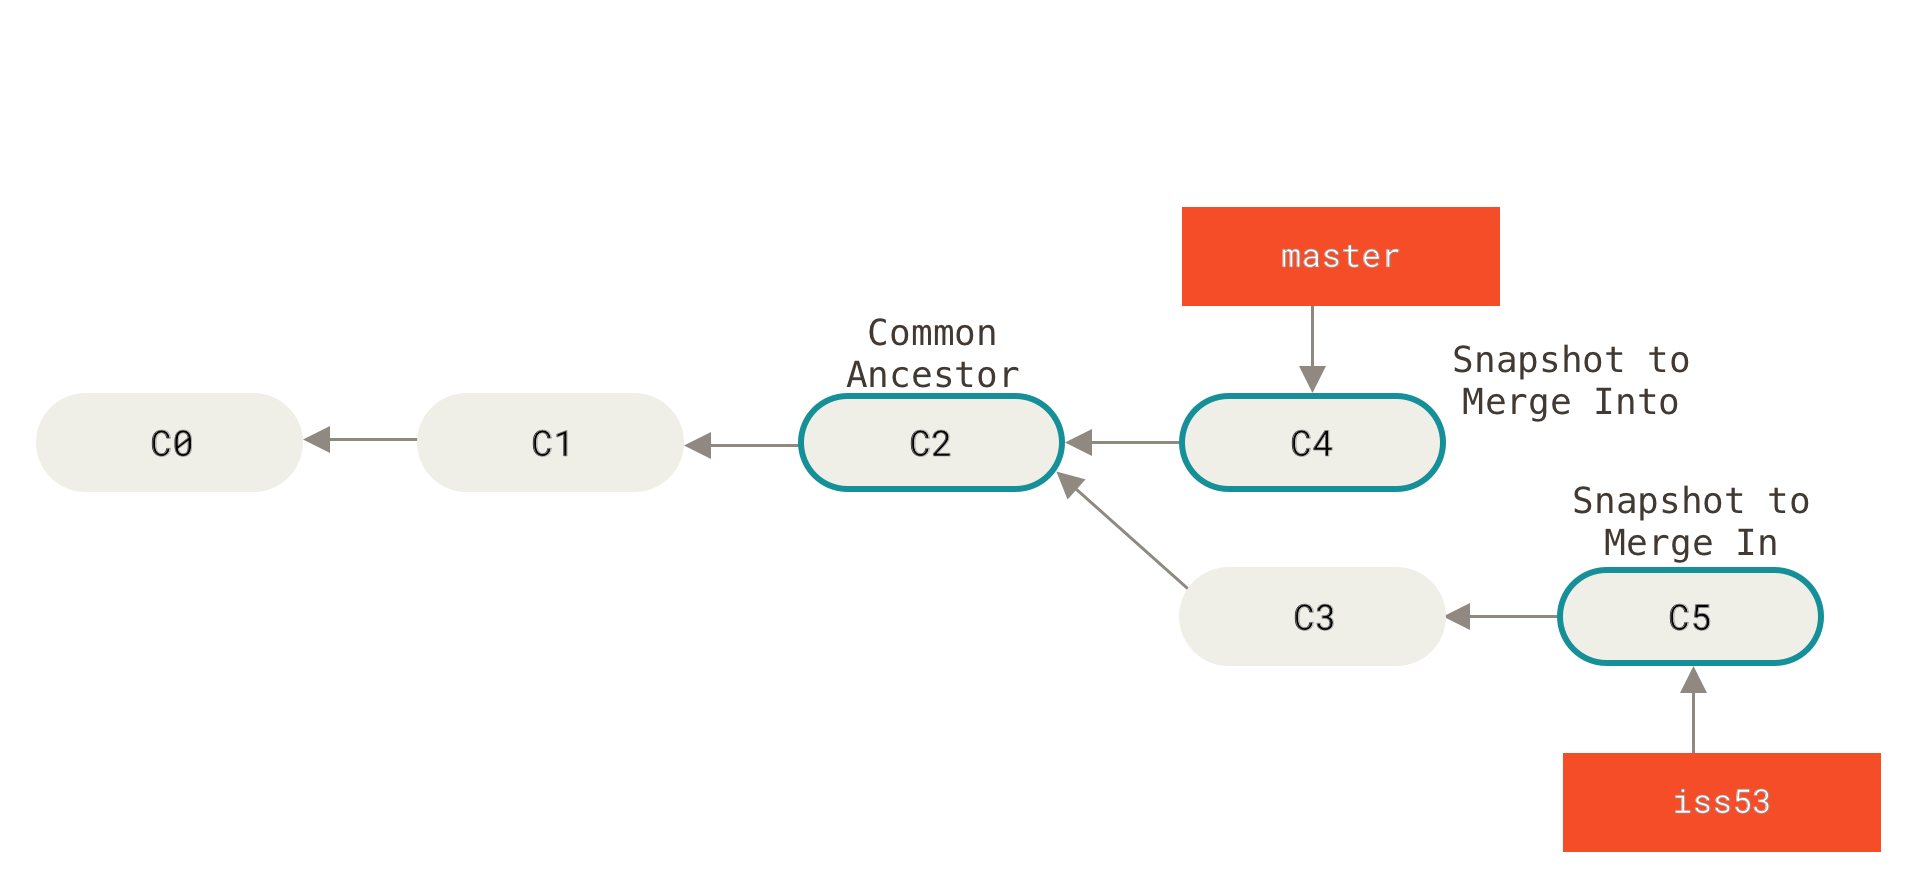
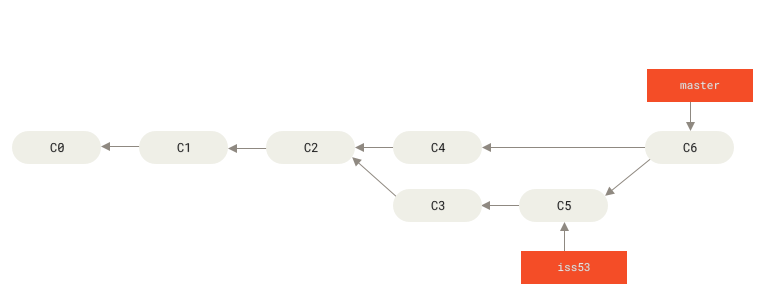
Now if you are ready to merge you iss53 branch to the master branch, you’ll have some subtlety. If the commit on the branch you’re on isn’t a direct ancestor of the branch you’re merging in, Git will do a ==three-way== merge. In this case, Git will use the snapshots pointed to by the branch tips (here, master and iss53) and the common ancestor of the two. Git creates a new snapshot that results from the branch tips and the ancestor, and automatically creates a new commit, which is called a ==merge commit==.
3.2.4 Basic merge conflicts
If you changed the same part of the same file differently in the two branches you’re merging, you’ll get a merge conflict.
1 | To see the unmerged file, run `git status` command |
1 | Open the unmerged file, and select the section of either the HEAD branch or the branch you're merging |
1 | Suppose you choose the iss53 |
1 | Run `git add` on each file to mark it as resolved |
1 | Another way is to use a graphical tool to resolve the merge conflicts |
1 | After that, run `git status` to verify that all conflicts have been resolved |
3.3 Branch Management
To see the last commit on each branch, run git branch -v
1 | git branch -v |
The useful --merged and --no-merged options can filter this list to branches that you have or have not yet merged into the branch you’re currently on. Also, you can specify a branch name to replace the default ==current branch==
1 | git branch --merged <branchname> |
3.4 Branching Workflows
3.4.1 Long-Running branches
The stable branches are farther down the line in your commit history, and the bleeding-edge branches are farther up the history.

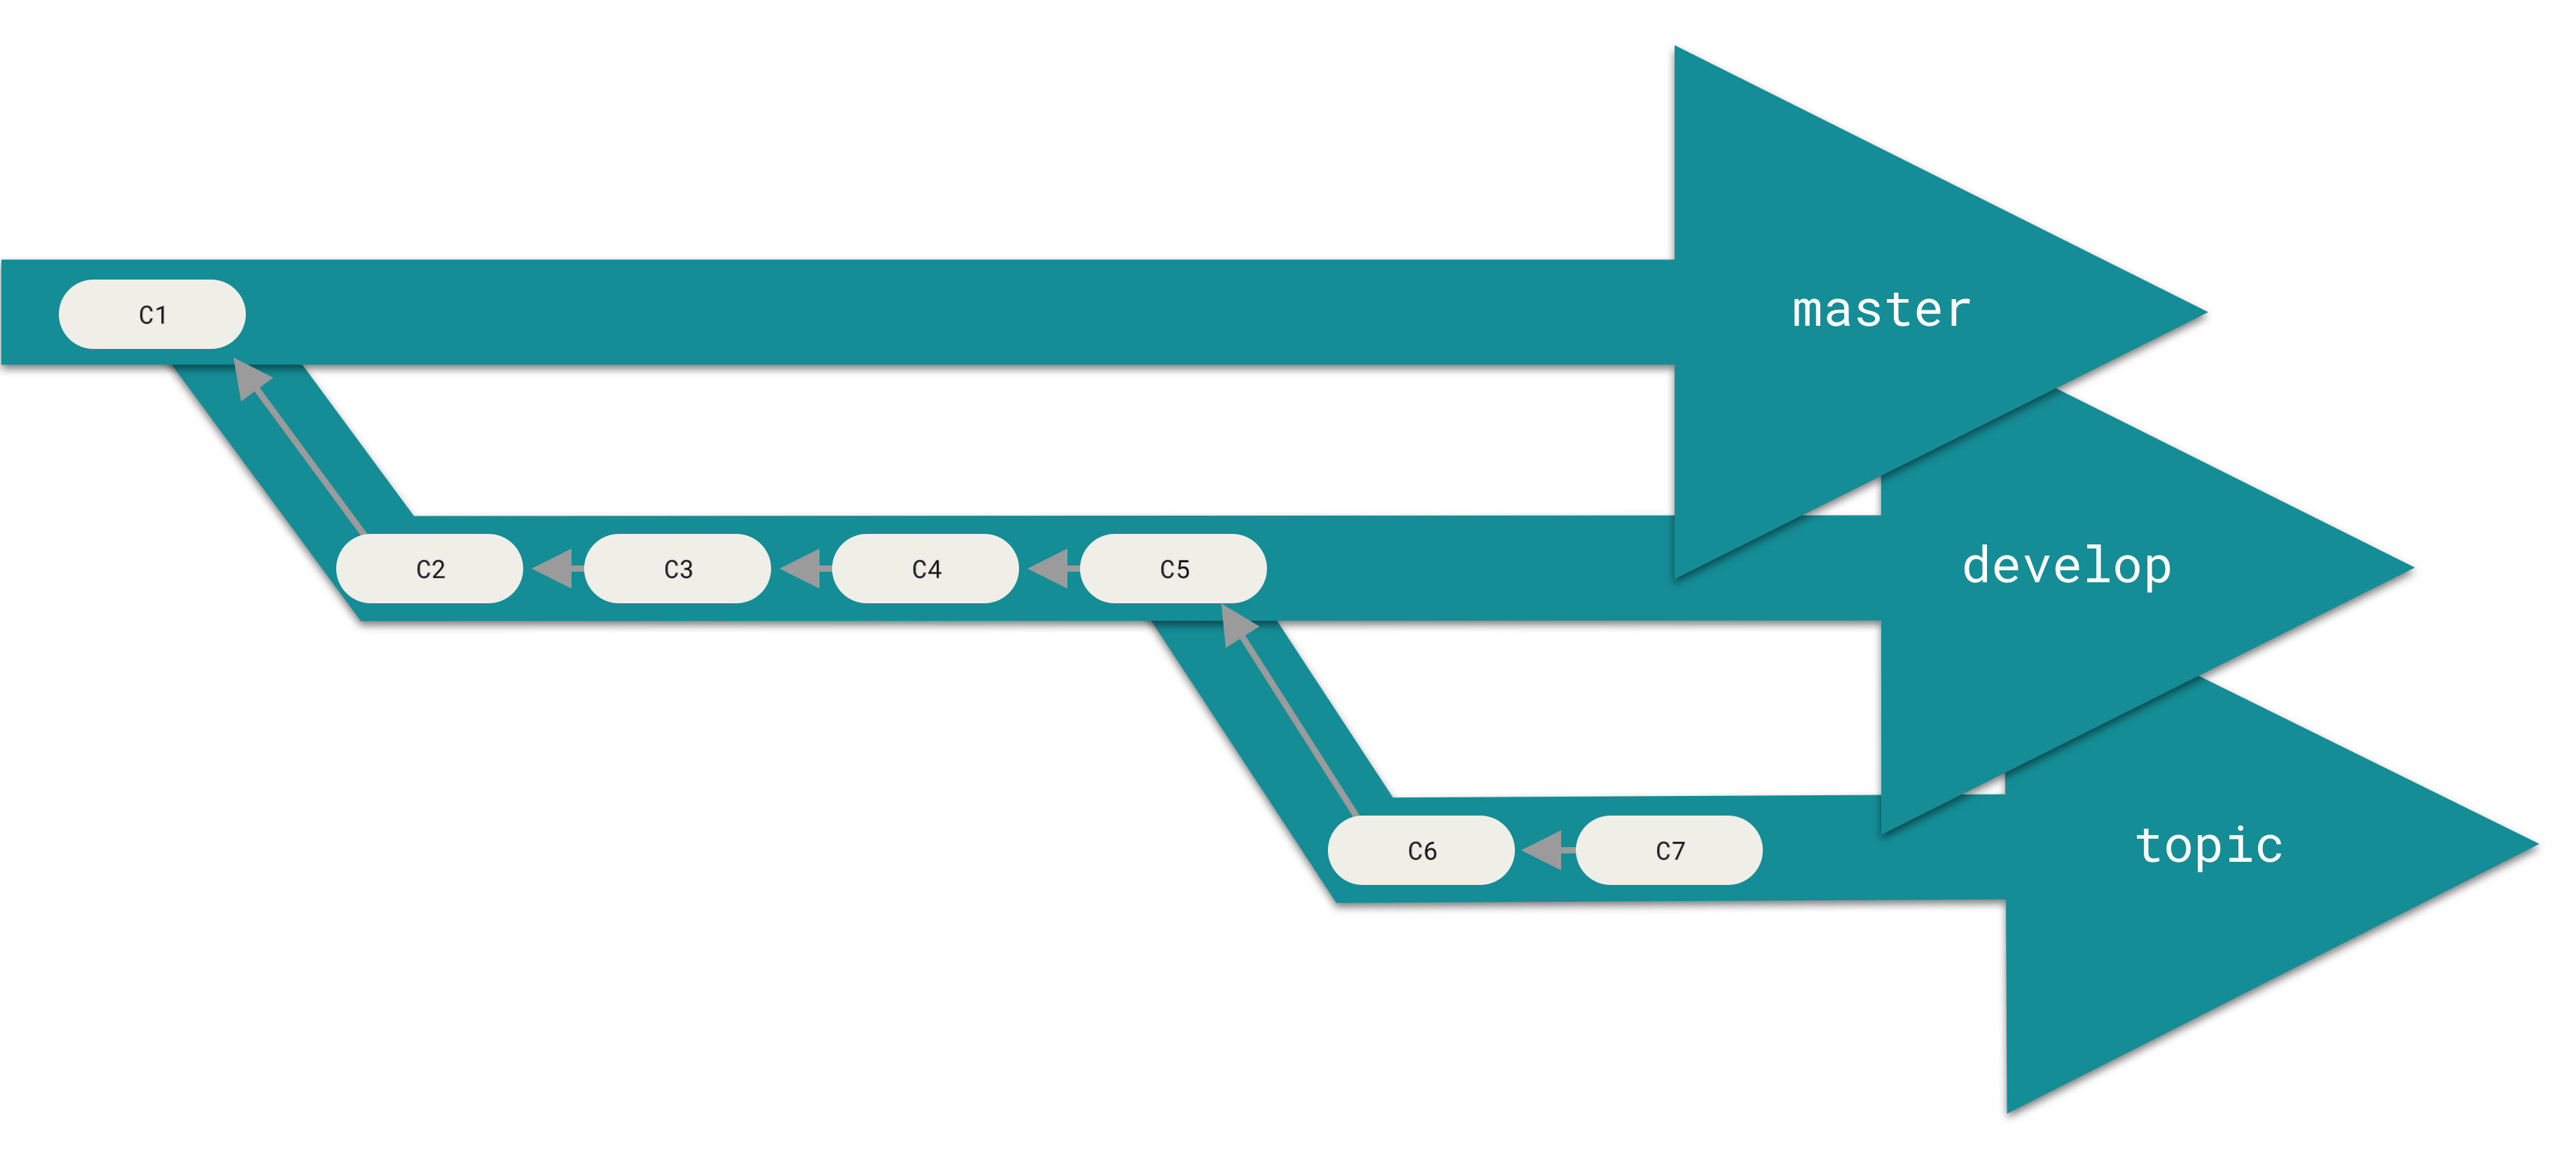
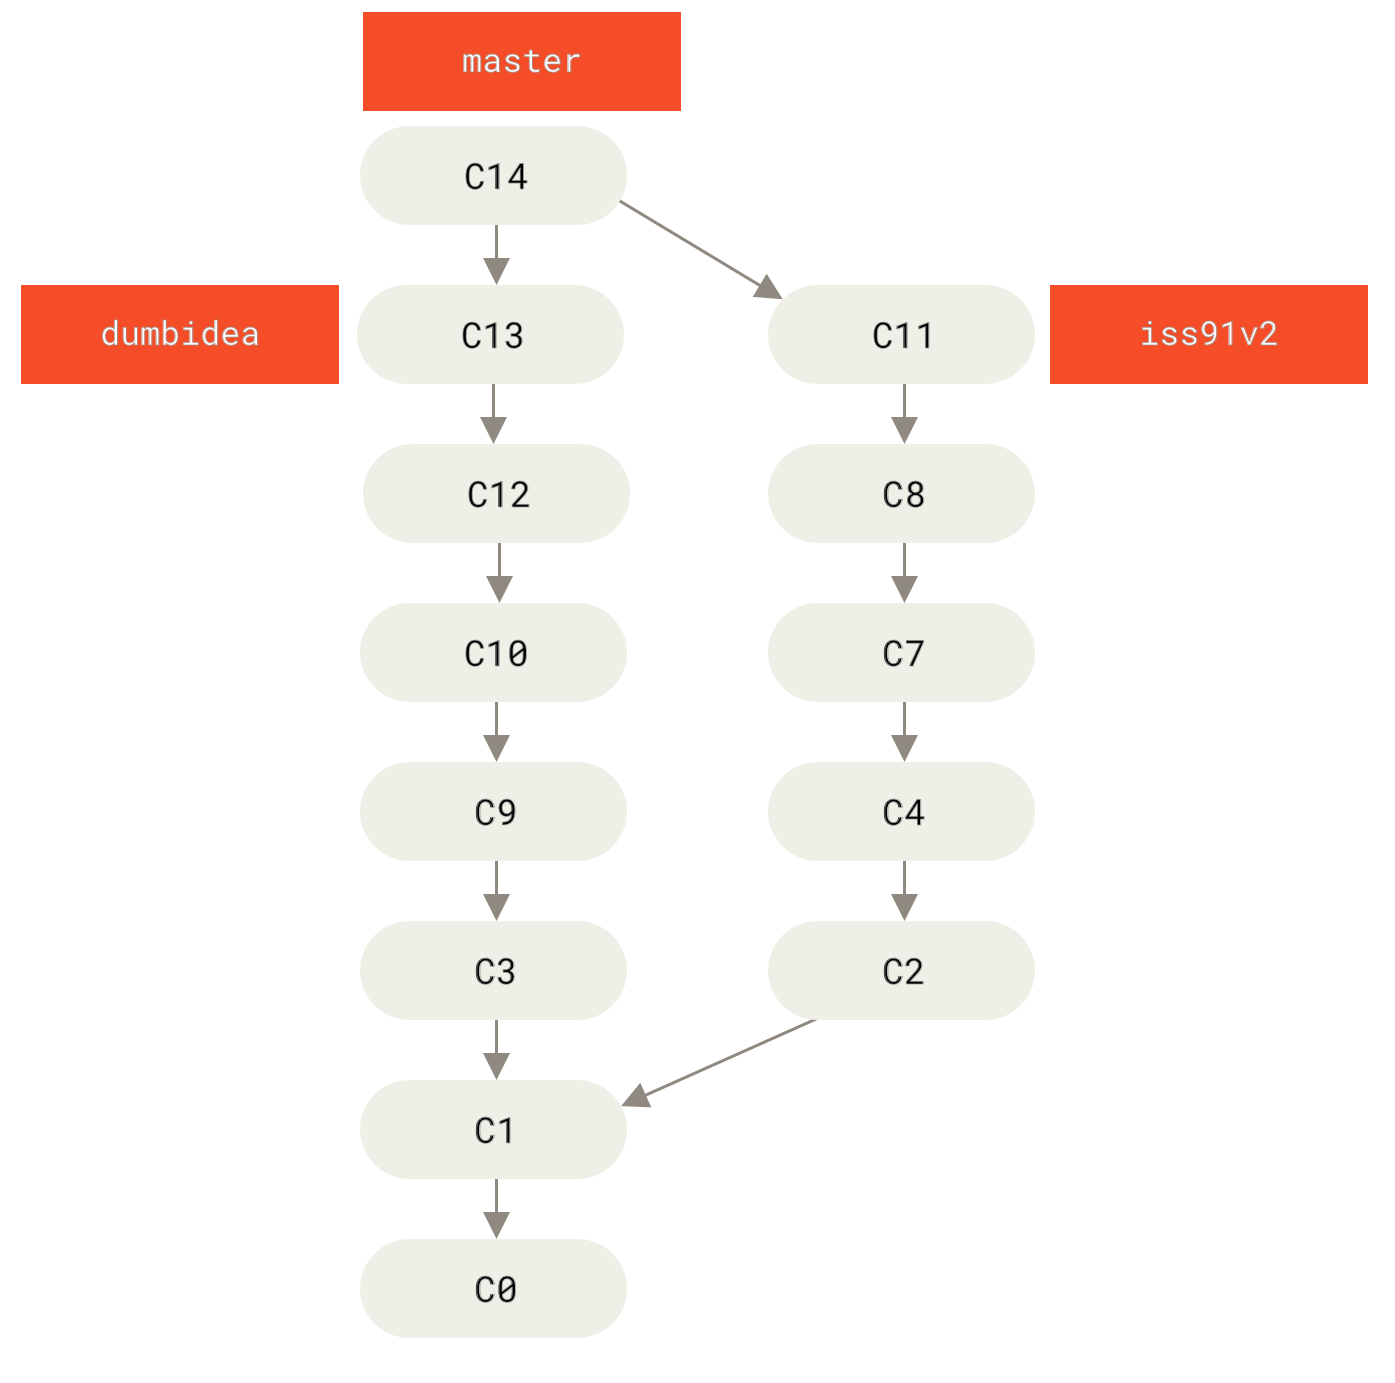
3.4.2 Topic branches
Topic branch is a ==short-lived== branch for a single particular feature or related work.
Consider an example below:
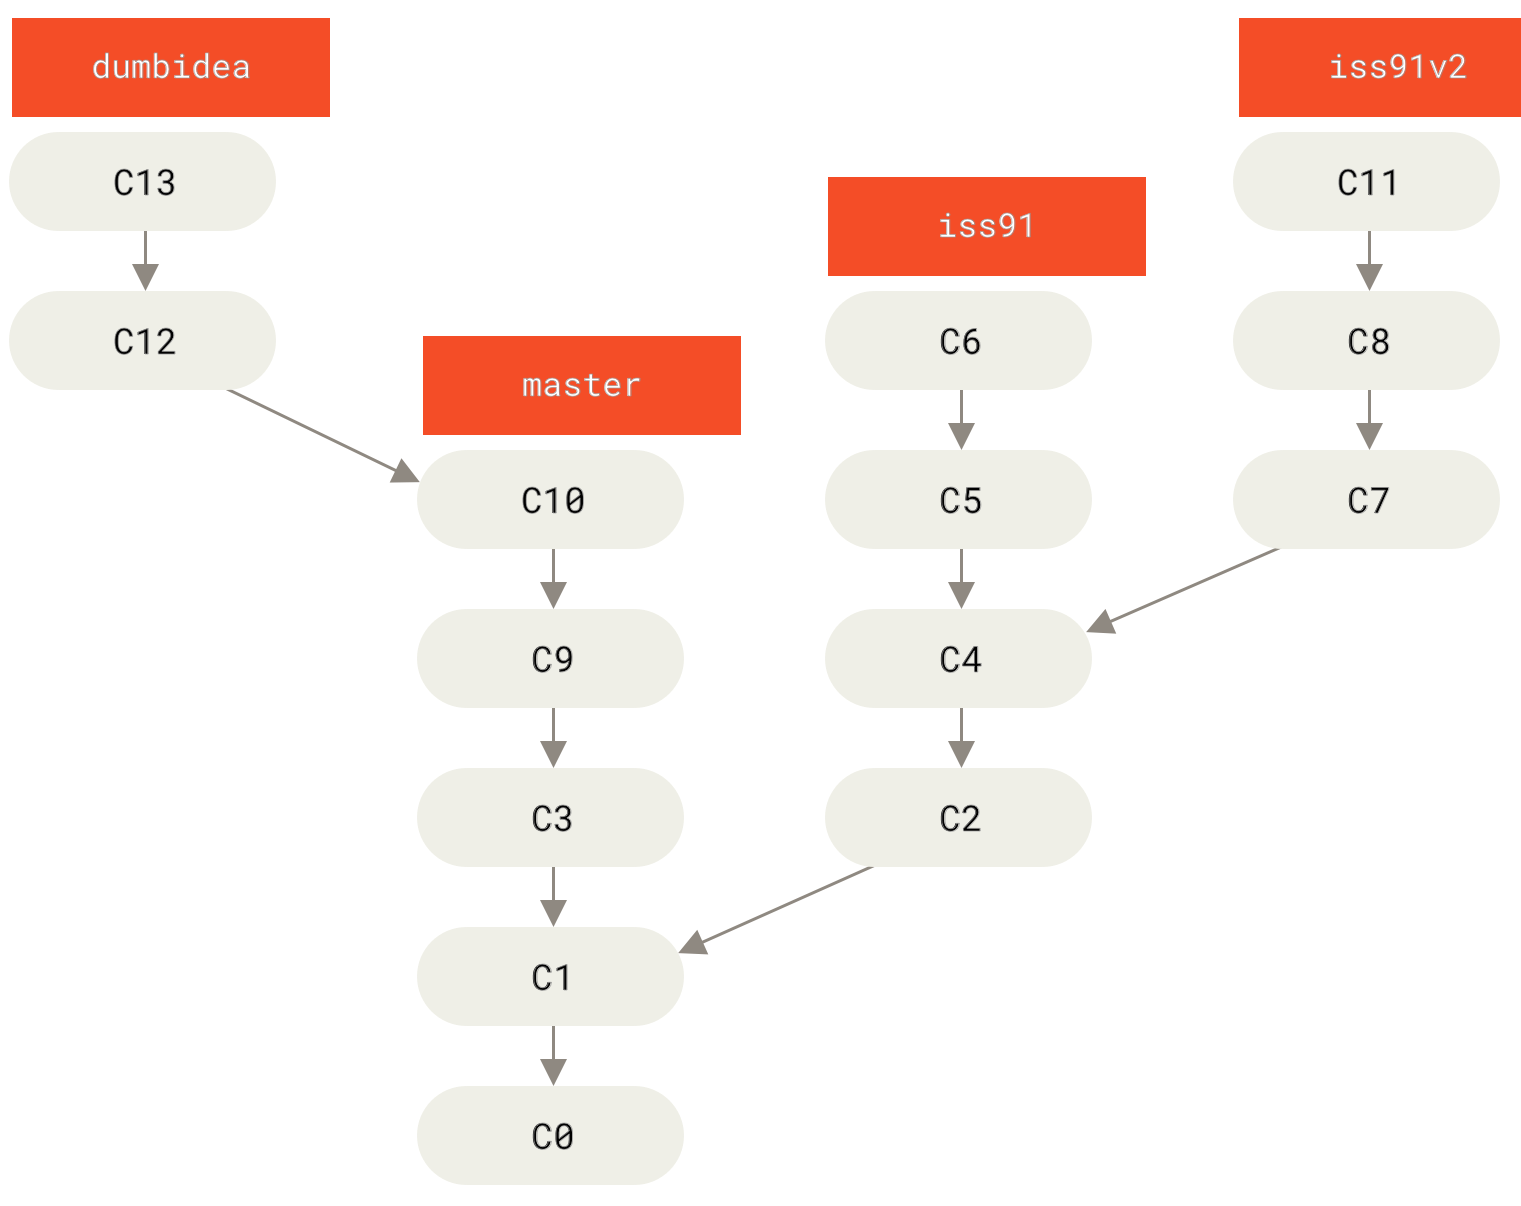
Ignore the iss91 branch and merge both dumbidea and iss91v2 into the master branch.
3.5 Remote Branches
3.5.1 Fetching
When you clone a repository from a server:
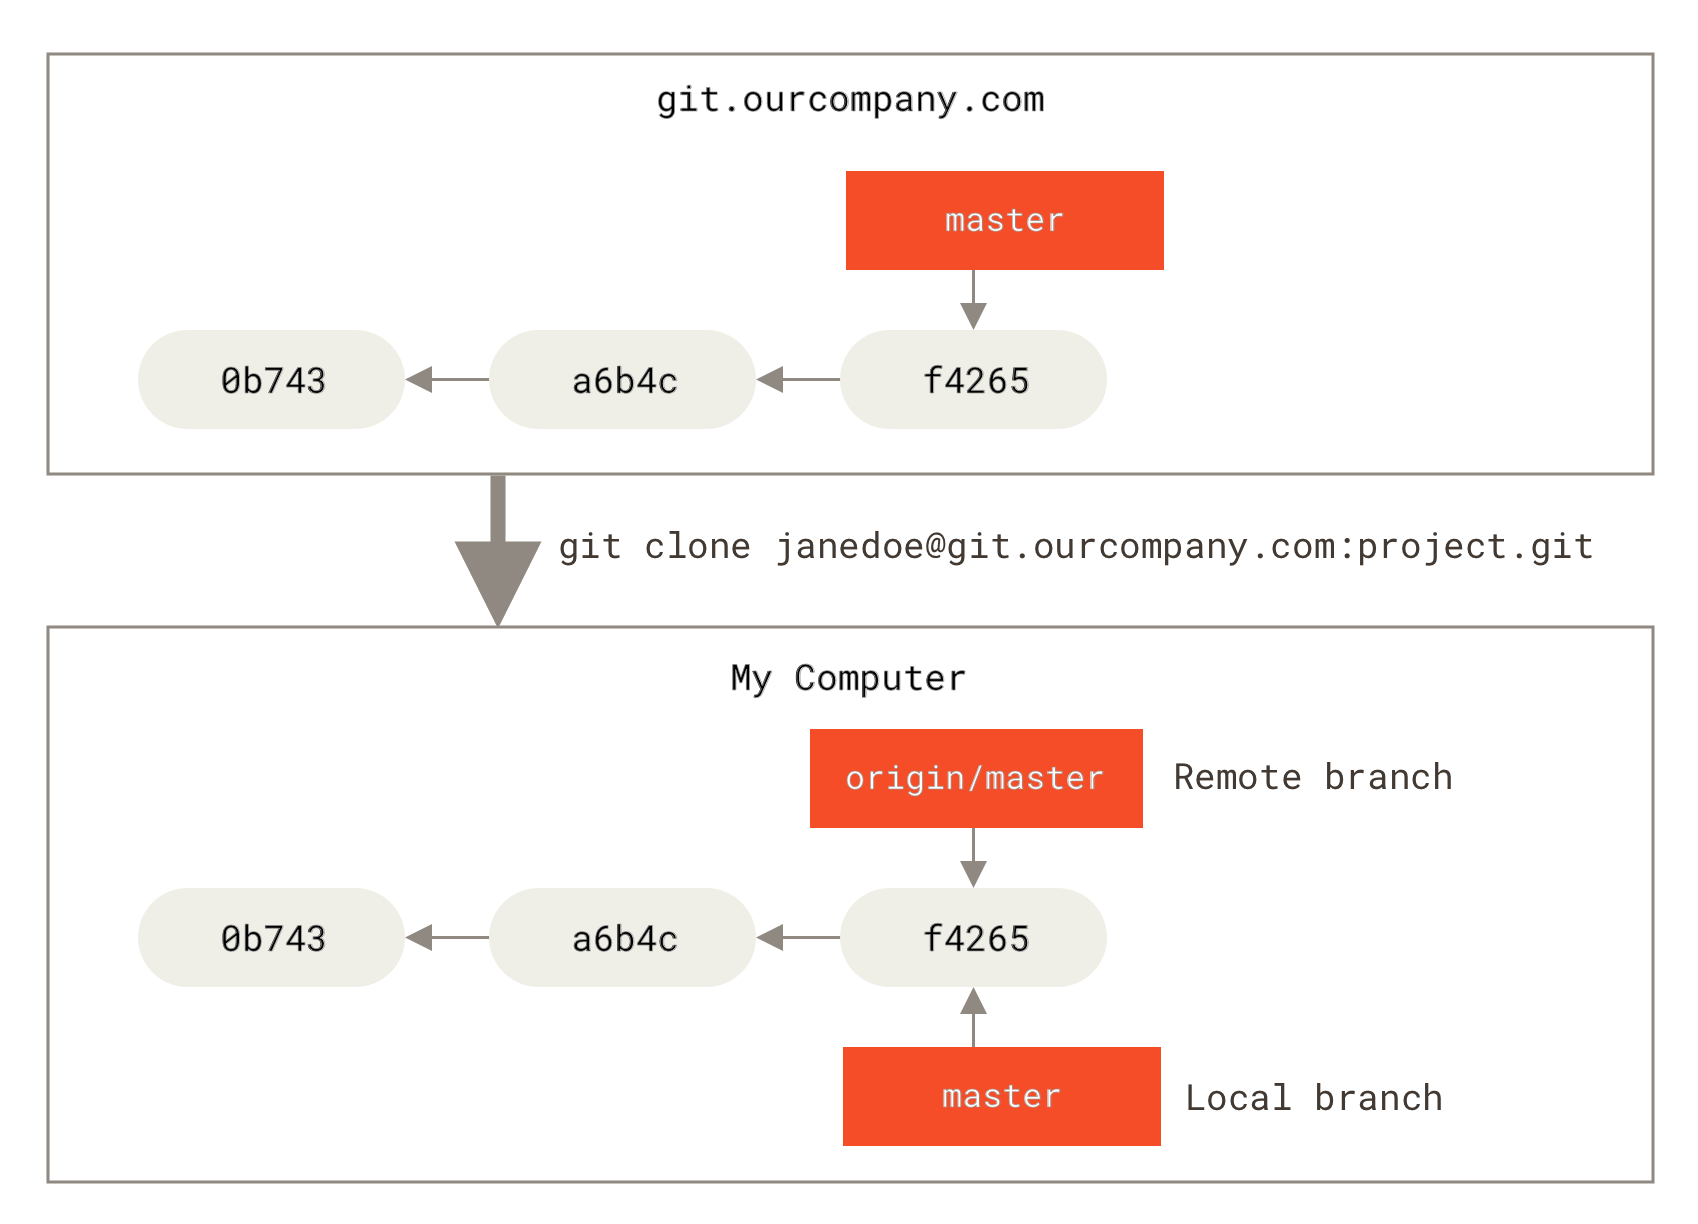
As long as you stay out of contact with your origin server, your origin/master pointer doesn’t move:
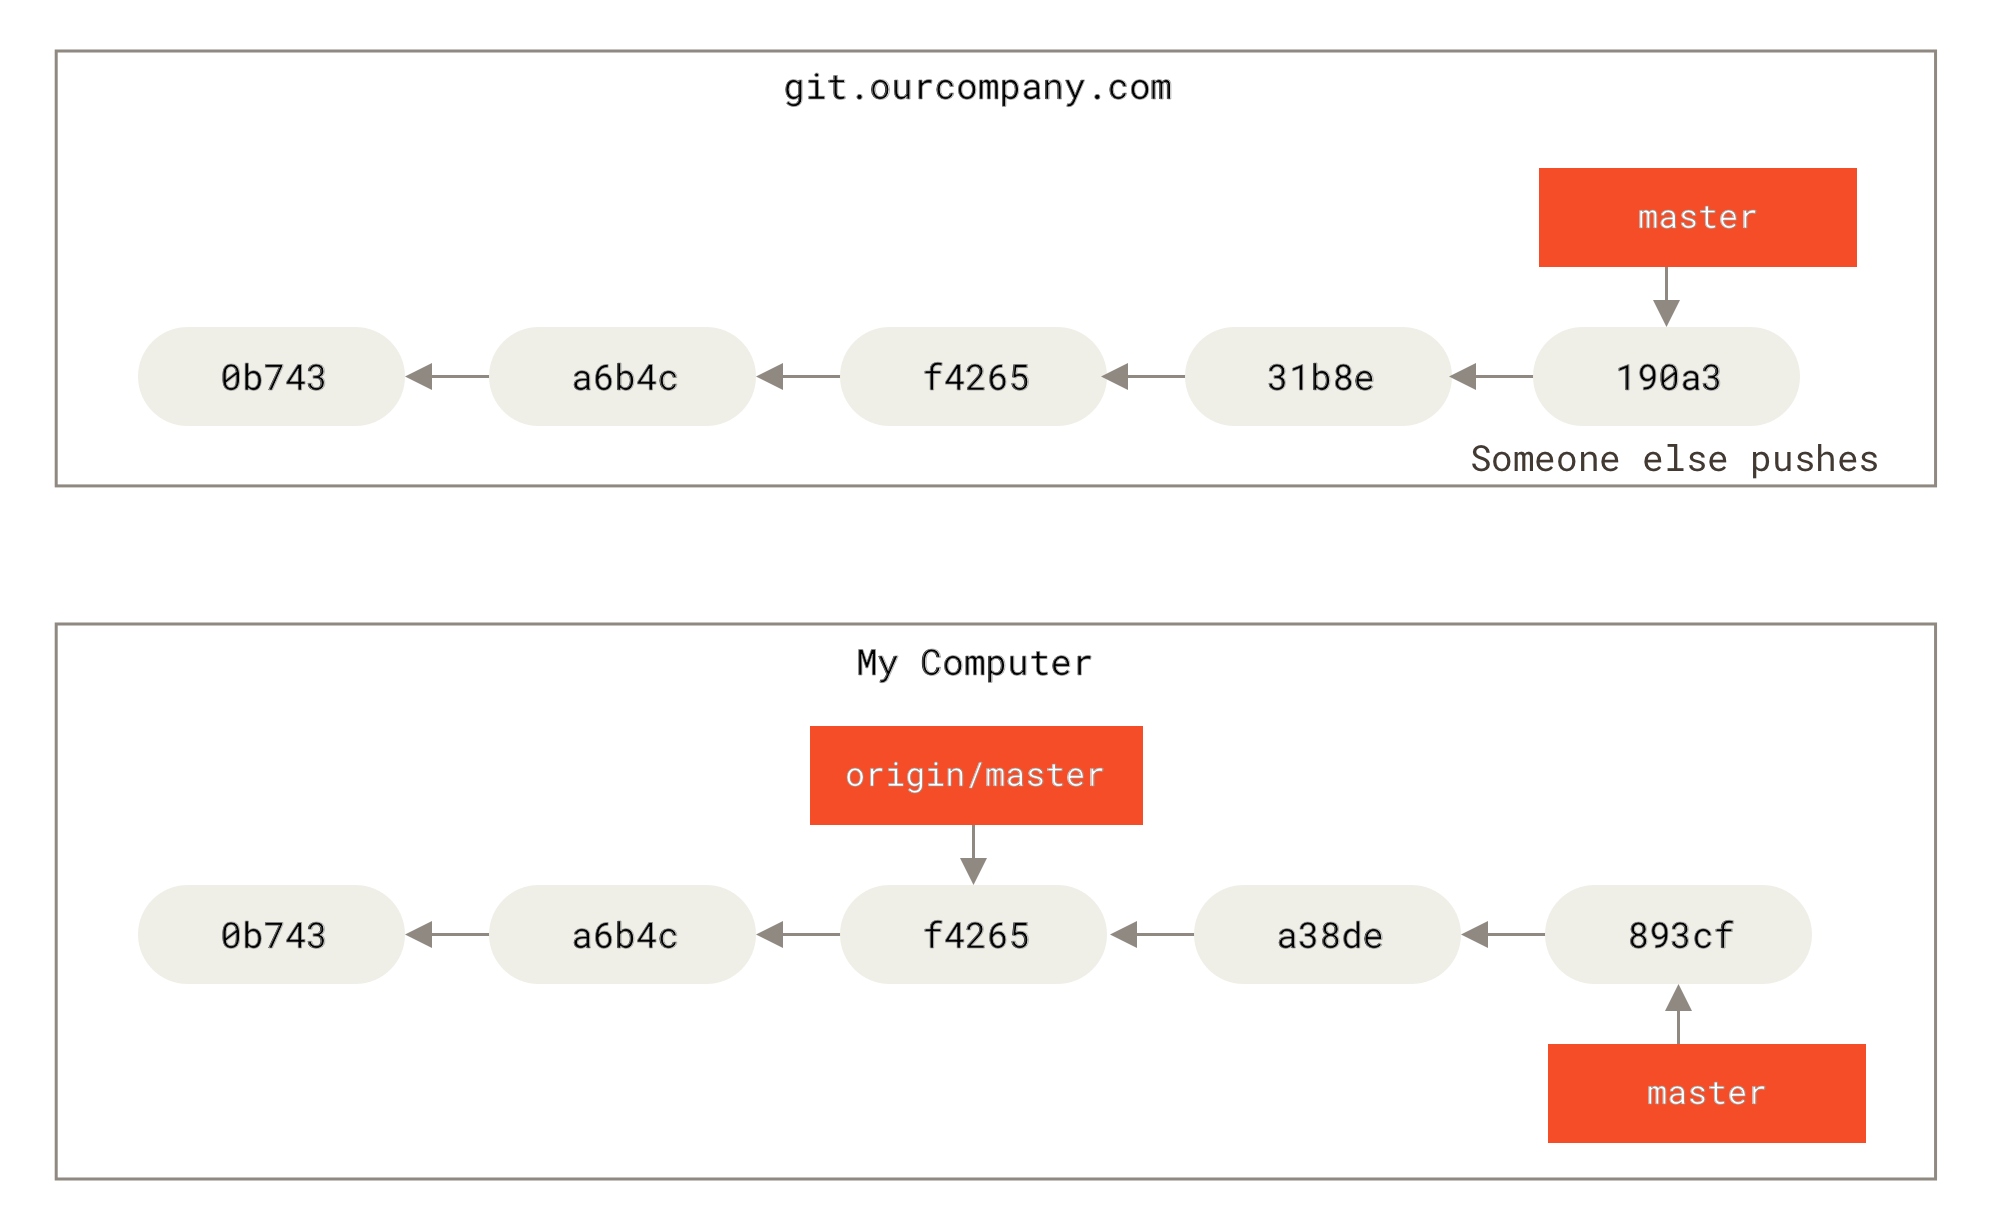
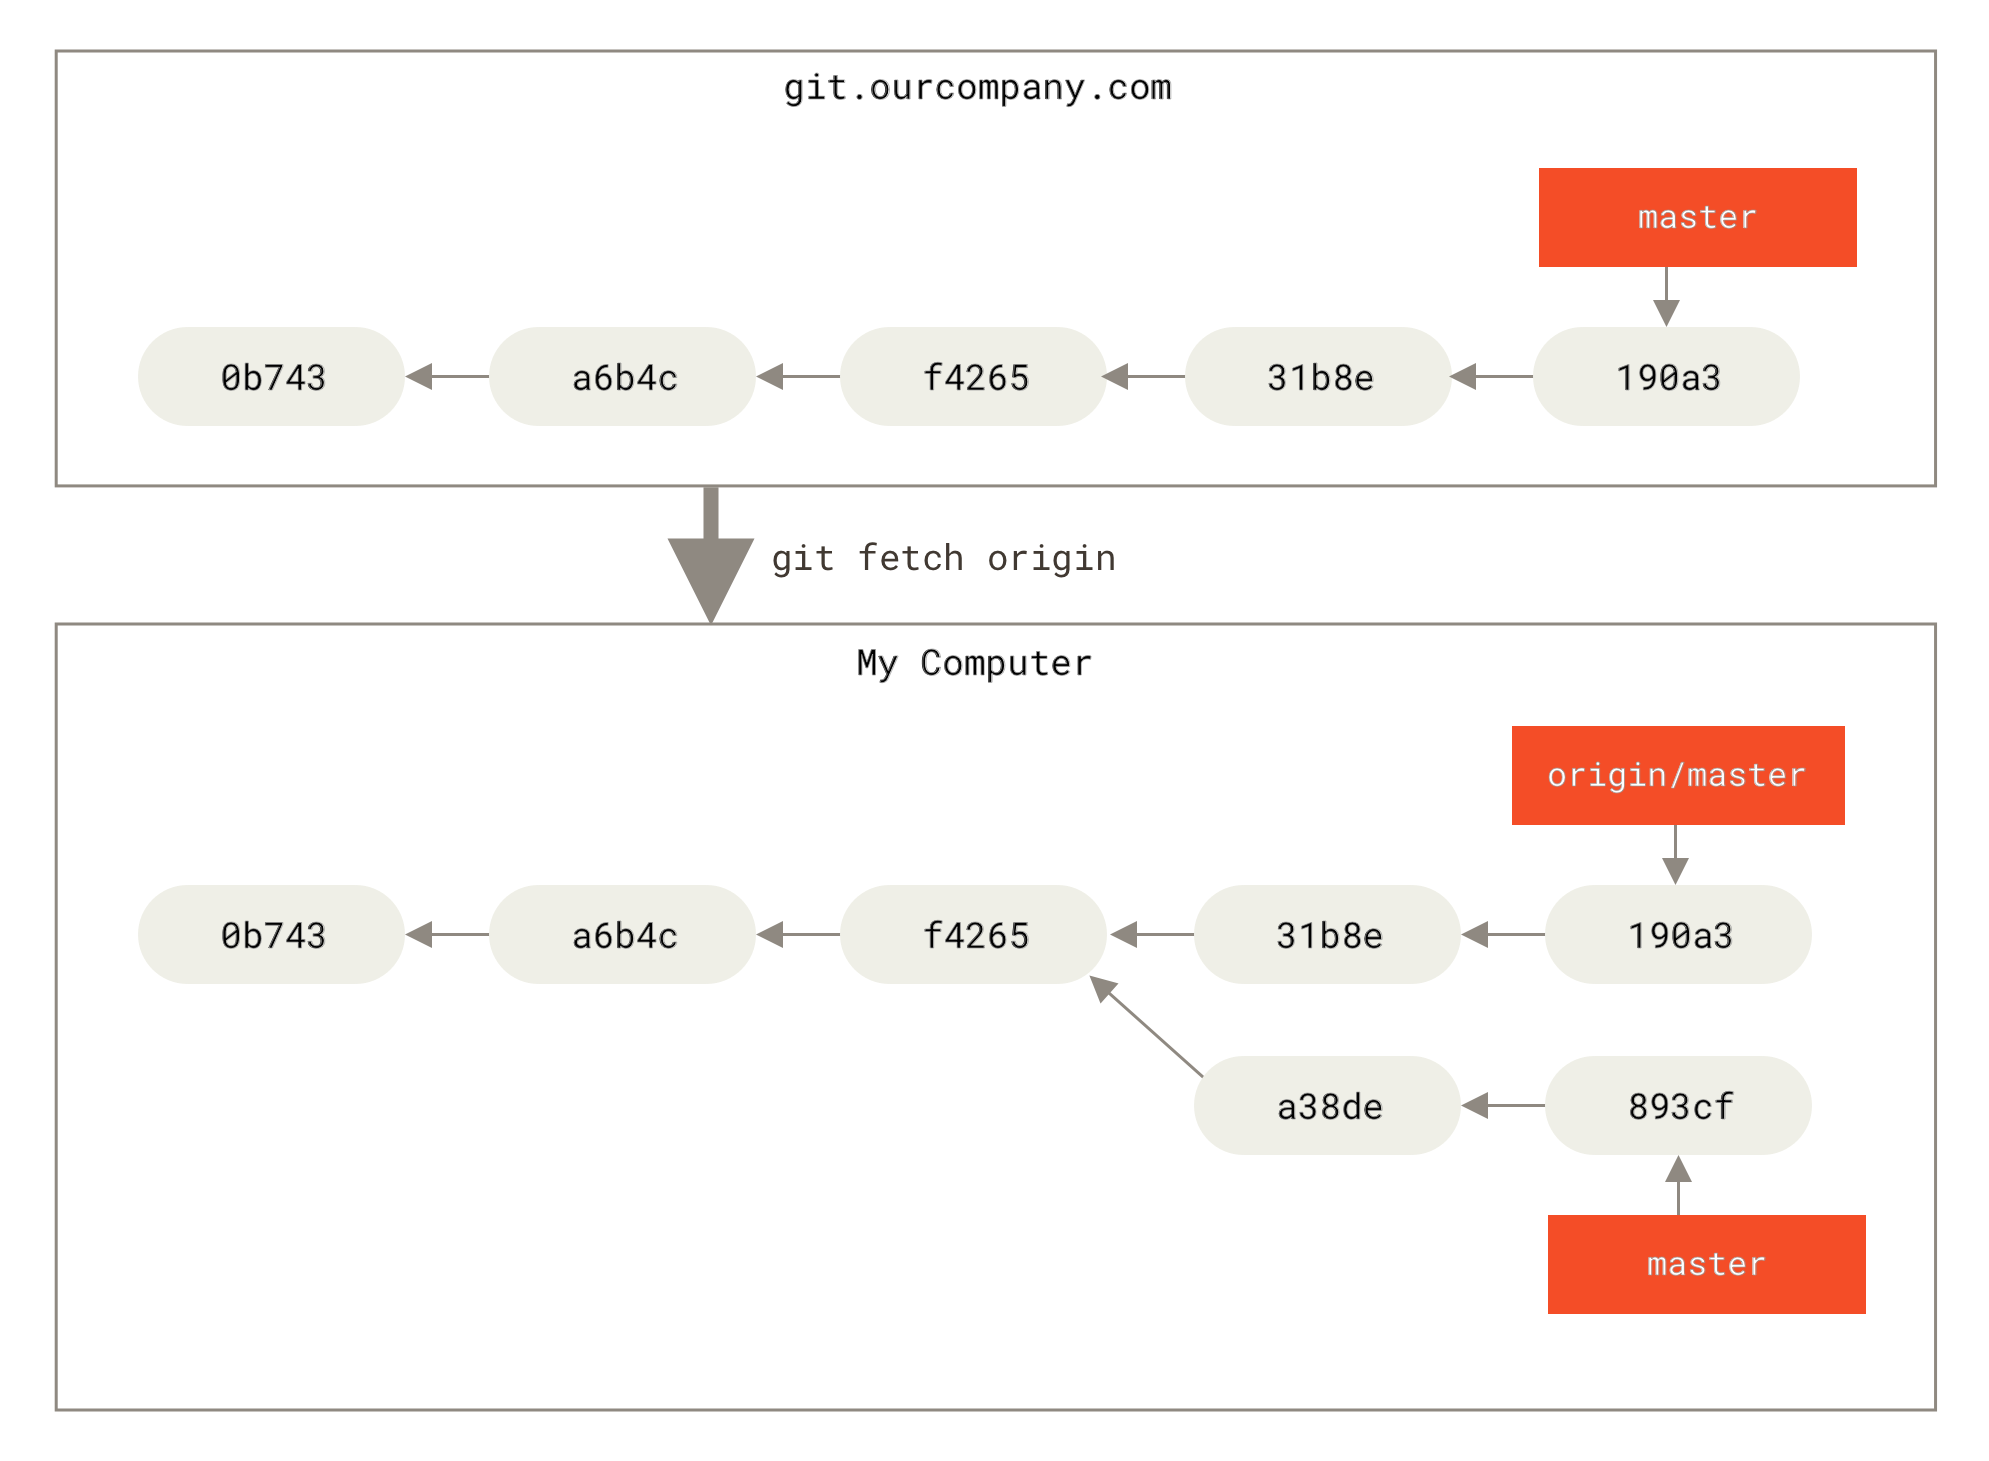
To synchronize your work with a given remote, you can run a git fetch <remote> command. This command looks up which server origin is, fetches any data from it that you don’t yet have, and updates your local database, moving your origin/master pointer to its new, more up-to-date position.
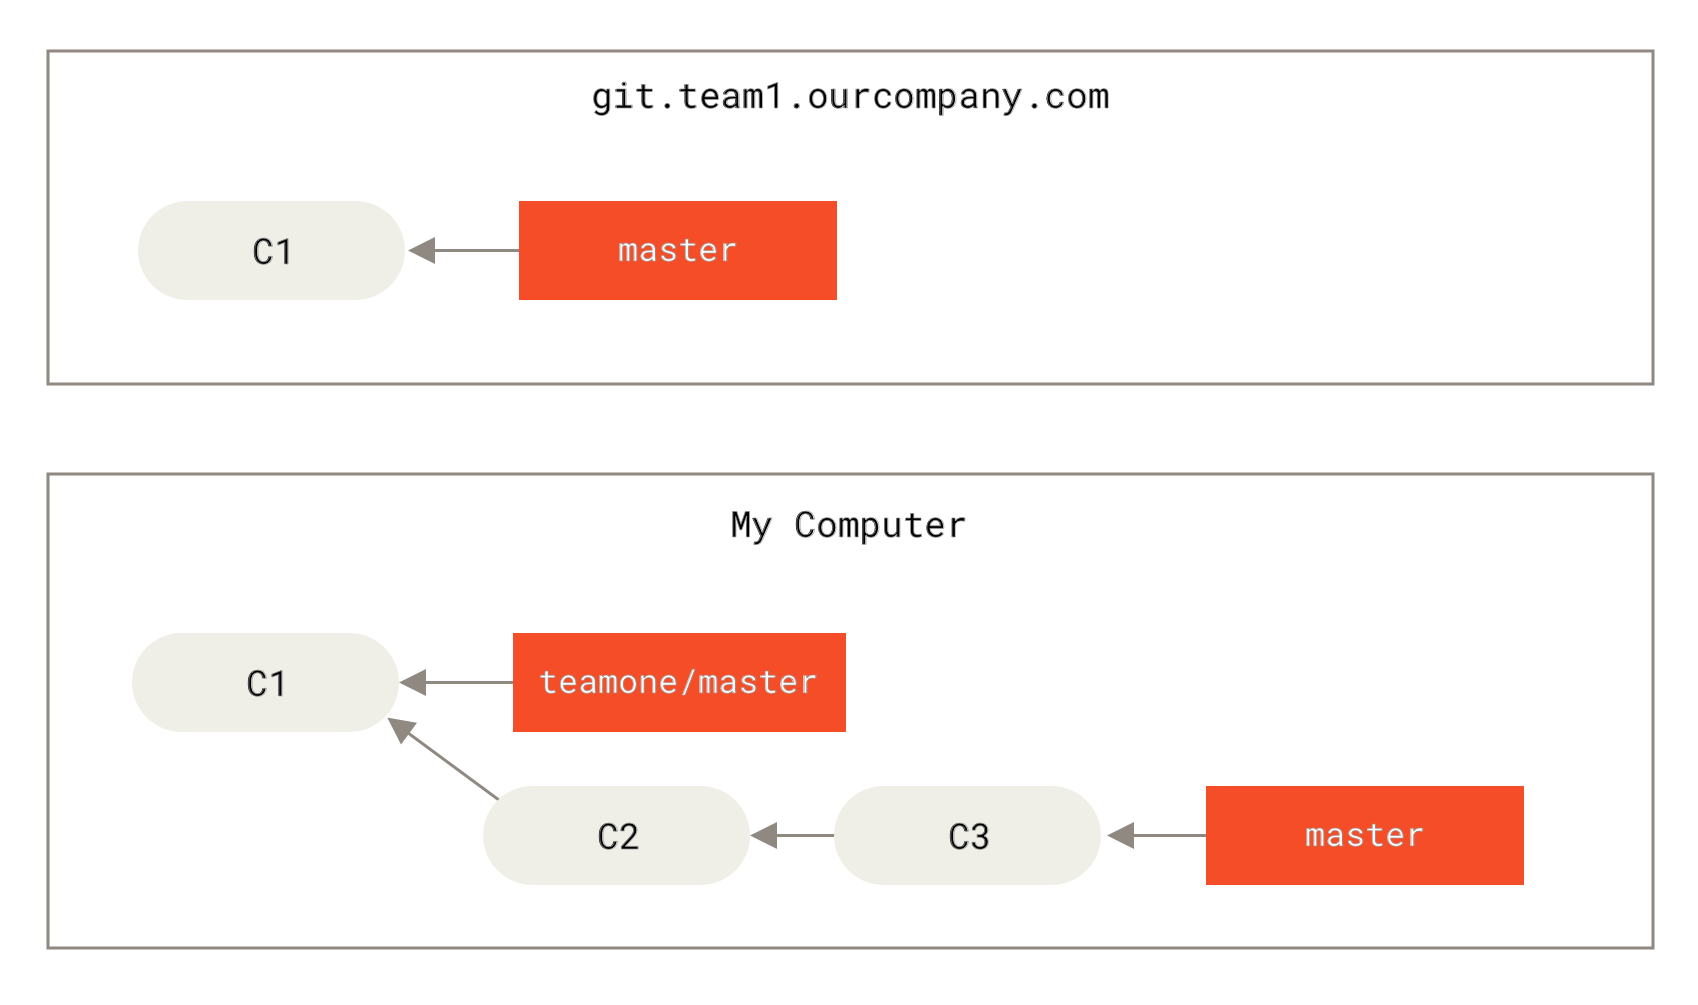
To demonstrate having multiple remote servers and what remote branches for those remote projects look like, here we can add a new remote server teamone.
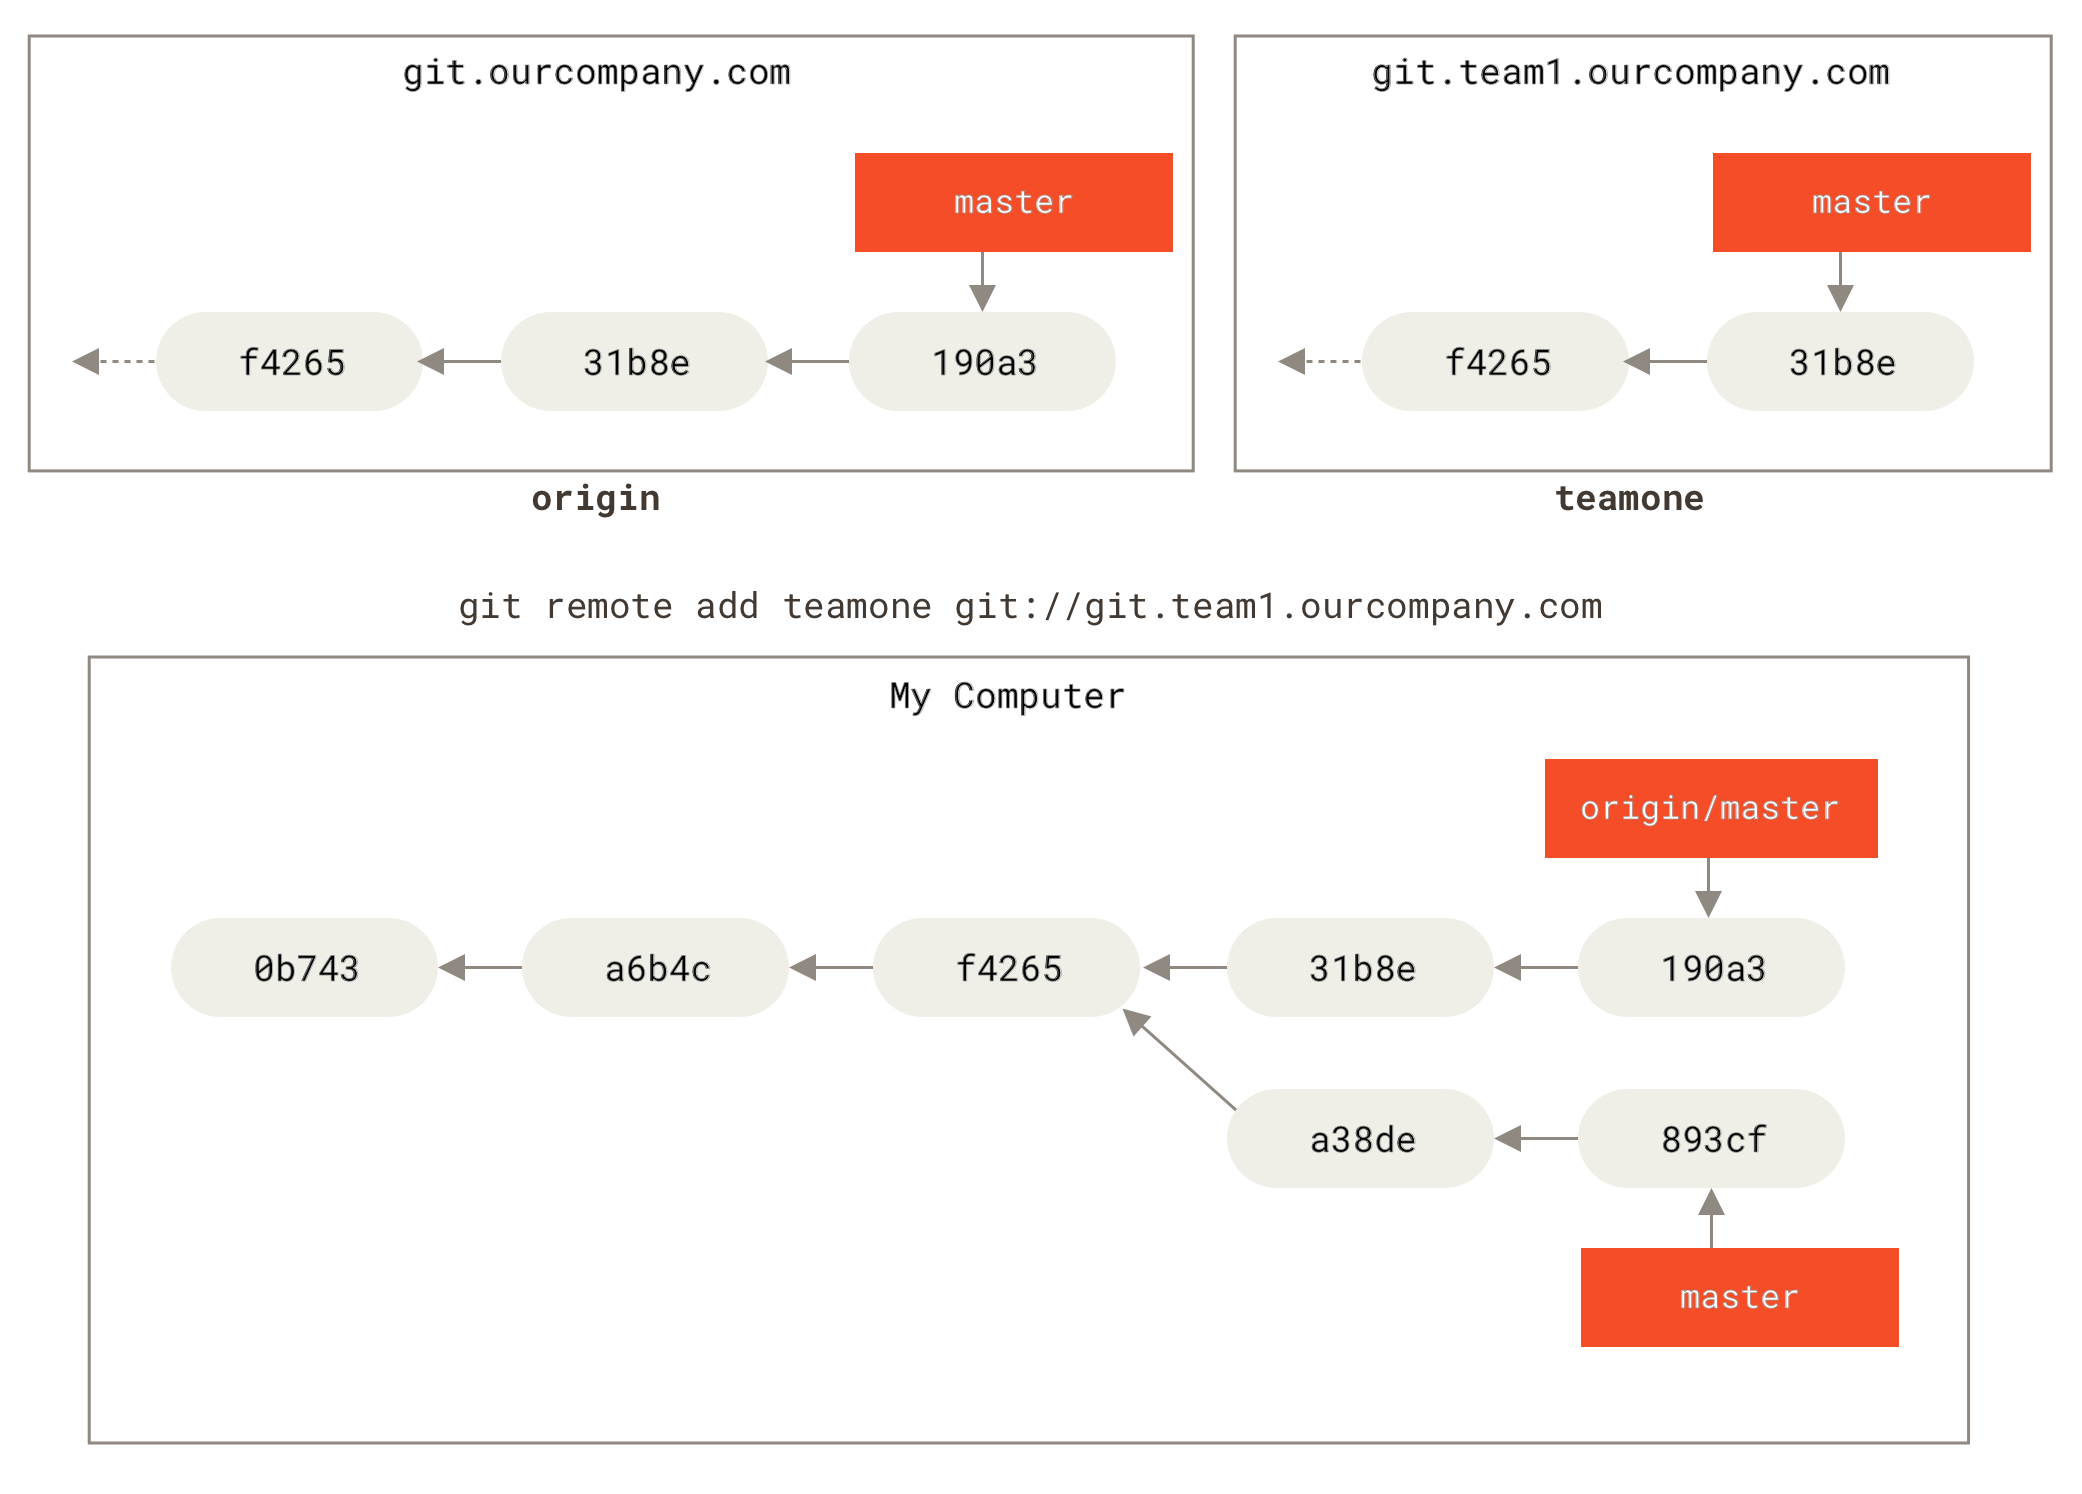
Now you can run git fetch teamone to fetch everything the remote teamone server has that you don’t have yet. Here Git fetches no data but sets a remote-tracking branch called teamone/master to point to the commit that teamone has its master branch.
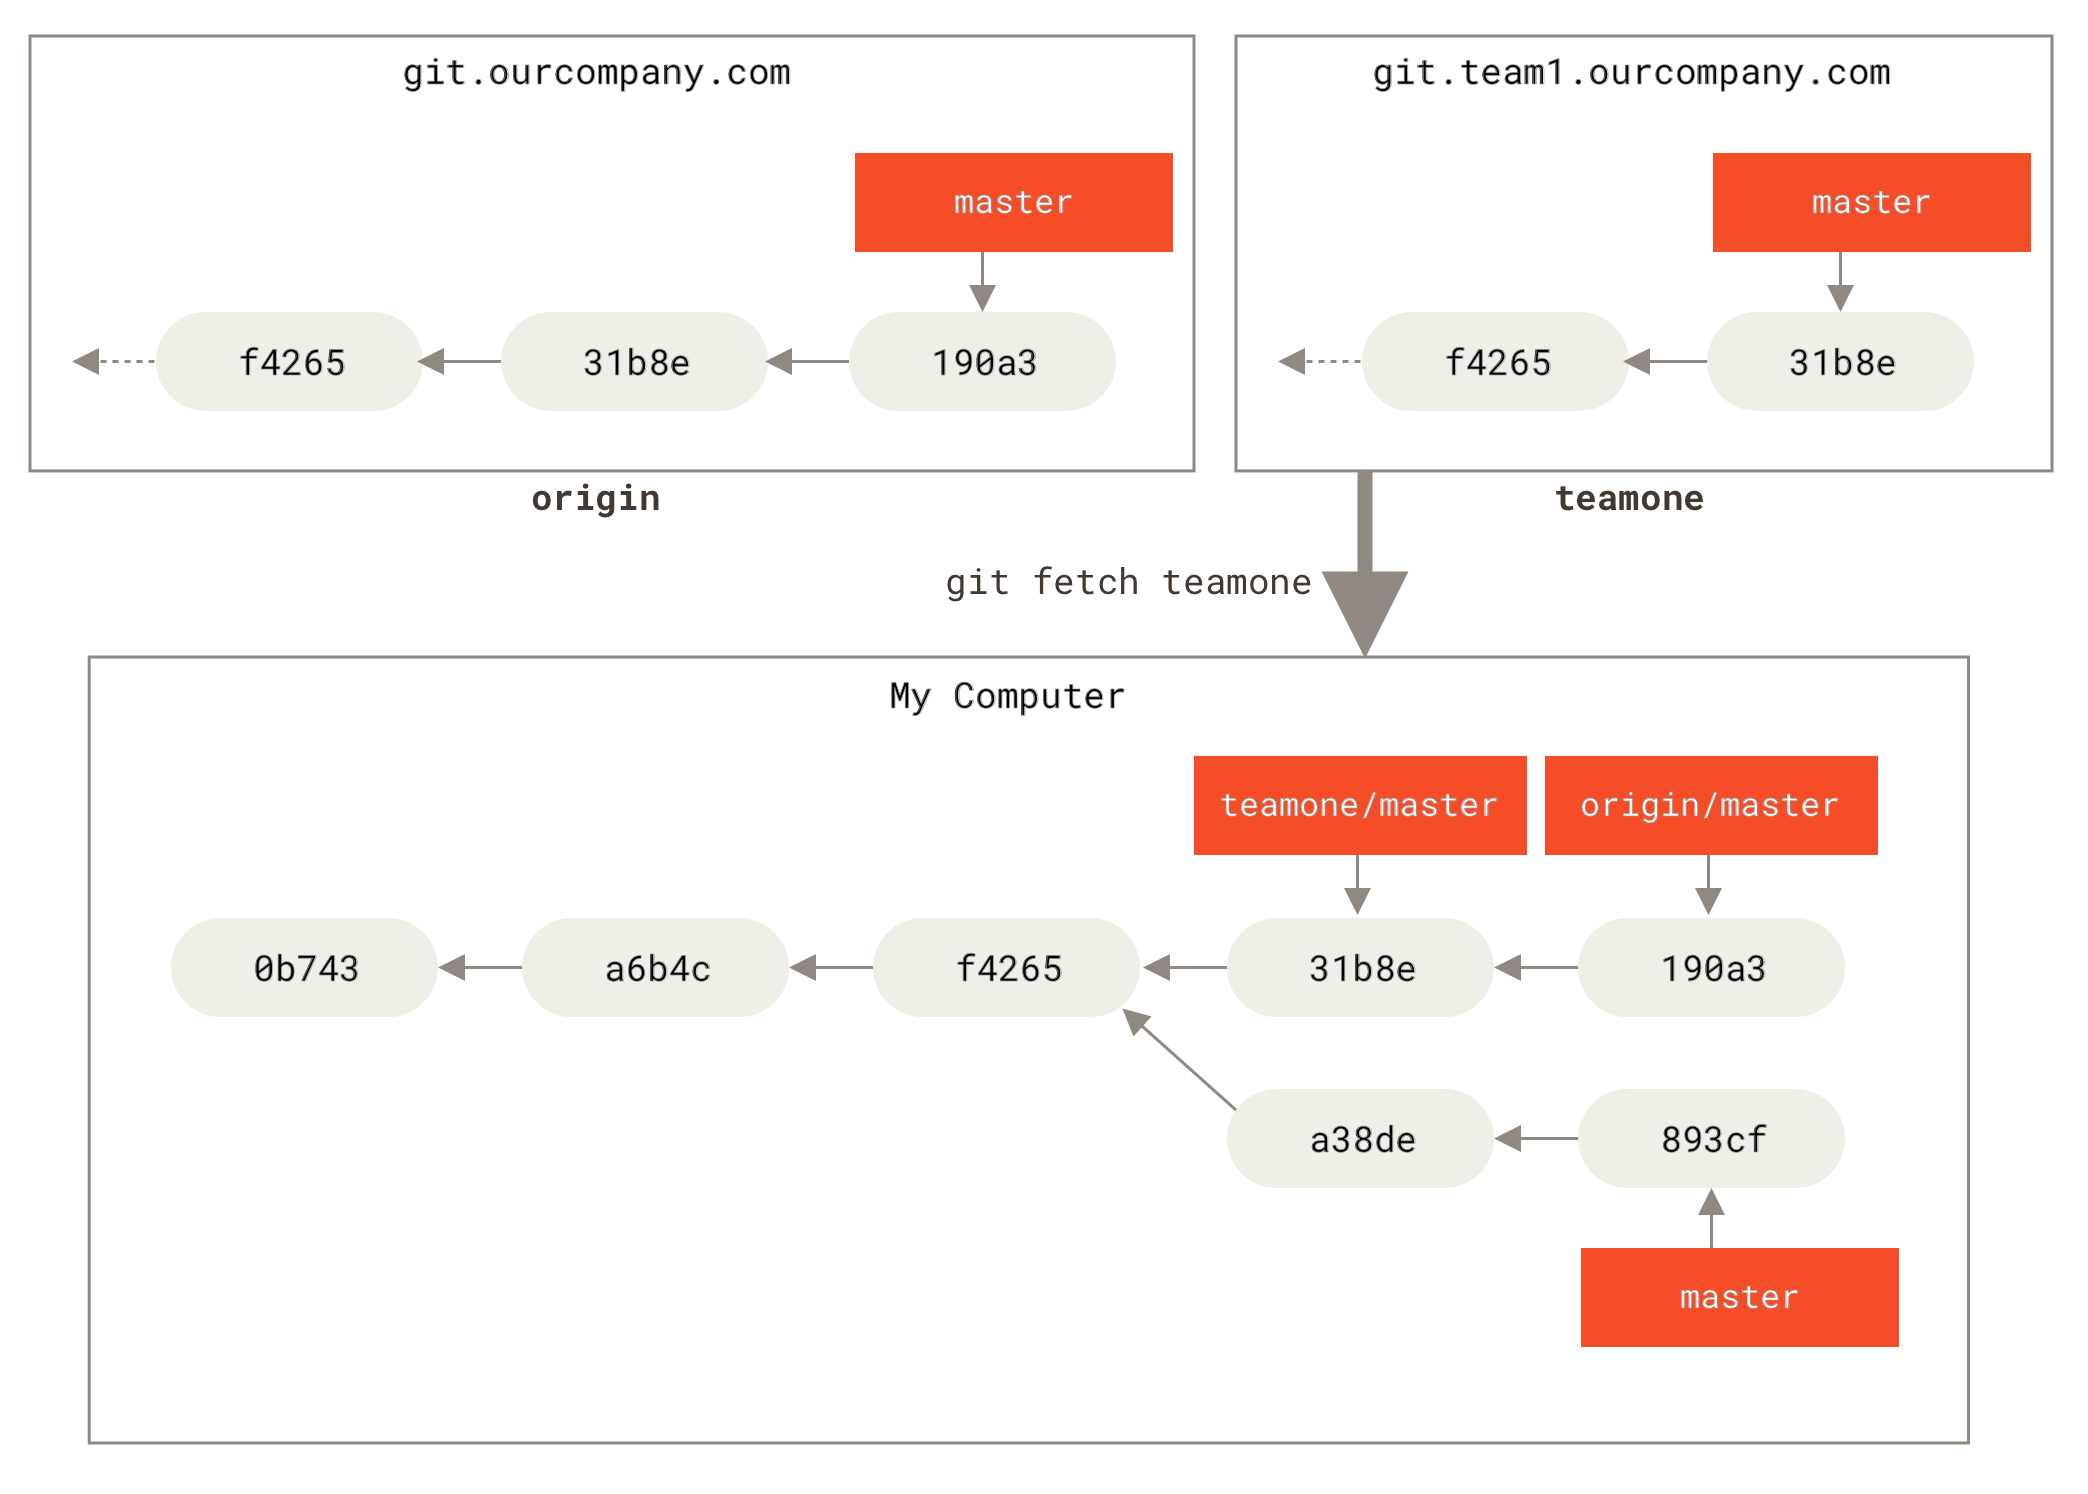
It’s important to note that when you do a fetch that brings down new remote-tracking branches, you don’t automatically have local, editable copies of them. In other words, in this case, you don’t have a new master branch — you have only an teamone/master pointer that you can’t modify.
3.5.2 Pushing
1 | git push <remote> <branch> |
To merge this work into your current working branch, you can run git merge origin/serverfix. If you want your own local branch of the remote master branch that you can work on, you can base it off your remote-tracking branch:
1 | git checkout -b serverfix origin/serverfix |
3.5.3 Tracking branches
Checking out a local branch from a remote-tracking branch automatically creates what is called a “tracking branch” (and the branch it tracks is called an “upstream branch”).
1 | to change the upstream branch you're tracking, you can use `-u` or `--set-upstream-to` option to `git branch` |
To see what tracking branches you have set up, use -vv option to git branch command.
1 | git branch -vv |
3.5.4 Pulling
Generally it’s better to simply use the fetch and merge commands explicitly as the magic of git pull can often be confusing.
3.5.5 Deleting remote branches
You can delete a remote branch using the --delete option to git push.
1 | git push origin --delete serverfix |
3.6 Rebasing
3.6.1 The basic rebase
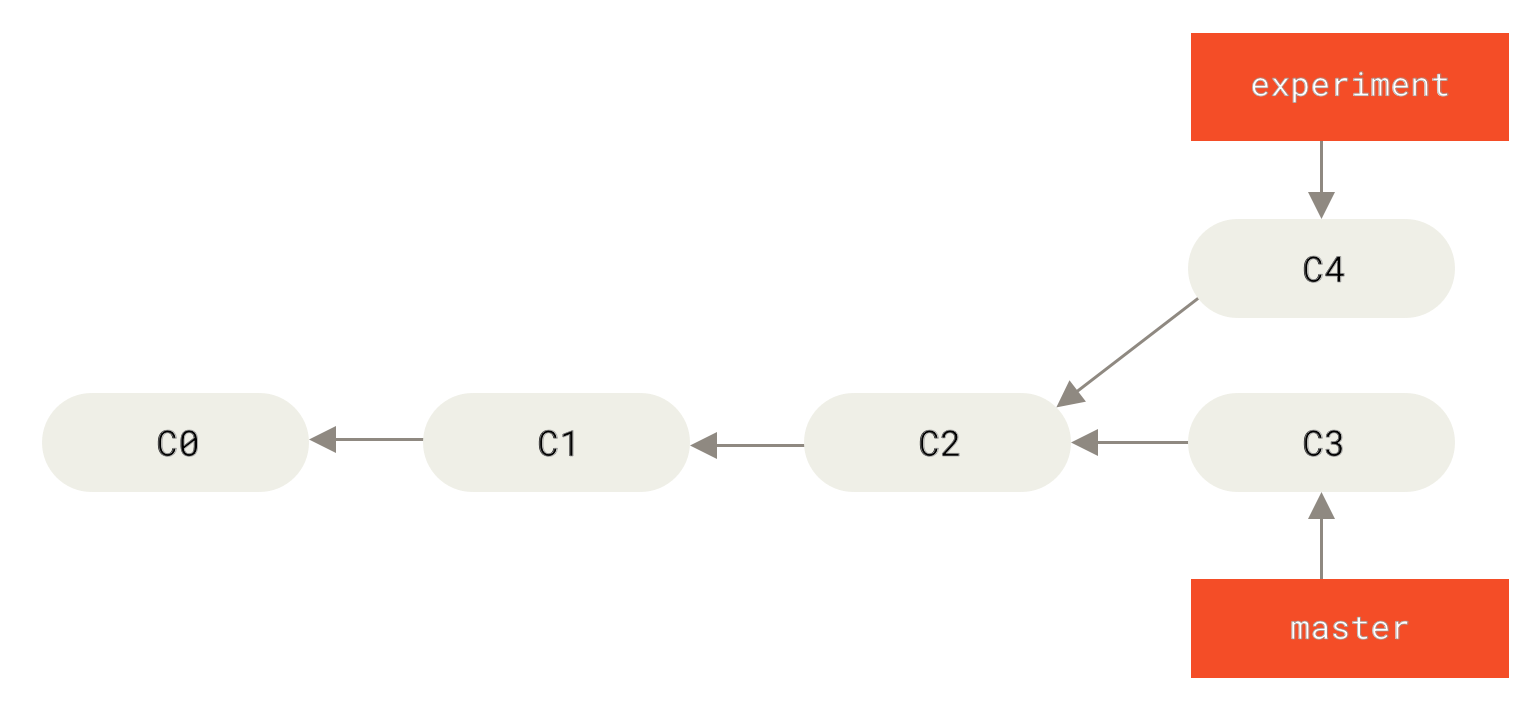
For three-way merging:
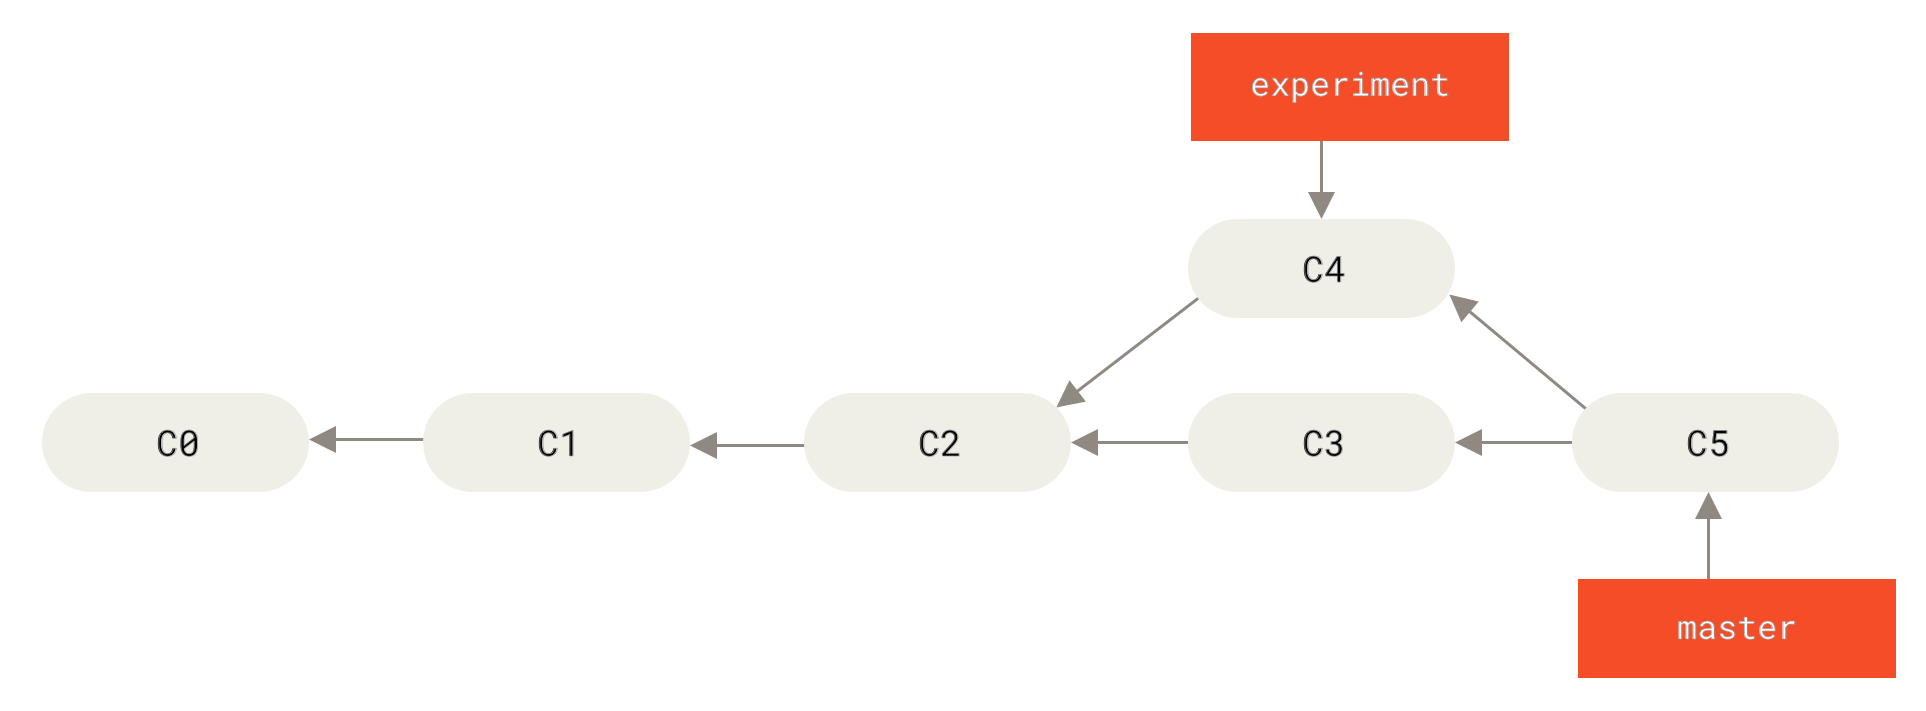
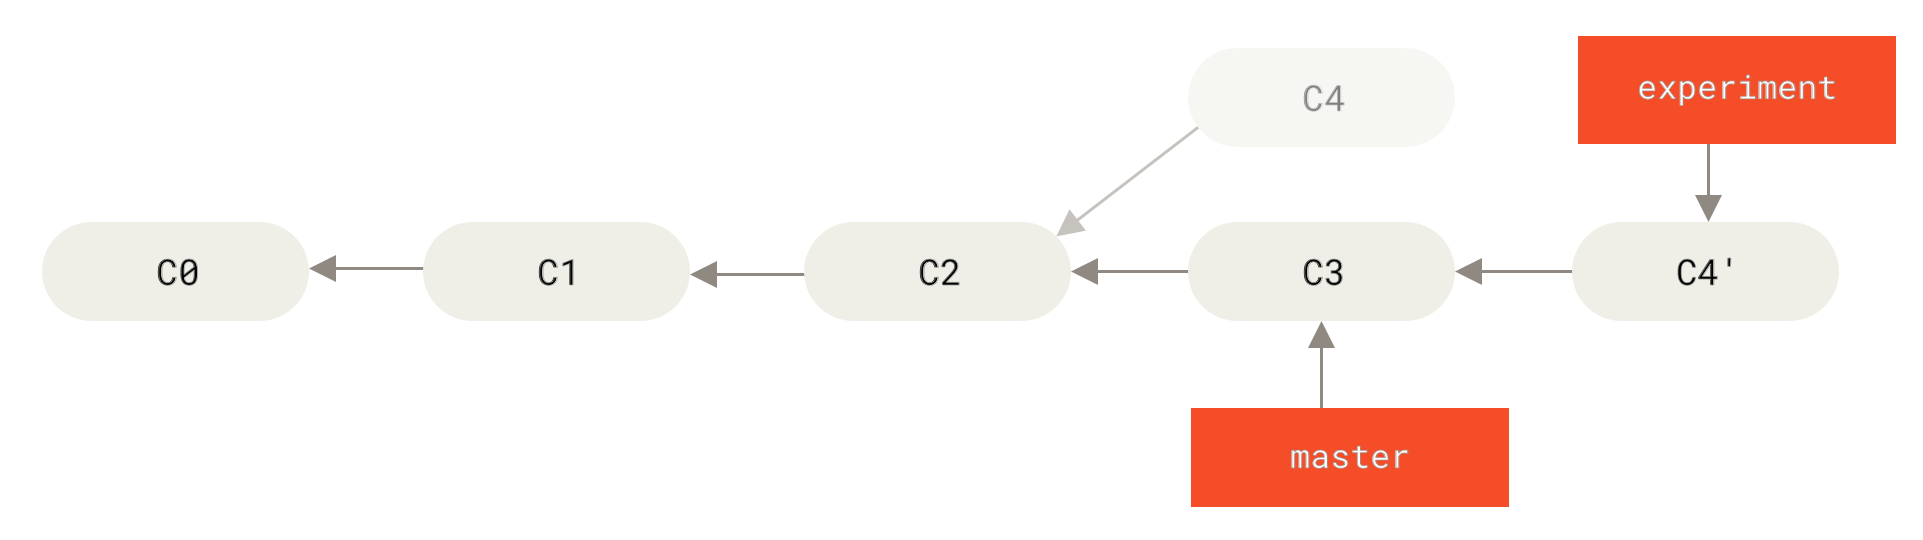
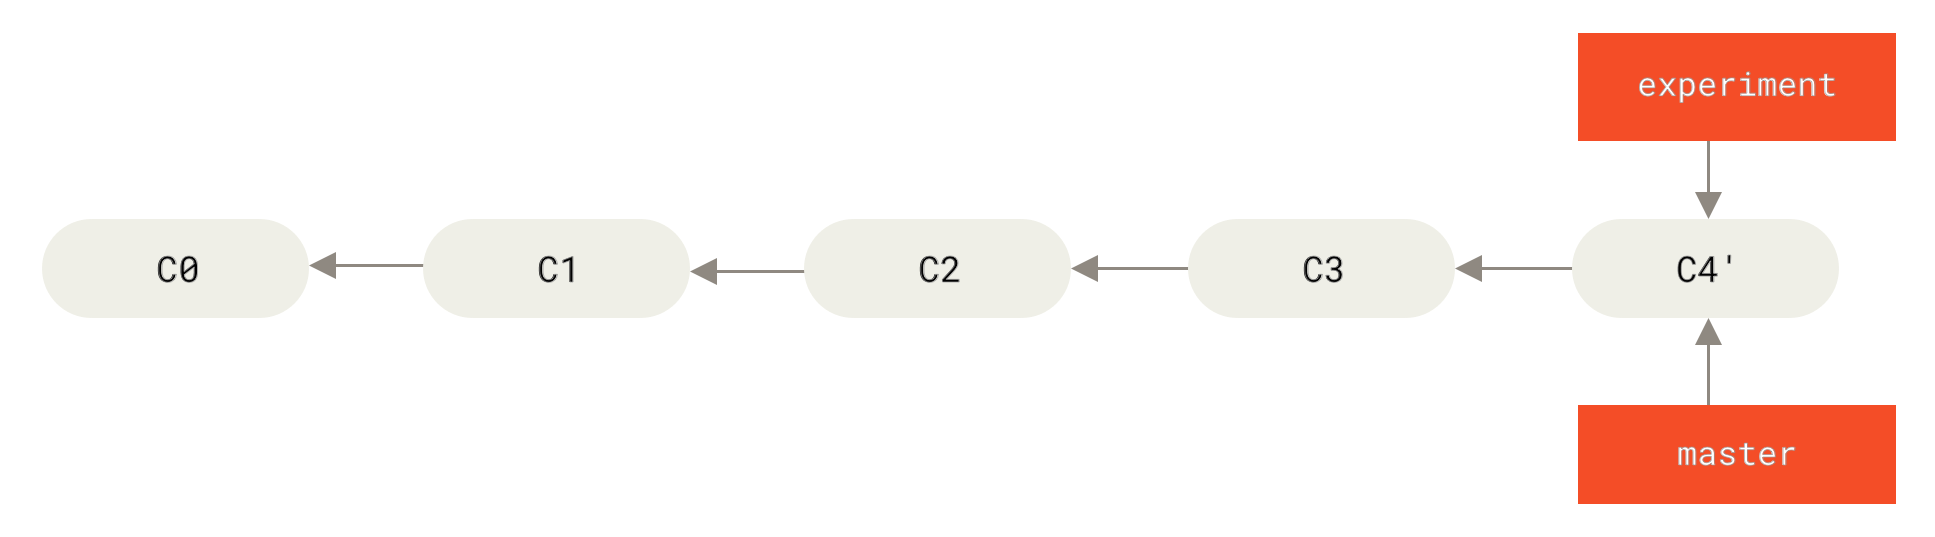
However, there is another way: you can take the patch of the change that was introduced in C4 and reapply it on top of C3. In Git, this is called rebasing. With rebase command, you can take all the changes that were committed on one branch and replay them on a different branch.
1 | check out the `experiment` branch, and then rebase it onto the `master` branch |
This operation works by going to the common ancestor of the two branches (the one you’re on and the one you’re rebasing onto), getting the diff introduced by each commit of the branch you’re on, saving those diffs to temporary files, resetting the current branch to the same commit as the branch you are rebasing onto, and finally applying each change in turn.
Do a fast-forward merge
3.6.2 More interesting rebases
Suppose you have a commit history like this:
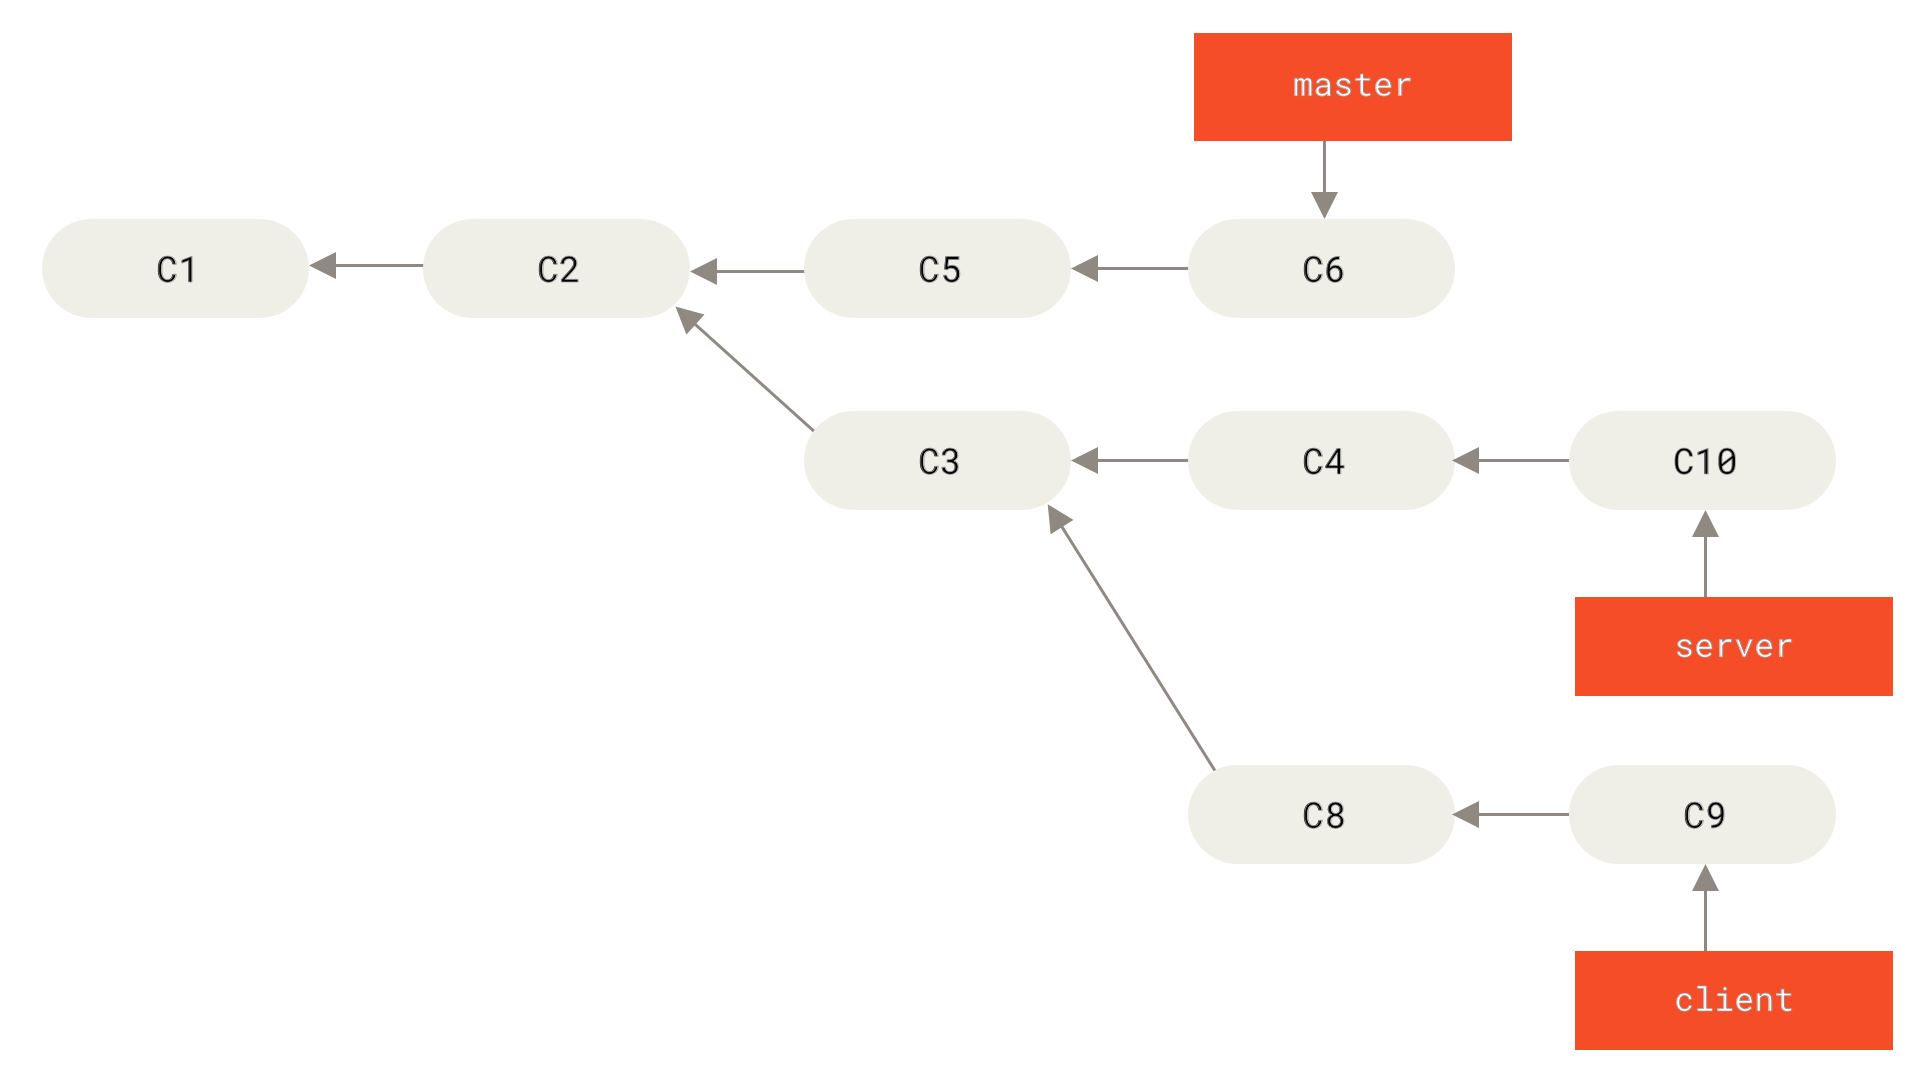
You want to merge your client-side changes into your mainline for a release, but you want to hold off on the server-side changes until it’s tested further. You can take the changes on client that aren’t on server(C8 and C9) and replay them on your master branch by using --onto option of git rebase
1 | git rebase --onto master server client |
This basically says, “Take the client branch, figure out the patches since it diverged from the server branch, and replay these patches in the client branch as if it was directly off the master branch instead.”
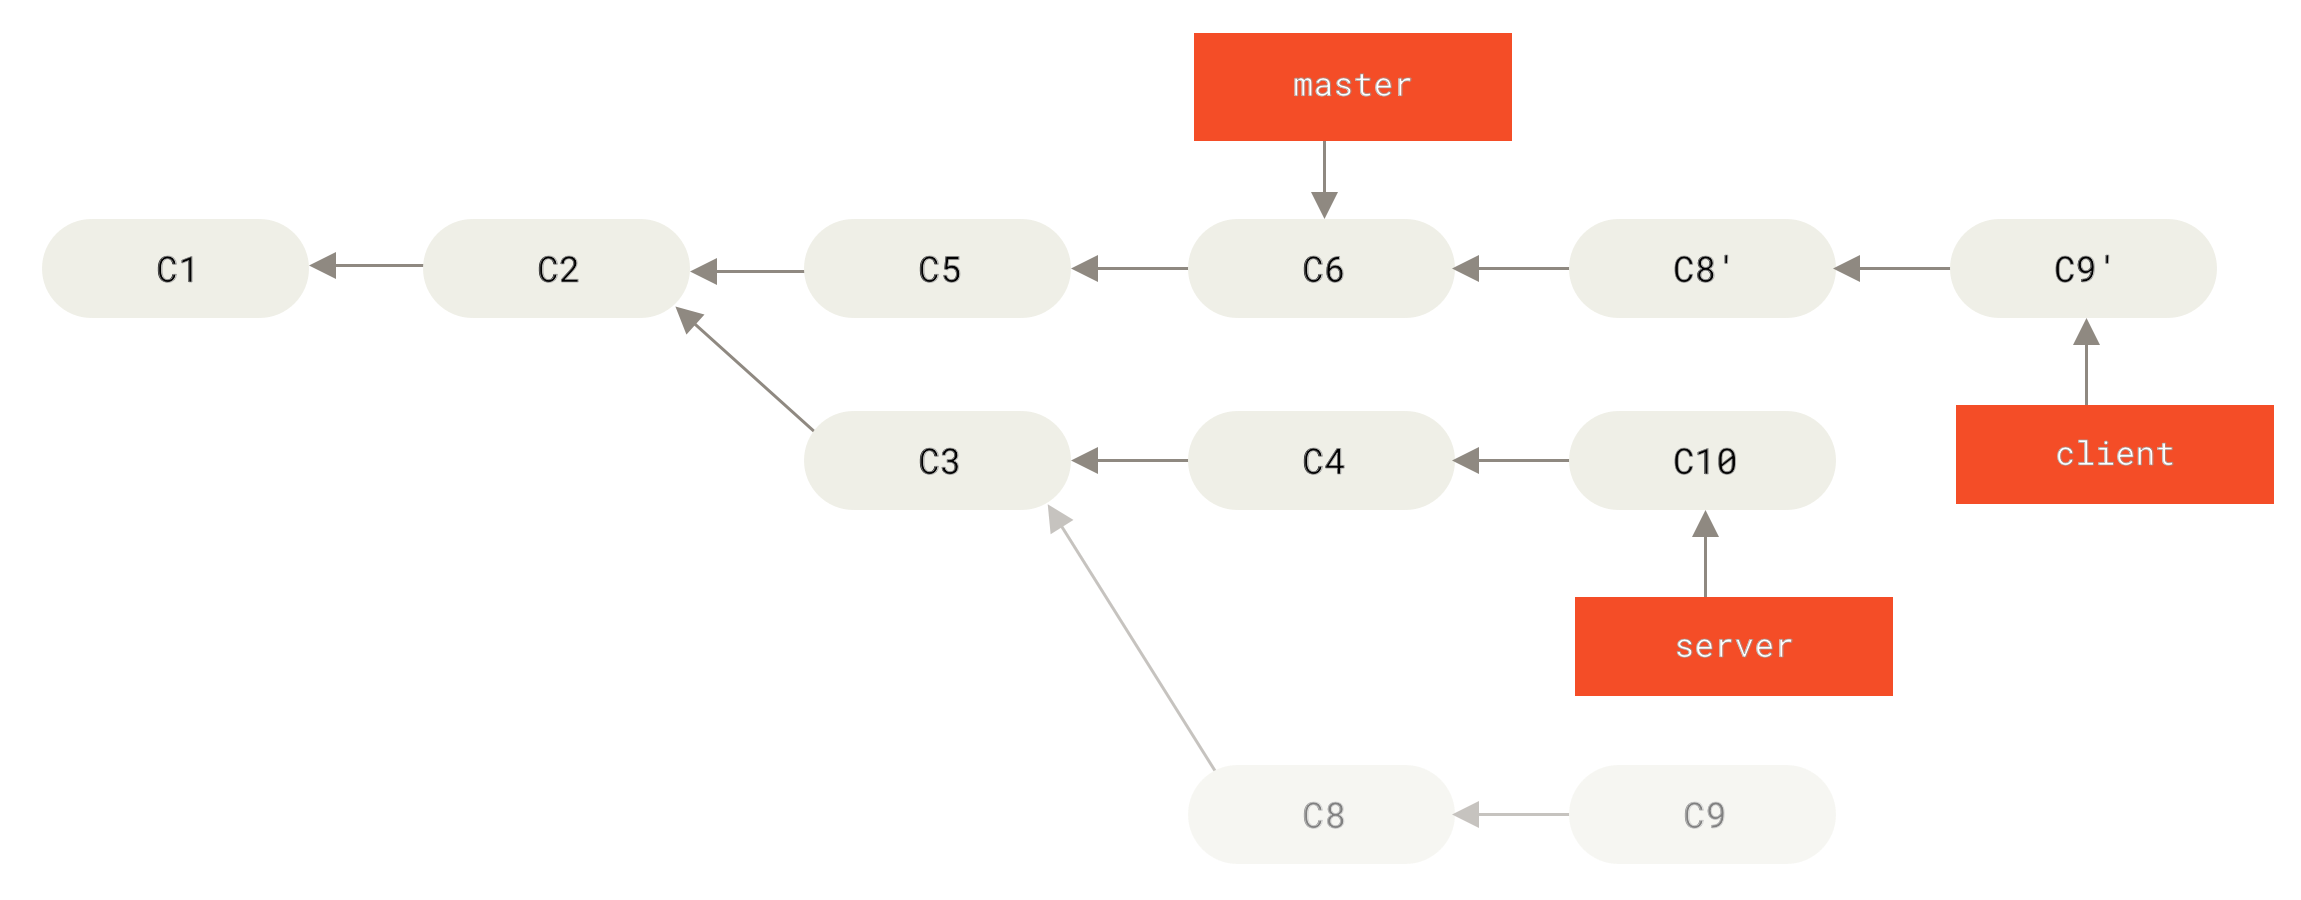
1 | Do a Fast-forward Merge |
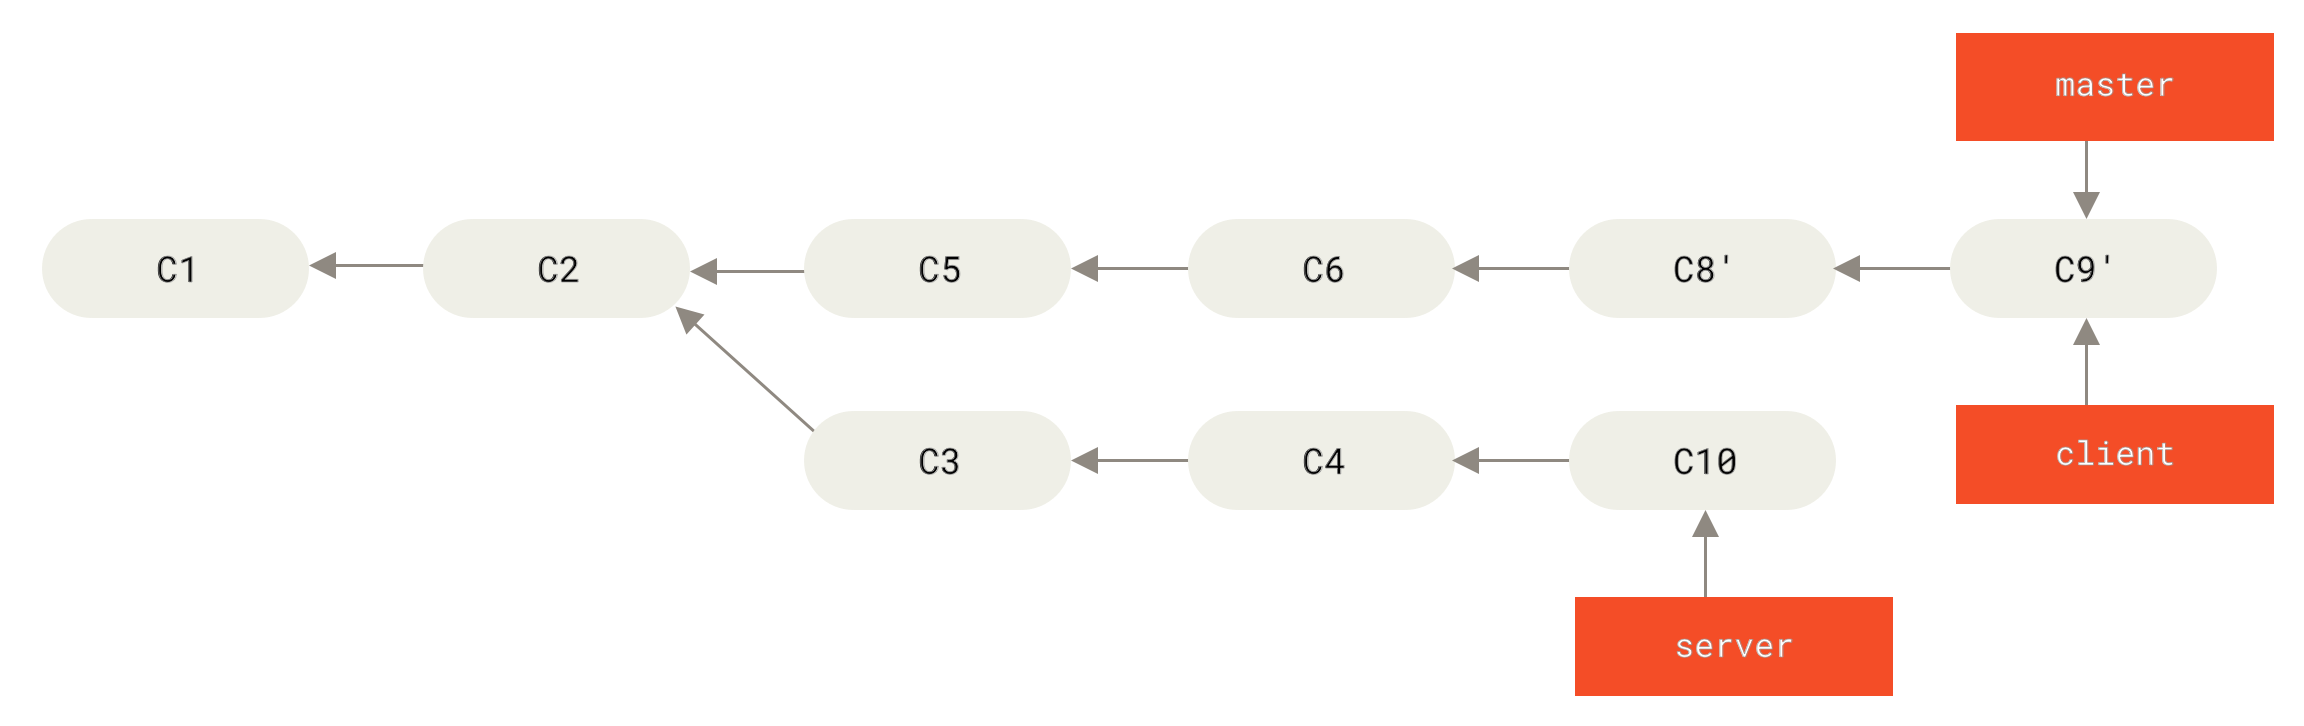
Now you want to pull in your server branch as well. You can rebase the server onto the master branch without having to check it out first by running git rebase <basebranch> <topicbranch> – which checks out the topic branch for you and replays it onto the base branch.
1 | git rebase master server |

1 | Do a Fast-forward Merge |

3.6.3 The perils of rebasing
Do not rebase commits that exist outside your repository and people may have based work on them.
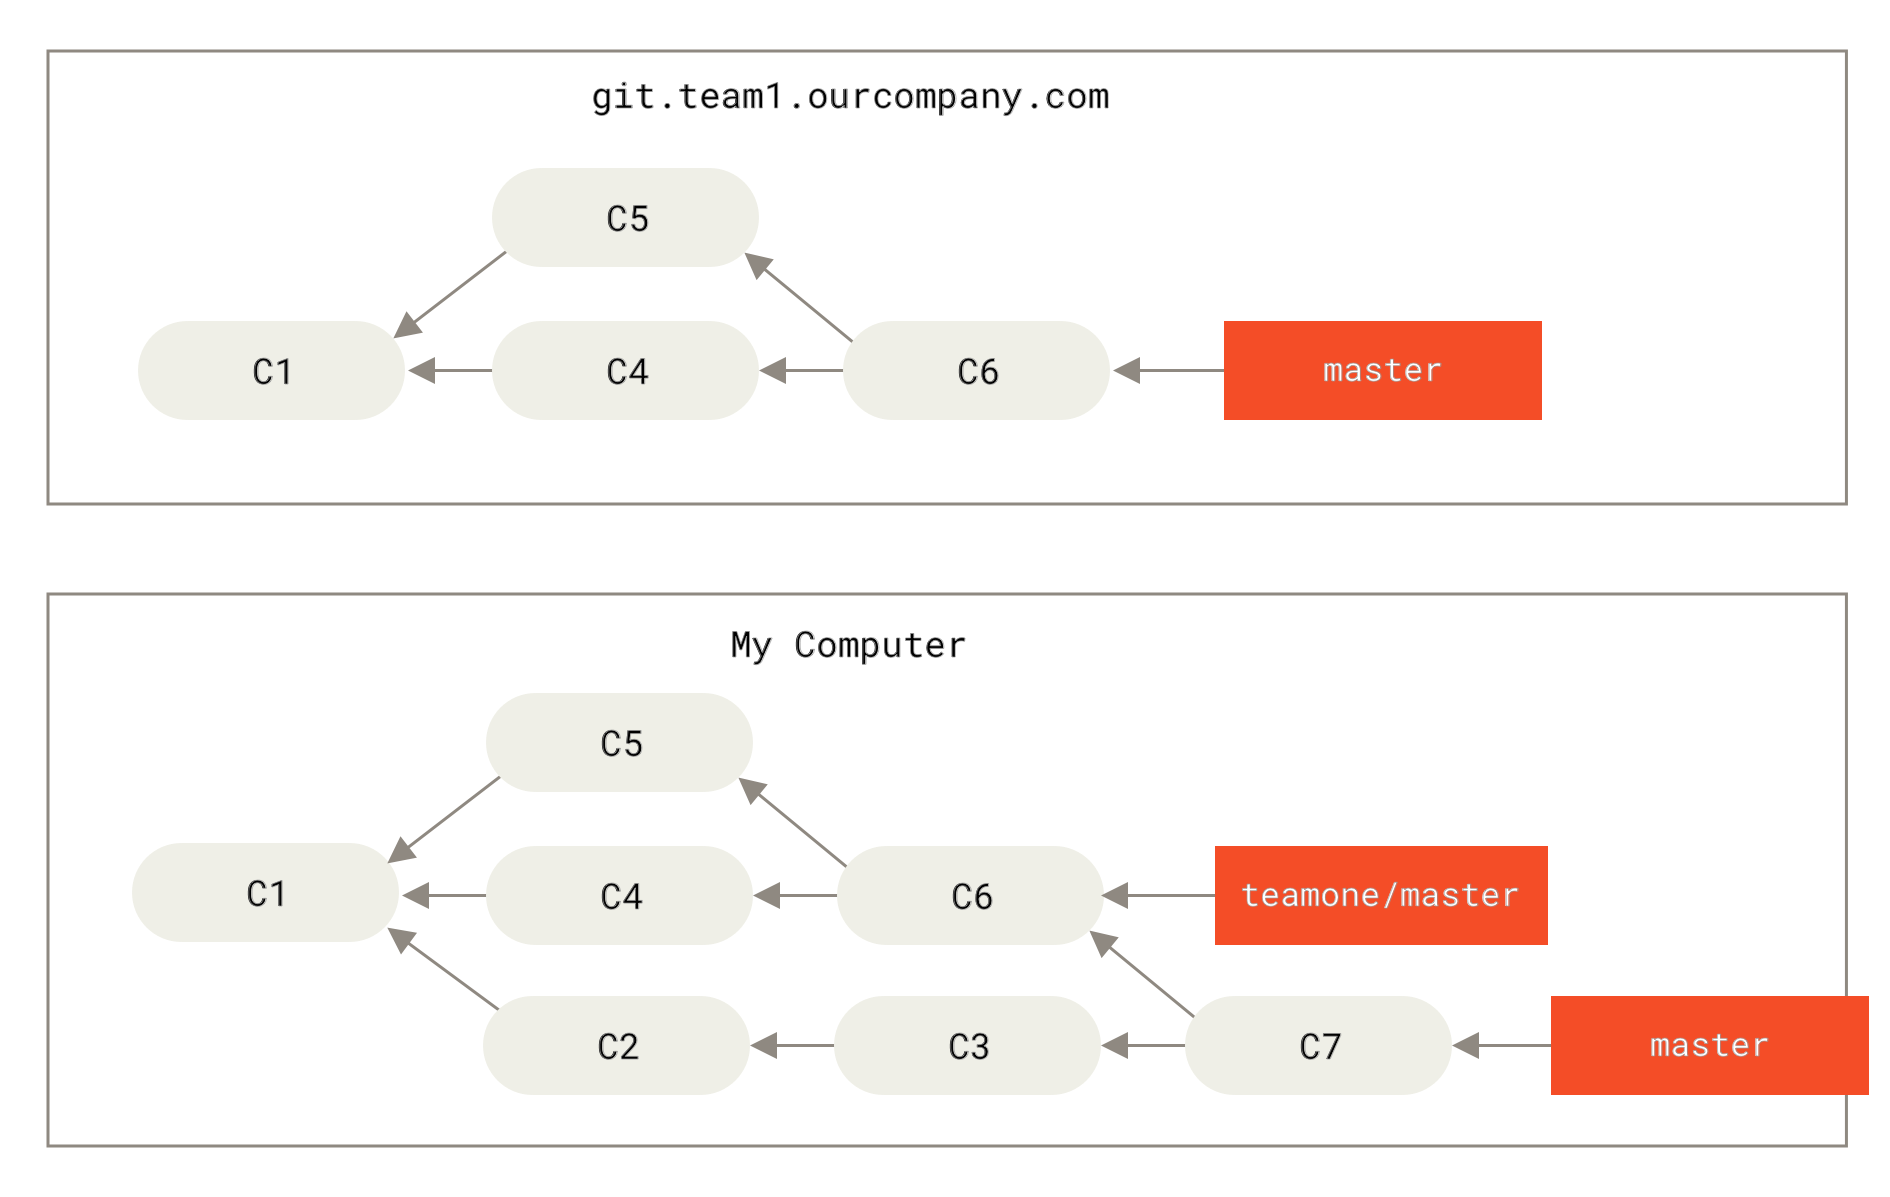
Let’s look at an example of how rebasing work that you’re made public can cause problems. Suppose you clone from a central server and then do some work off that. Your commit history looks like this:
Now, someone else does more work that includes a merge, and pushes that work to the central server. You fetch it and merge the new remote branch into your work, making your history look something like this:
Next, the person who pushed the merged work decides to go back and rebase their work instead; they do a git push --force to overwrite the history on the server. You then fetch from that server, bringing down the new commits.
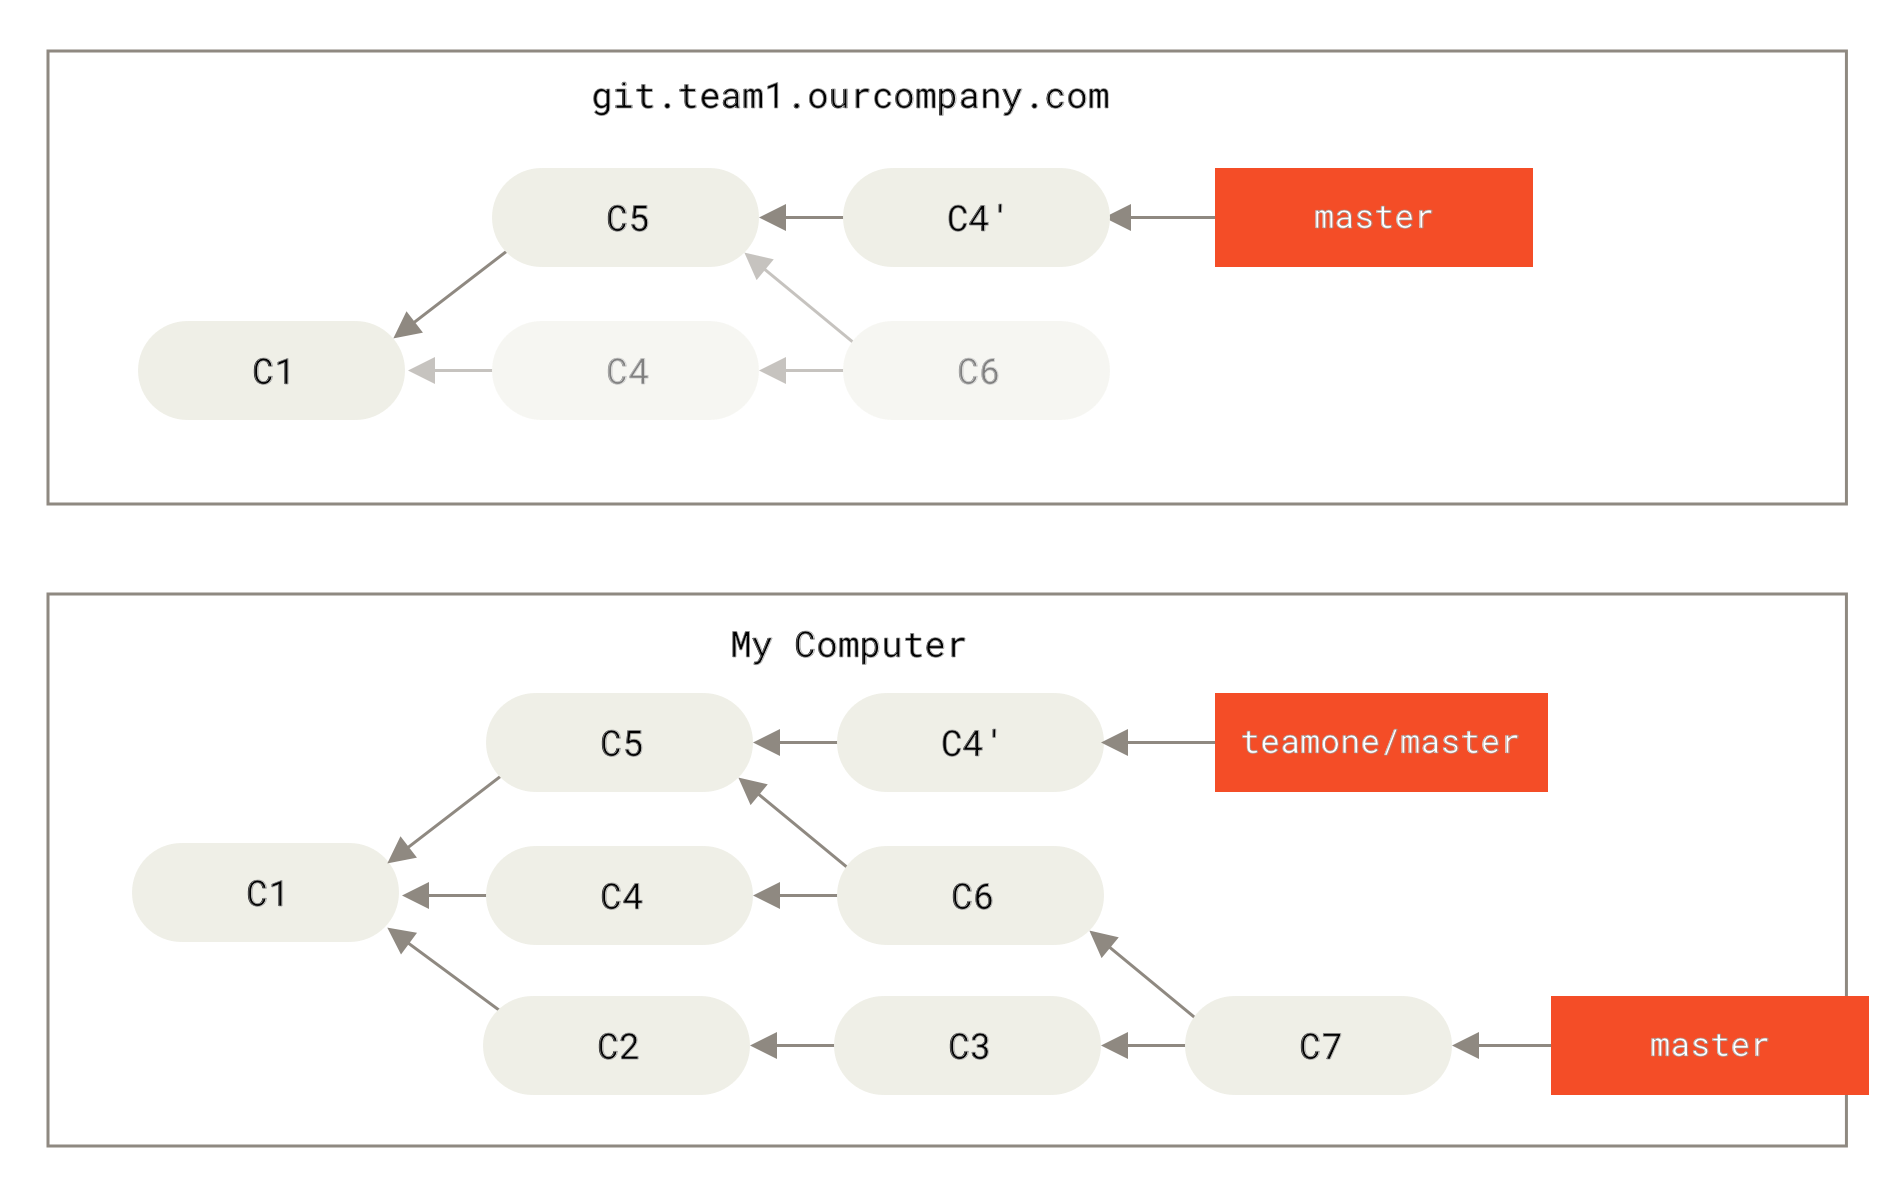
If you do a git pull now, you’ll create a merge commit which includes both lines of history, and your repository will look like this:
The author originally wanted to remove the C4 and C6 commits, but if you push your work back to the server, you’ll reintroduce all those commits to the central server.
3.6.4 Rebase when you rebase
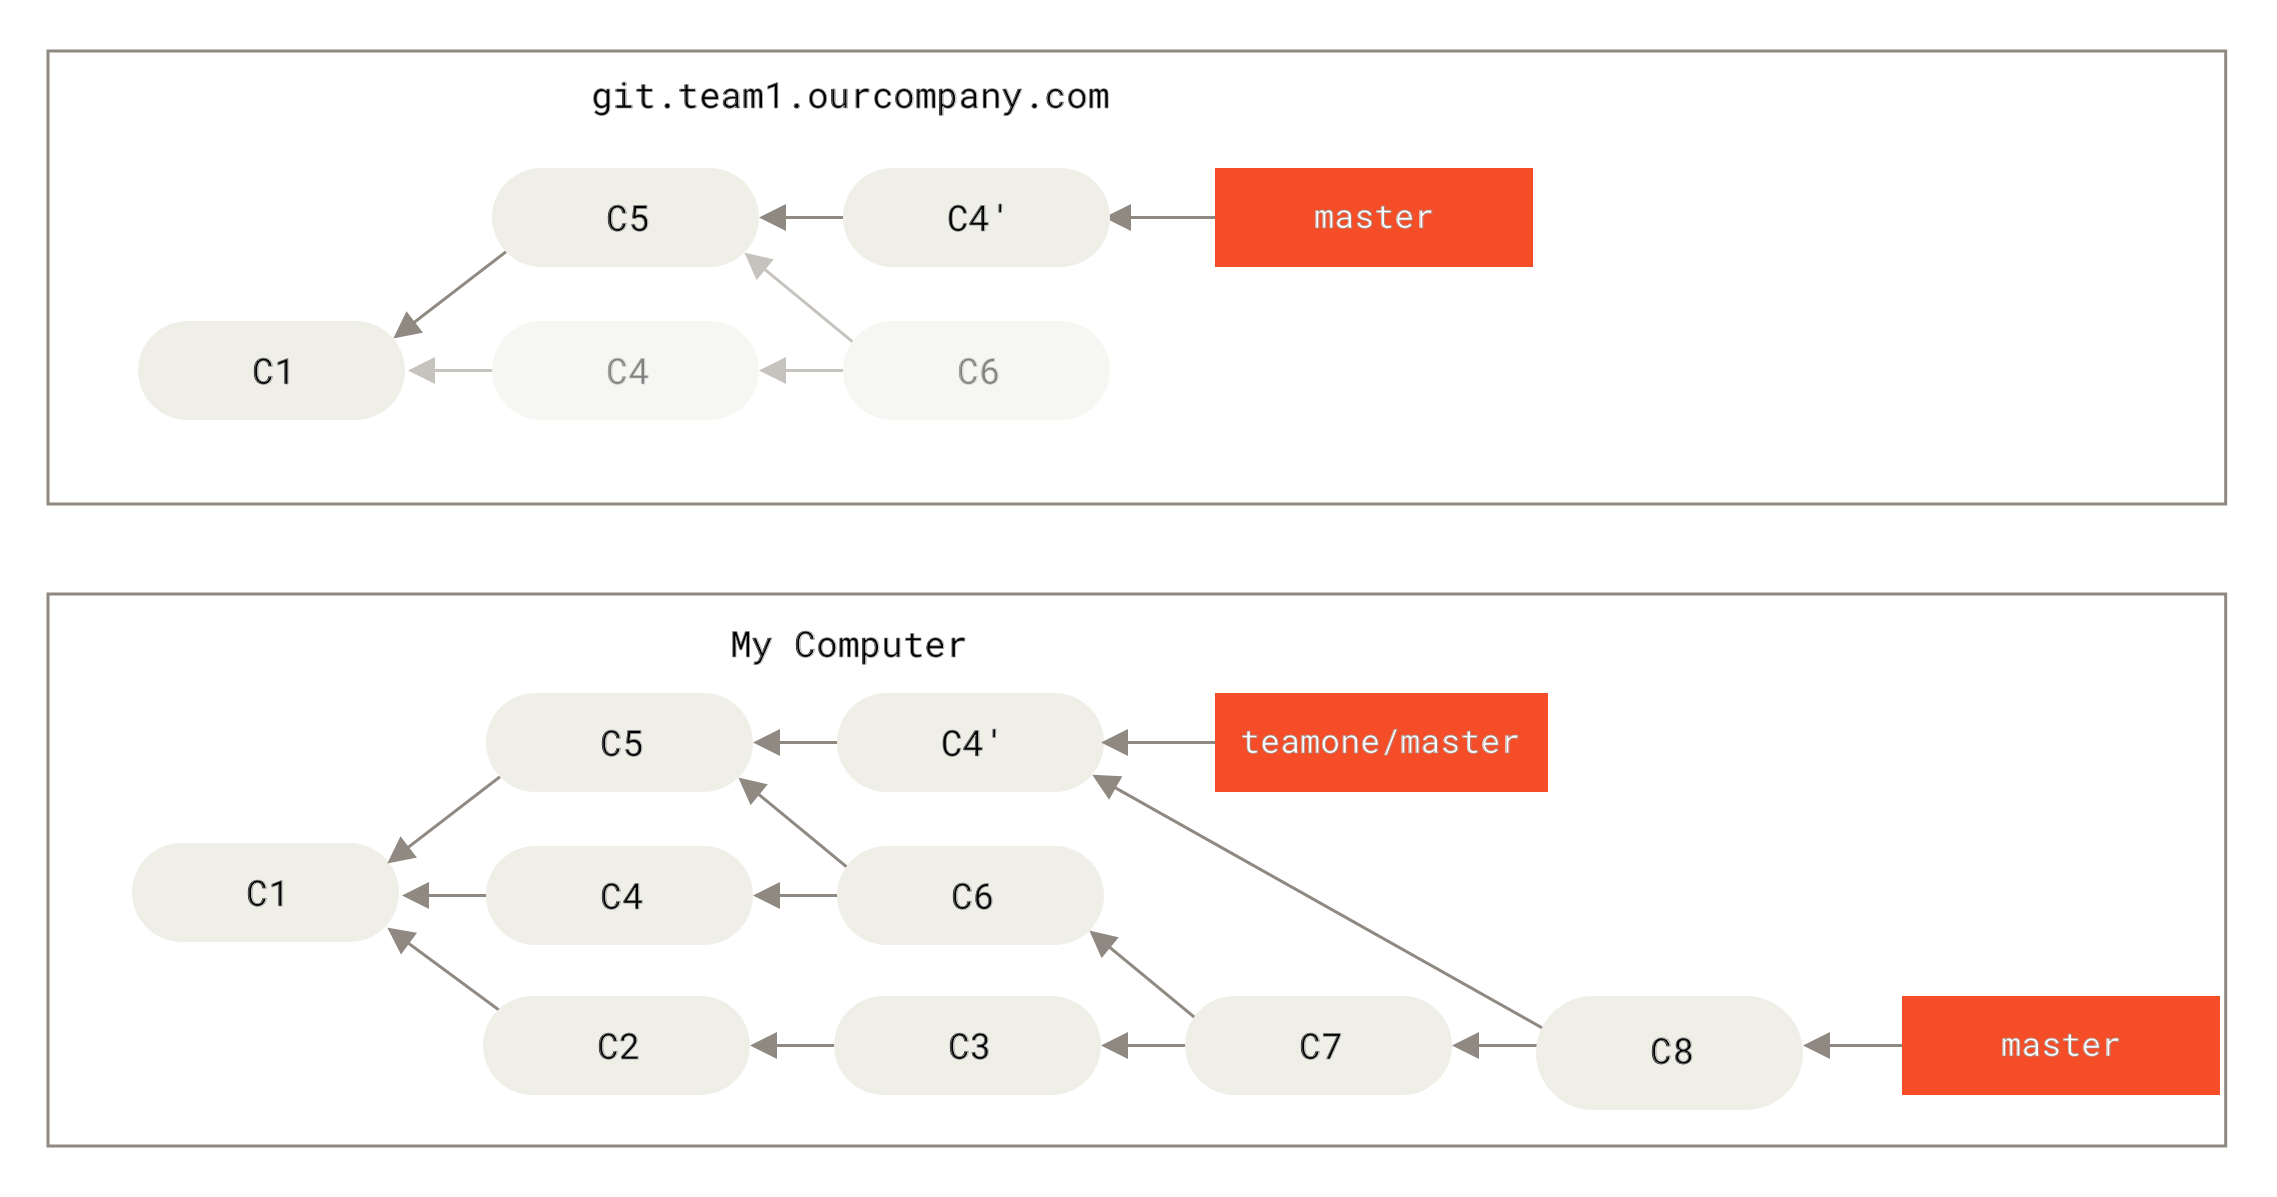
If you do find yourself in a situation like the above one, i.e. if someone on your team force pushes changes that overwrite work that you’ve based work on, your challenge is to figure out what is yours and what they’ve rewritten.
It turns out that in addition to the commit SHA-1 checksum, Git also calculates a checksum that is based just on the patch introduced with the commit. This is called a “patch-id”.
For instance, in the previous scenario, if instead of doing a merge when we’re at Someone pushes rebased commits, abandoning commits you’ve based your work on we run git rebase teamone/master, Git will:
- Determine what work is unique to our branch (C2, C3, C4, C6, C7)
- Determine which are not merge commits (C2, C3, C4)
- Determine which have not been rewritten into the target branch (just C2 and C3, since C4 is the same patch as C4’)
- Apply those commits to the top of
teamone/master
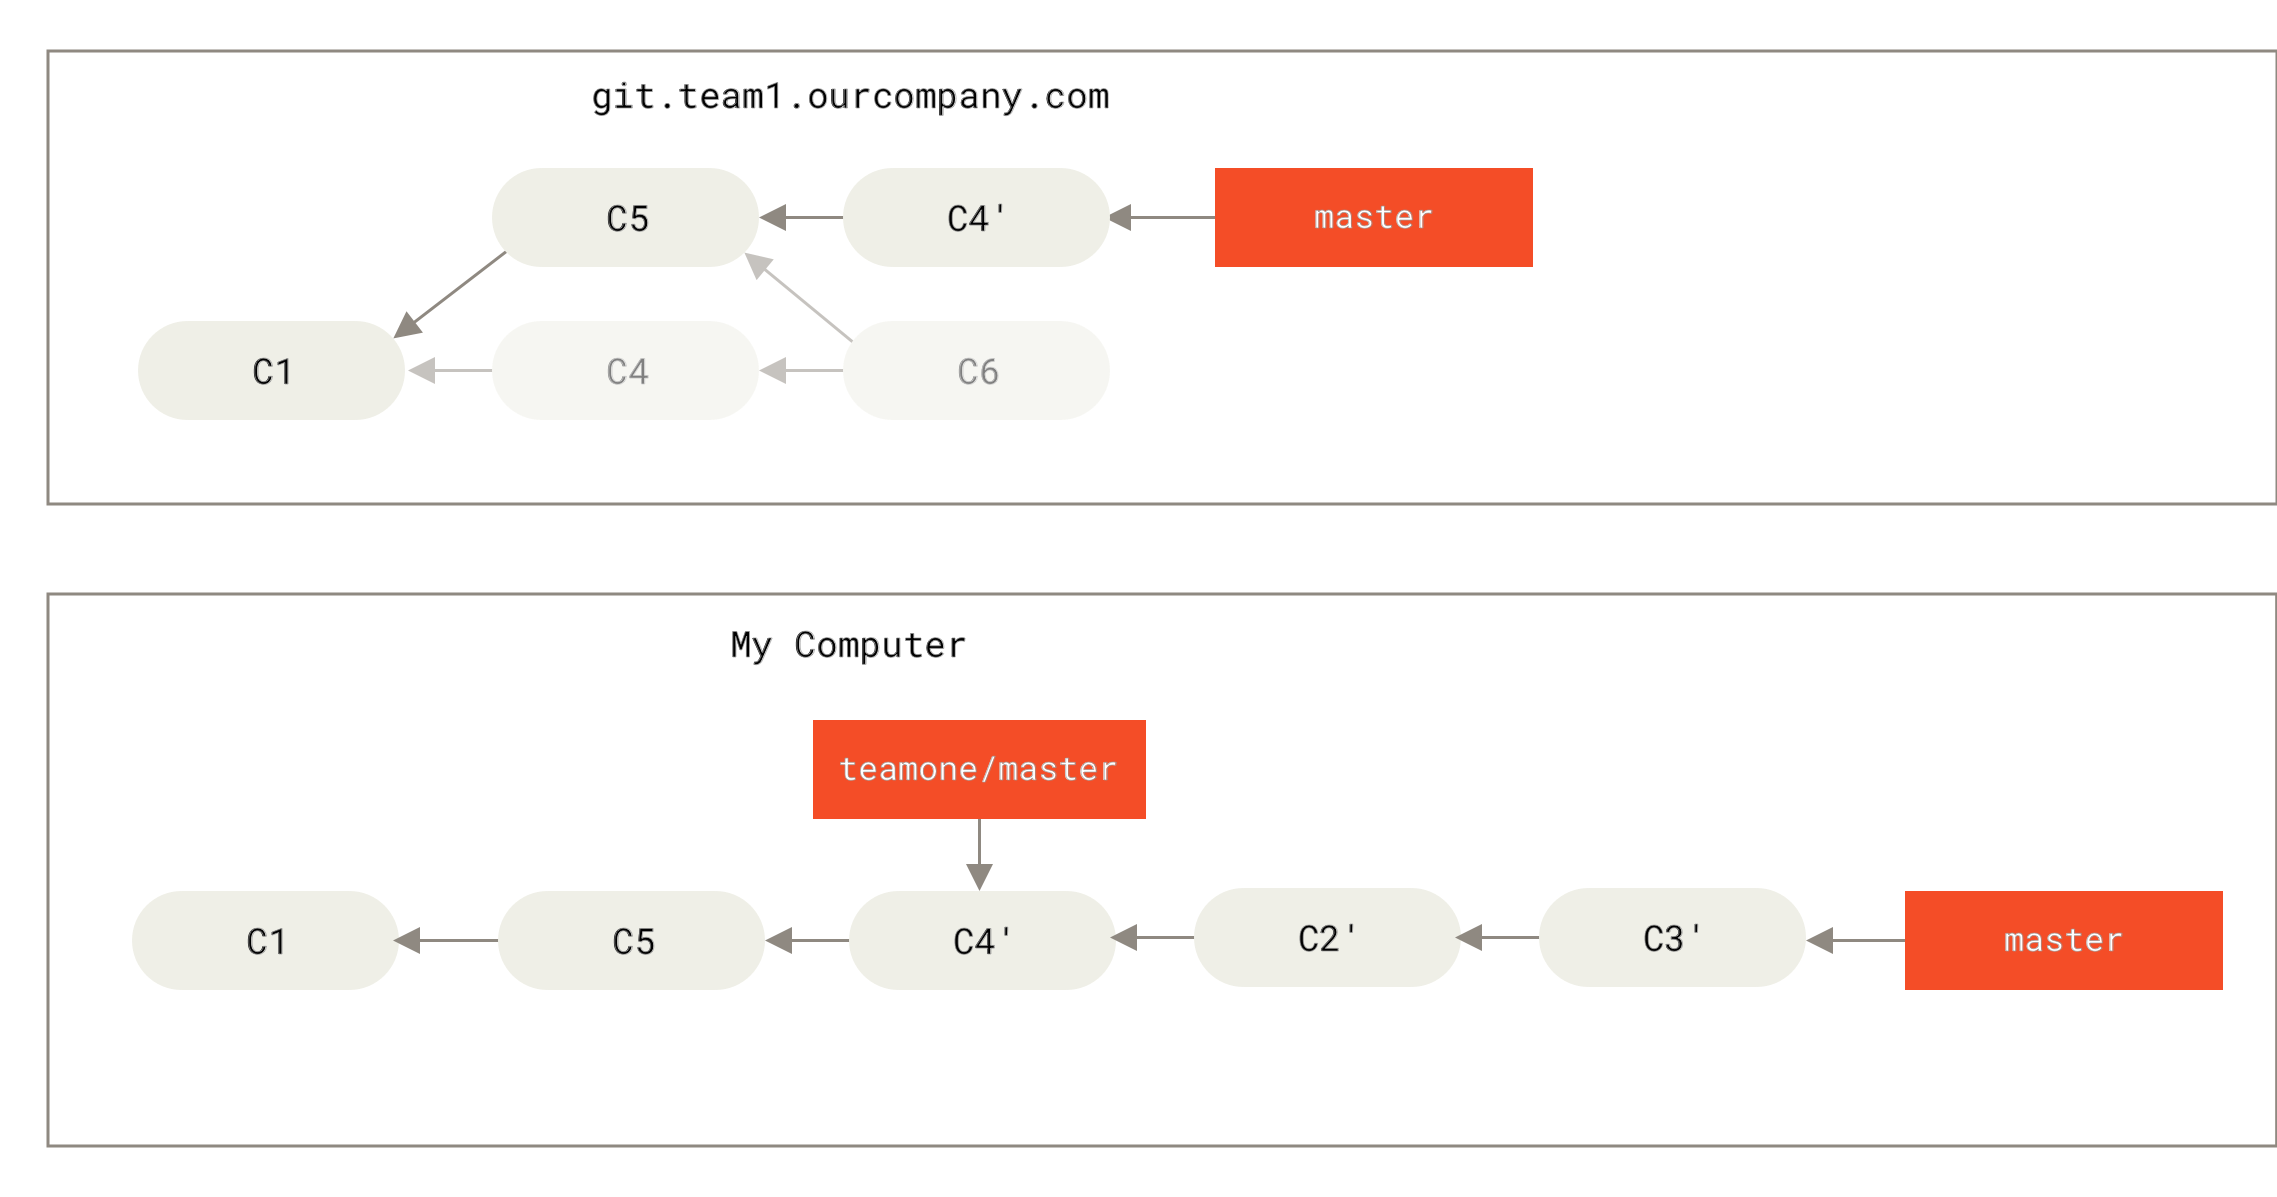
1 | git pull --rebase |
3.6.5 Rebase vs. Merge
Now that you’ve seen rebasing and merging in action, you may be wondering which one is better.
The answer is ==It’s up to you==
In general the way to get the best of both worlds is to rebase ==local changes== you’ve made but haven’t shared yet before you push them in order to clean up your story, but ==never== rebase anything you’ve pushed somewhere.
Chapter 5 Distributed Git
5.1 Distributed Workflows
5.1.1 Centralized workflow
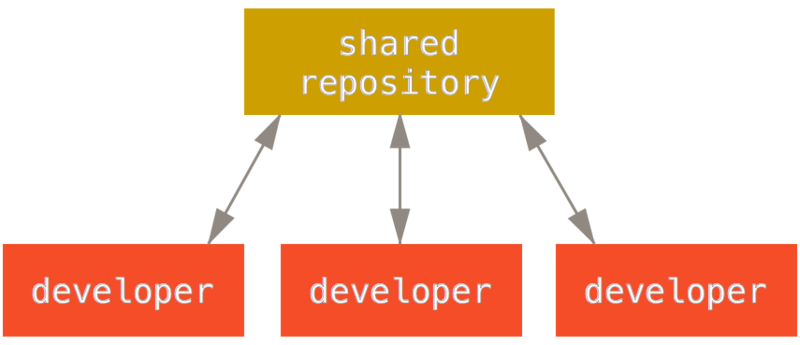
Note: This workflow is the same as the one we’ve learnt above.
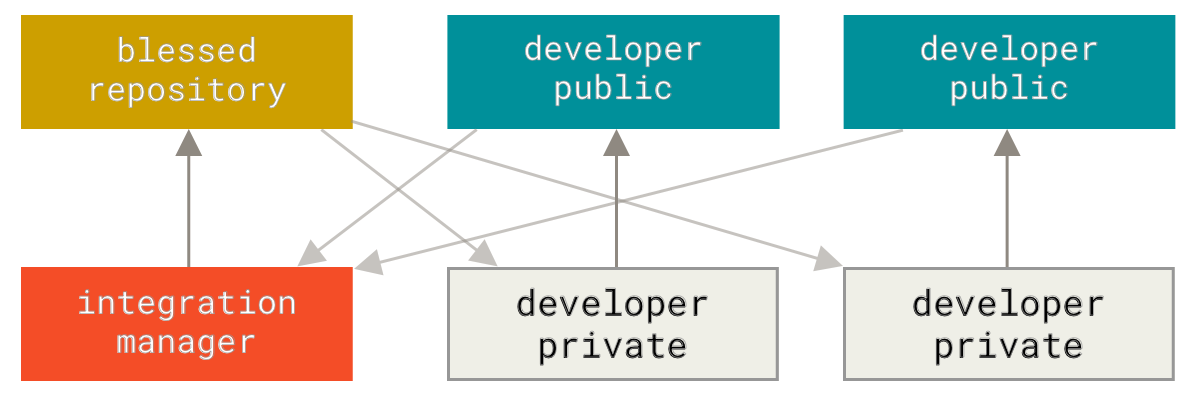
5.1.2 Integration-Manager workflow
The process works as follows:
- The project maintainer pushes to their public repository.
- A contributor clones that repository and makes changes.
- The contributor pushes to their own public copy.
- The contributor sends the maintainer an email asking them to pull changes.
- The maintainer adds the contributor’s repository as a remote and merges locally.
- The maintainer pushes merged changes to the main repository.
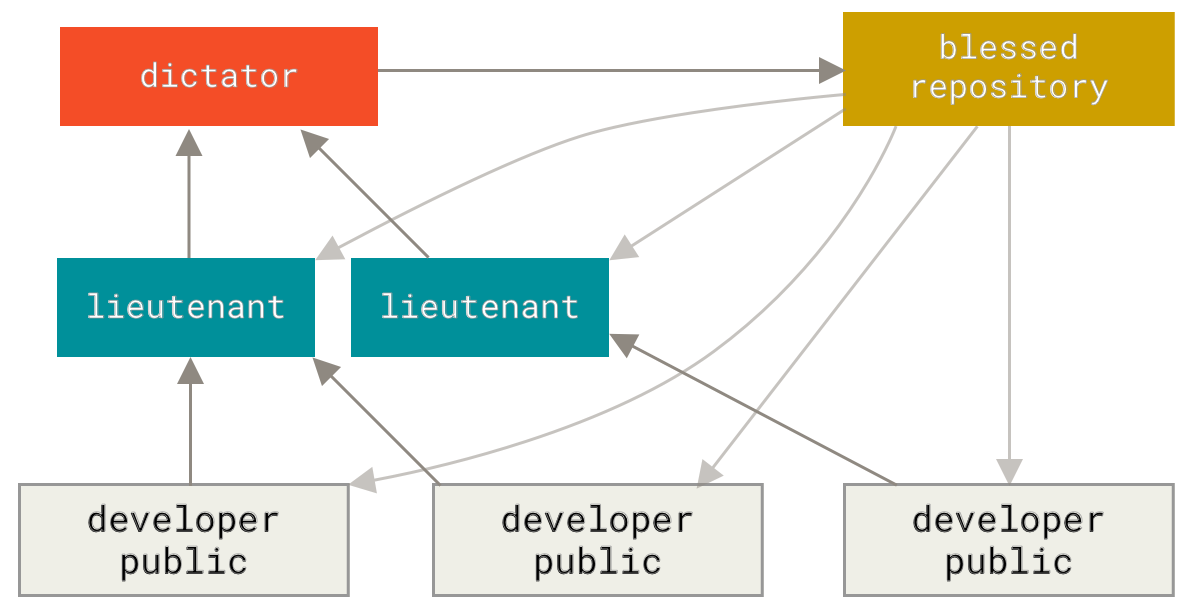
5.1.3 Dictator and Lieutenants workflow
This is generally used by huge projects with hundreds of collaborators. Various integration managers are in charge of certain parts of the repository, they’re called lieutenants. All the lieutenants have one integration manager known as the benevolent dictator. The process works like this:
- Regular developers work on their topic branch and rebase their work on top of
master. Themasterbranch is that of the reference repository to which the dictator pushes. - Lieutenants merge the developer’s topic branches into their
masterbranch. - The dictator merges the lieutenants’
masterbranches into the dictator’smasterbranch. - Finally, the dictator pushes that
masterbranch to the reference repository so the other developers can rebase on it.
5.2 Contributing to a Project
5.2.1 Commit guidelines
- Your submission should not contain any whitespace errors;
1 | before your commit, run `git diff --check` to identifies possible whitespace errors and lists them for you |
- Try to make each commit a logically separate changeset. ==At least one== commit per issue, with a useful message per commit. If some of the changes modify the same file, try to use
git add --patchto ==partially stage files== (covered in detail in Interactive Staging). And this also makes it easier to ==revert== one of the changesets; - Commit message should start with a single line that’s ==no more than about 50 characters== and that describes the changeset ==concisely==,
followed bya ==blank line==,followed bya ==more detailed explanation==. Write your commit message in the imperative: “Fix bug” and not “Fixed bug” or “Fixes bug.” Here is a template originally written by Tim Pope .
5.2.2 Private small team
5.2.3 Private managed team
5.2.4 Forked public project
One can contribute to a public project via:
- forking
Basic contributing workflow:
- clone the main repository
- create a
topicbranch - make some commits
- click the
forkbutton - add the forked repository URL as a new remote of your local repository
- push the
topicbranch you’re working on to your forked repository - send a pull request
1 | the `git request-pull` command takes the base branch into which you want your topic branch pulled and the Git repository URL you want them to pull from, and produces a summary of all the changes you're asking to be pulled |
Tips:
- your local
masterbranch always trackorigin/masterbranch, and to do your work in topic branches that you can easily discard if they’re rejected. This makes you easier to rebase your work to the tip of the main repository. - if you want to submit a second topic of work to the project, don’t continue working on the topic branch you just pushed up, start over from the main repository’s
masterbranch
1 | git checkout -b featureB origin/master |
Let’s say the project maintainer has pulled in a bunch of other patches and tried your first branch, but it no longer cleanly merges. In this case, you can try to rebase that branch on top of origin/master, ==resolve== the conflicts for the maintainer, and then resubmit your changes:
1 | git checkout featureA |
Another scenario: the maintainer asks you to change an implementation detail of your topic, you can branch a new branch off the origin/master branch, and merge in your topic, change the implementation and push to myfork again.
1 | git checkout -b featureBv2 origin/master |
Here, the --squash option takes all the work on the merged branch and squashes it into one changeset producing the repository state as if a real merge happened, without actually making a merge commit. This means your future commit will have one parent only and ==allows you to introduce all the changes from another branch and then make more changes before recoding the new commit==. Also, the --no-commit option can be useful to delay the merge commit in case of the default merge process.
5.3 Maintaining a Project
5.3.1 Checking out remote branches
1 | got a remote URL from the contributor, add it as your remote repository |
5.3.2 Determining what is introduced
this section revisits some useful command and their variations.
1 | exclude commits between branches by add `--not` option before the branch name |
5.3.3 Integrating contributed work
5.3.3.1 merging workflows
topicbranch ->masterbranchtopicbranch ->devbranch >masterbranchtopicbranch ->integratebranch ->devbranch >masterbranch
5.3.3.2 large-merge workflows
5.3.3.3 rebasing and Cherry-Picking workflows
- rebase
- cherry-pick
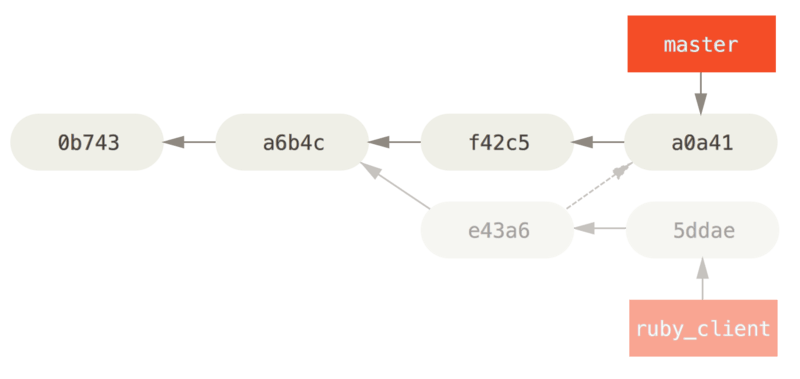
A ==cherry-pick== in Git is like a rebase for a ==single commit==. It takes the patch that was introduced in a commit and tries to reapply it ==on the branch you’re currently on==. This is useful if you have ==a number of commits on a topic branch== and you want to integrate ==only one of them==, or if you ==only have one commit on a topic branch== and you’d prefer to cherry-pick it rather than run rebase.
1 | git cherry-pick e43a6 |

5.3.4 Rerere
Rerere stands for “reuse recorded resolution”, it comes in two parts: ==a configuration== and ==a command==. It’s a way of shortcutting manual conflict resolution.
1 | git config --global rerere.enabled true |
After enable rerere,whenever you do a merge that resolve conflicts, the resolution will be recorded in the cache in case you need it in the future. Rungit rerere command when you’re fixing merge conflicts, Git checks its database of resolutions and tries to find a match with any current merge conflicts and resolve them automatically.
5.3.5 Tagging your releases
==Tag== – You can recreate that release at any point, see here for more details.
Chapter 6 GitHub
6.1 Contributing to a Project
6.1.1 The GitHub flow
- Fork the project
- Create a topic branch from
master - Make some commits to improve the project
- Push this branch to your GitHub project
- Open a Pull Request on GitHub
- Discuss, and optionally continue committing
- The project owner merges or closes the Pull Request
- Sync the uploaded master back to your fork
6.1.2 Advanced pull requests
How to fix merge conflicts?
rebase your branch on top of whatever the target branch is (normally the
masterbranch of the repository you forked)merge the target branch (original repository) into your branch
- Add the original repository as a remote named “upstream”
- Fetch the newest work from that remote
- Merge the main branch of that repository into your topic branch
- Fix the conflict that occurred
- Push back up to the same topic branch
How do I reference the old Pull Request?
simply put
#<num>in any comment or description within the repositoryput
username#<num>referring to an Issue or Pull Request in a forkput
username/repo#<num>referring to something in another repositorysame way for SHA-1 info to replace
<num>to refer to a commit6.1.3 Keep your GitHub public repository up-to-date
If you were on another branch, return to
masterFetch changes from URL and merge them into
masterPush your
masterbranch toorigin
1 | git checkout master |
Automate Configuration:
- Add the source repository and give it a name.
- Set your
masterbranch to fetch from the URL remote - Define the default push repository to
origin
1 | git remote add name URL |
Be Careful:
- If you were on another branch, return to
master - Fetch changes from URL and merge changes into
master - Push your
masterbranch toorigin
1 | git checkout master |
6.3 Maintaining a Project
6.3.1 Managing pull requests
- receive the email
- iterate on Pull Requests page
- pull request refs for merging in many Pull Requests branches, this requires configuration
6.3.2 Pull requests on pull requests
6.3.3 Contributing
CONTRIBUTING file is for specifying your criterion of contributors contribute to your repository. If this file exists, GitHub will show some guidelines to the contributors when they create a Pull Request.
Chapter 7 Git Tools
7.1 Revision Selection
1 | use `git show` to examine the a specific commit |
1 | show full SHA-1 hash, use `git rev-parse` |
1 | similar to shell history, Git has `git reflog` |
1 | to show the parent of HEAD, use `^` or `~` |
1 | using either the `character` or `--not` before any reference from which you don't want to see reachable commits. The following three commands are equivalent: |
1 | the triple-dot syntax, which specifies all the commits that are reachable by either of two references but not by both of them. To make the output more useful, pass `--left-right` option to the command |
7.2 Interactive Staging
If you run git add with the -i or --interactive option, Git enters an interactive shell mode, it lists the changes you’ve staged on the left and unstaged changes on the right.
1 | Some useful patch level commands: |
7.3 Stashing and Cleaning
7.3.1 Stashing
To push a new stash onto your stack, run git stash or git stash push.
To see which stashes you’ve stored, you can use git stash list.
You can reapply the one you just stashed by using the git stash apply command, or if you want to apply one of the older stashes, you can specify it by naming it, like this: git stash apply stash@{2}. The changes to your files were reapplied, but the file you staged before wasn’t restaged. To do that, you must run git stash apply command with a --index option to tell the command to try to reapply the staged changes.
To remove a stash from your stack, run git stash drop with the name of the stash. Alternatively, you can run git stash pop to apply the stash and then immediately drop it from your stack.
With the --keep-index option, Git will stash all the changes, but also leaved the staged file to the working directory. The unstaged file will be removed.
If you specify --include-untracked or -u, Git will include untracked files in the stash being created. However, including untracked files in the stash will still not include explicitly ignored files, which should be included by passing the --all or -a option.
To interactively stash patches, pass --patch option to the git stash command.
To create a branch from a stash, you can run git stash branch <new branchname>, which creates a new branch for you with your selected branch name, checks out the commit you were on when you stashed your work, reapplies your work there, and then drops the stash if it applies successfully.
7.3.2 Cleaning
To clear all untracked files, use git clean. To remove all the untracked files in your working directory, you can run git clean -f -d, which removes any files and also any subdirectories that become empty as a result.
If you want to see what it would do, you can run the command with the --dry-run (or -n) option, which means “do a dry run and tell me what you would have removed.”
To keep all the files instead, use git stash --all.
Add a -x option to the clean command to clear ignored files as well.
7.5 Searching
Use git grep command to search the given pattern. By default, git grep will look through the files in ==your working directory==. To print out the line numbers where Git has found matches, use -n or --line-number option.
1 | git grep -n movic |
7.6 Rewriting History
Don’t push your work until you’re happy with it
Don’t amend your last commit if you’ve already pushed it
To modify a commit that is farther back in your history, use git rebase -i tool.
1 | git rebase -i HEAD~3 |
The Nuclear Option: filter-branch
1 | git filter-branch --tree-filter "rm -f passwords.txt" HEAD |
7.7 Reset Demystify
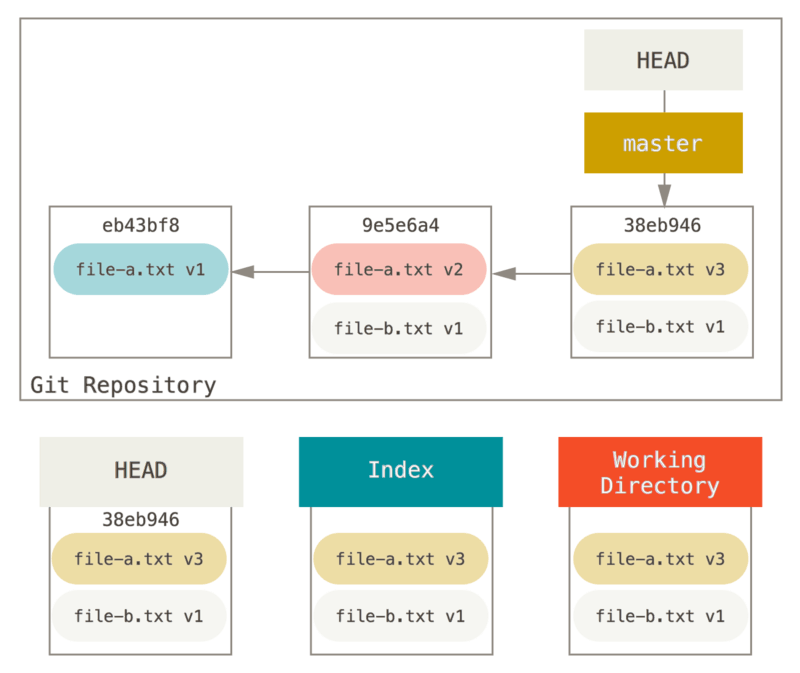
- The Head: your last commit on that branch
- The Index: your proposed next commit
- The Working Directory: working tree
7.7.1 The role of reset
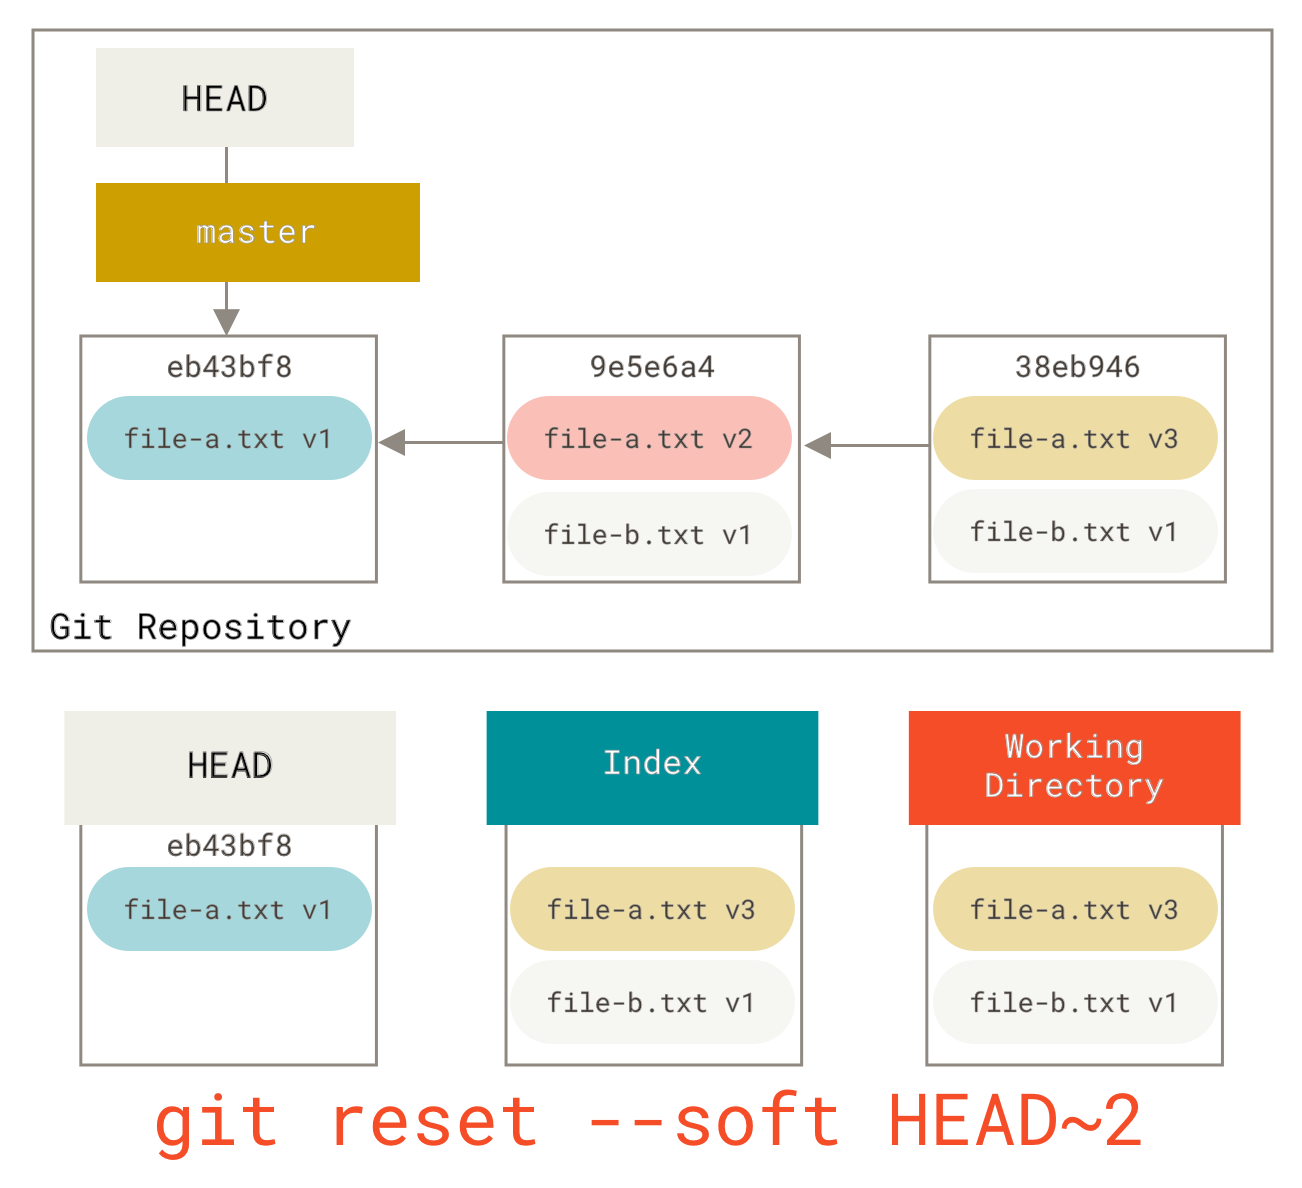
- ==Move the branch HEAD== points to (stop here if
--soft), opposite op of commit - Make the index look like HEAD (stop here unless
hard), default:--mixed - Make the working directory look like the index (be careful)
7.7.2 Reset with a path
If you specify a path, reset will skip step 1, and limit the remainder of its actions to a specific file or set of files. It is the opposite operation of git add.
So you can directly pull content of arbitrary commit to the current index tree, without copying that content to the working directory before head.
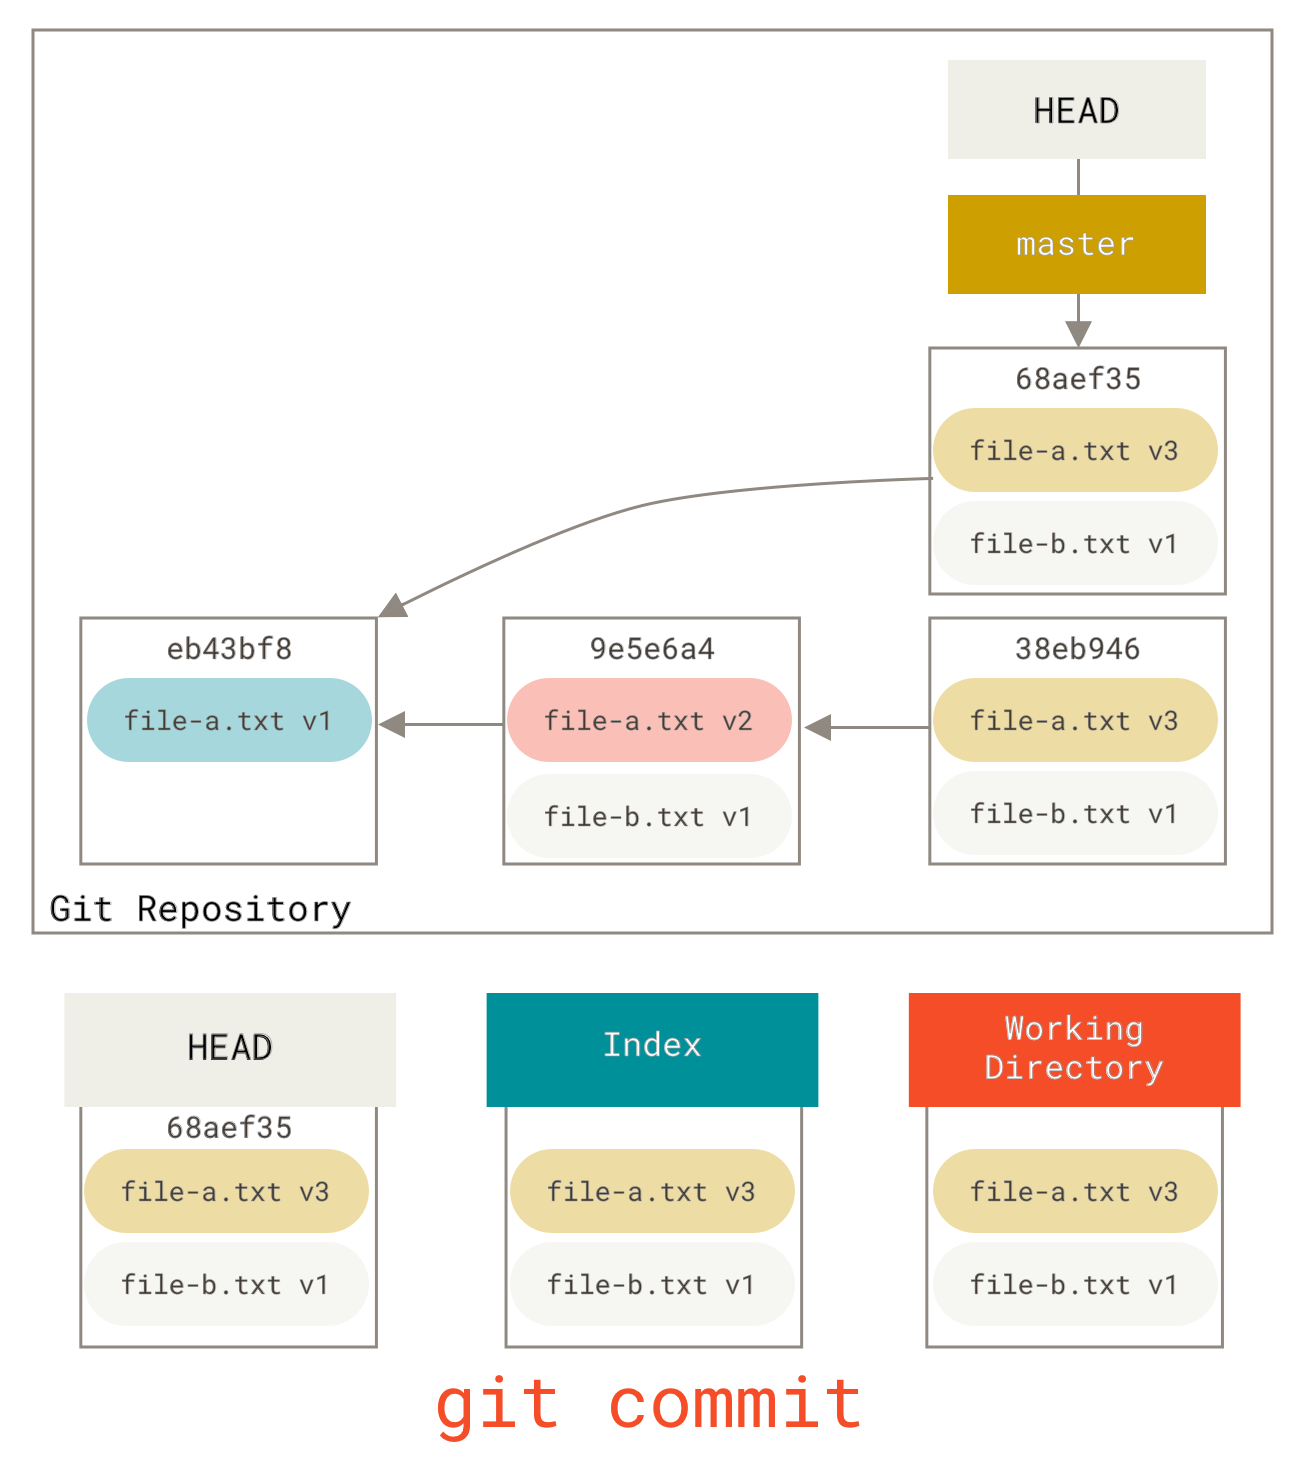
7.7.3 Squashing
Skip the intermediate commit, use reset --soft followed by git commit
7.7.4 Check it out
Checkout with path will overwrites the file in the working directory. It would be exactly like git reset --hard [branch] file, it does not move HEAD.
7.7.5 Cheat-sheet
| HEAD | Index | Workdir | WD Safe? | |
|---|---|---|---|---|
| Commit Level | ||||
reset --soft [commit] |
REF | NO | NO | YES |
reset [commit] |
REF | YES | NO | YES |
reset --hard [commit] |
REF | YES | YES | NO |
checkout <commit> |
HEAD | YES | YES | YES |
| File Level | ||||
reset [commit] <paths> |
NO | YES | NO | YES |
checkout [commit] <paths> |
NO | YES | YES | NO |
7.8 Advance Merging
1 | Use `git merge --abort` to abort a merge |